Baking chicken skewers might seem straightforward, but getting those edges to caramelize and develop a smoky flavor without a grill takes a little finesse. It’s all about the hot oven, a touch of patience, and knowing when to turn up the heat at just the right moment.
I’ve always loved the idea of making skewers that look like they’ve been grilled, especially when I don’t have access to a grill or just want something quicker and less messy. Achieving that crispy, slightly charred exterior in the oven is surprisingly doable if you pay attention to the timing and marinade.
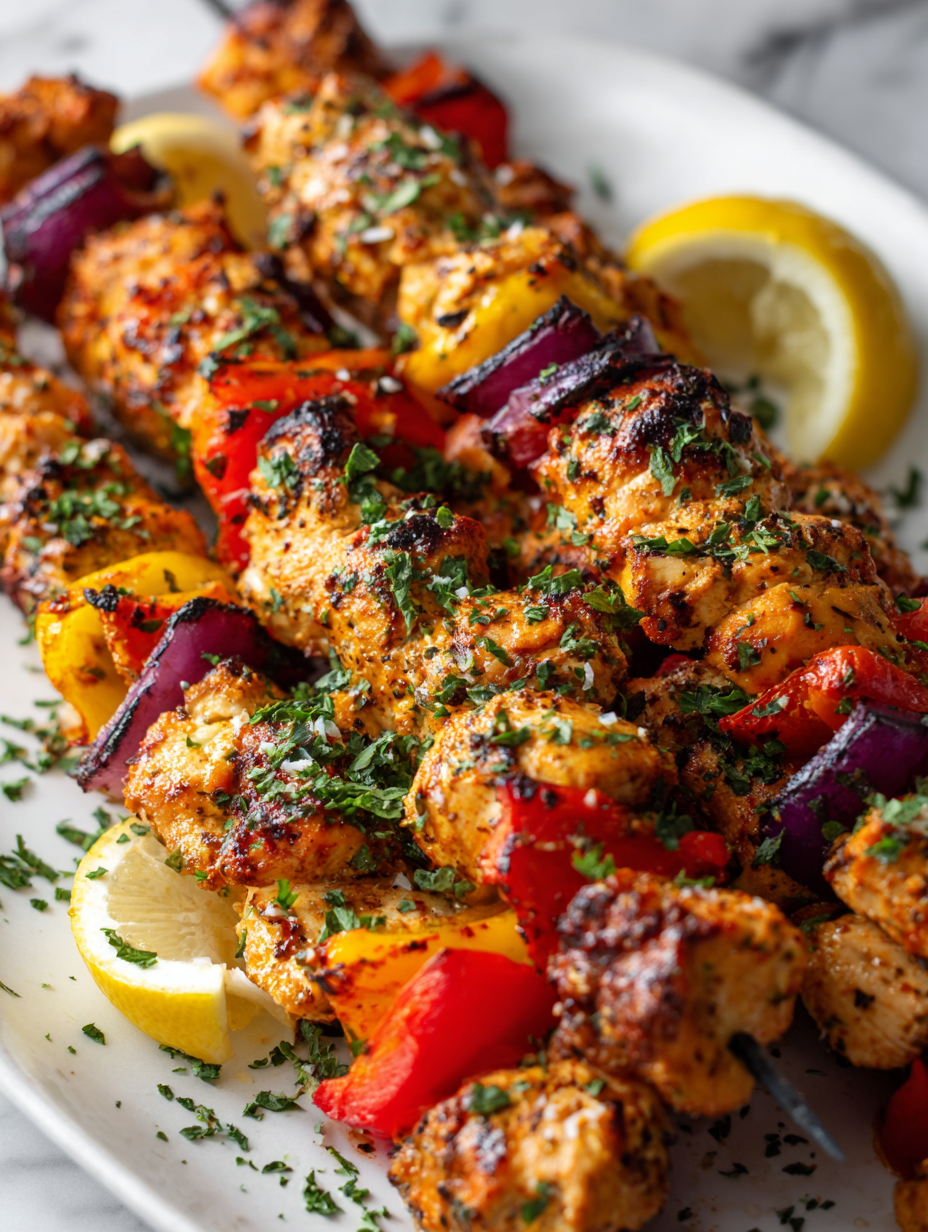
This recipe isn’t just about flavor — it’s about the joy of tugging off perfectly roasted, smoky chicken from those skewers, feeling the crispy edges crackle under your teeth, and savoring every juicy bite. It’s a simple fix that turns an everyday dinner into something a little more special.
Focusing on how to achieve perfectly caramelized, smoky edges on baked chicken skewers without a grill, using only a hot oven and a simple marinade.
The story behind this recipe
- This recipe came together one rainy afternoon when I was craving something smoky and satisfying but didn’t want to fire up the grill. I remembered the charred, juicy skewers I had at a tiny seaside shack last summer—those flavors stuck with me. It’s funny how a simple marinade and a hot oven can mimic that smoky essence so well, and now I keep coming back to this method whenever I want that grilled feel without the fuss.
- There’s a bit of nostalgia in every bite, reminding me of summer nights and backyard gatherings. It’s become my go-to when friends drop by unannounced or I need a quick, impressive dinner on a busy weeknight. Honestly, it’s a reminder that you don’t need fancy equipment to make something feel special—just a hot oven, good ingredients, and a little patience.
- story_type
- paragraph
Ingredient breakdown
- Chicken thighs: I prefer boneless, skinless thighs—juicier and more forgiving than breasts, with a rich flavor that stays tender. Swap for breasts if you like leaner, but watch the cook time for dryness.
- Olive oil: I like a good extra virgin for its fruity aroma and smooth texture. If you only have a milder oil, the marinade will be less punchy but still work. Skip if you prefer a dry rub.
- Lemon juice: Brightens the marinade and helps tenderize the chicken. Use fresh squeezed for that zesty, vibrant punch. Bottled lemon juice can work in a pinch but loses some zing.
- Garlic: Fresh minced garlic adds a punch of sharp aroma that wakes up the chicken. Dried garlic powder can stand in if you’re out, but it’s not quite the same in vibrancy.
- Paprika: Smoked paprika gives that subtle smoky depth, almost like the grill’s kiss. Regular paprika is fine if you prefer a milder, sweeter flavor—just skip the smoky note.
- Honey or brown sugar: Adds a touch of caramelization and balance to the marinade. Use honey for a brighter sweetness, or brown sugar if you want a deeper, molasses undertone. Skip if you want less sweetness.
- Skewers: Wooden skewers are traditional, but soak them in water for 30 minutes before threading to prevent burning. Metal skewers are a fuss-free alternative that conduct heat evenly.
Spotlight on key ingredients
Chicken thighs:
- I prefer boneless, skinless thighs—juicier and more forgiving than breasts, with a rich flavor that stays tender. Swap for breasts if you like leaner, but watch the cook time for dryness.
- Olive oil: I like a good extra virgin for its fruity aroma and smooth texture. If you only have a milder oil, the marinade will be less punchy but still work. Skip if you prefer a dry rub.
Lemon juice & garlic:
- Lemon juice: Brightens the marinade and helps tenderize the chicken. Use fresh squeezed for that zesty, vibrant punch. Bottled lemon juice can work in a pinch but loses some zing.
- Garlic: Fresh minced garlic adds a punch of sharp aroma that wakes up the chicken. Dried garlic powder can stand in if you’re out, but it’s not quite the same in vibrancy.
Notes for ingredient swaps
- Chicken thighs: I prefer boneless, skinless thighs—juicier and more forgiving than breasts, with a rich flavor that stays tender. Swap for breasts if you like leaner, but watch the cook time for dryness.
- Olive oil: I like a good extra virgin for its fruity aroma and smooth texture. If you only have a milder oil, the marinade will be less punchy but still work. Skip if you prefer a dry rub.
- Lemon juice: Brightens the marinade and helps tenderize the chicken. Use fresh squeezed for that zesty, vibrant punch. Bottled lemon juice can work in a pinch but loses some zing.
- Garlic: Fresh minced garlic adds a punch of sharp aroma that wakes up the chicken. Dried garlic powder can stand in if you’re out, but it’s not quite the same in vibrancy.
- Paprika: Smoked paprika gives that subtle smoky depth, almost like the grill’s kiss. Regular paprika is fine if you prefer a milder, sweeter flavor—just skip the smoky note.
- Honey or brown sugar: Adds a touch of caramelization and balance to the marinade. Use honey for a brighter sweetness, or brown sugar if you want a deeper, molasses undertone. Skip if you want less sweetness.
- Skewers: Wooden skewers are traditional, but soak them in water for 30 minutes before threading to prevent burning. Metal skewers are a fuss-free alternative that conduct heat evenly.
Equipment & Tools
- Oven: To bake the skewers evenly at high heat.
- Baking sheet with parchment: Provides a non-stick surface for easy cleanup.
- Skewers (wooden or metal): To hold chicken pieces securely for even cooking.
- Tongs: To flip skewers without piercing the meat.
- Small bowl: For mixing marinade.
- Cooking thermometer: To check internal chicken temperature.
Step-by-step guide to baked skewers
- Equipment & Tools: Preheat oven to 220°C (430°F). Use a baking sheet lined with parchment for easy cleanup. Gather skewers, a small bowl for marinade, and tongs for turning.
- Prepare marinade: Mix olive oil, lemon juice, minced garlic, smoked paprika, honey, salt, and pepper in a bowl. Whisk until smooth.
- Cut chicken: Slice boneless, skinless thighs into 2-inch pieces. Thread 3-4 pieces onto each skewer, leaving space between for even cooking.
- Marinate: Brush or dip skewered chicken in the marinade. Let sit for at least 15 minutes. For more flavor, refrigerate up to 2 hours.
- Bake skewers: Arrange skewers on the prepared baking sheet. Bake in the hot oven for 15 minutes. Flip skewers with tongs and bake another 10 minutes.
- Check for caramelization: The chicken should look golden with darker edges. If not, broil for 2-3 minutes, watching carefully to prevent burning.
- Final turn and bake: Turn skewers again, bake for an additional 2-3 minutes if needed, until edges are crispy and juices run clear when pierced.
- Rest: Remove from oven, let rest for 3 minutes. This helps juices redistribute and keeps meat moist.
- Serve: Plate skewers hot, garnish with fresh herbs if desired. Serve with a squeeze of lemon for extra brightness.
Let the skewers rest for 3 minutes on a plate. Finish with a squeeze of lemon or fresh herbs. Serve immediately for maximum juiciness and warmth.
How to Know It’s Done
- Color: Skewers should be golden with darker caramelized edges.
- Juices: When pierced, juices should run clear, not pink or bloody.
- Internal temp: Use a probe thermometer; chicken should reach 75°C (165°F).
Oven-Baked Smoky Chicken Skewers
Ingredients
Equipment
Method
- Preheat your oven to 220°C (430°F) and line a baking sheet with parchment paper. Gather your skewers and ingredients for marinating.
- In a small bowl, whisk together olive oil, lemon juice, minced garlic, smoked paprika, honey, salt, and pepper until well combined. This aromatic marinade will infuse the chicken and help develop a smoky flavor.
- Thread the chicken pieces onto the soaked skewers, leaving a small space between each piece for even cooking and caramelization.
- Brush or dip the skewered chicken generously with the marinade, ensuring all sides are coated. Let sit for at least 15 minutes to absorb flavors; refrigerate for longer if desired.
- Arrange the skewers on the prepared baking sheet, spacing them out to allow heat circulation. Place in the hot oven and bake for 15 minutes.
- Use tongs to carefully flip each skewer to promote even browning and caramelization of all sides. Bake for another 10 minutes, keeping an eye on the edges for slight charring.
- Turn on the broiler for 2-3 minutes to achieve those desirable smoky, crispy edges. Watch carefully to prevent burning, as the sugars will caramelize quickly and add a beautiful char.
- Use a cooking thermometer to check that the internal temperature of the chicken reaches 75°C (165°F). The meat should be firm, juicy, and with darkened, caramelized edges.
- Remove the skewers from the oven and let rest for 3 minutes. This helps the juices redistribute, ensuring each bite is tender and flavorful.
- Serve the skewers hot, garnished with a squeeze of fresh lemon if desired, and enjoy the crispy, smoky exterior with juicy, tender chicken inside.
Pro tips for perfect baked skewers
- Use high heat to develop crispy edges—don’t shy away from the broiler.
- Turn skewers carefully with tongs—avoid piercing the meat to keep juices in.
- Marinate for at least 15 minutes—more for deeper flavor and better caramelization.
- Broil in short bursts—watch closely to prevent burning and achieve that smoky char.
- Rest skewers for a few minutes after baking—allows juices to redistribute for moist bites.
- Use a probe thermometer—chicken should reach 75°C (165°F) for safety and perfect texture.
- Soak wooden skewers—prevent burning and splintering during baking.
Common mistakes and how to fix them
- FORGOT to soak wooden skewers → Soak skewers 30 mins to prevent burning.
- DUMPED marinade on chicken → Marinate for at least 15 mins for flavor.
- OVER-TORCHED edges → Broil for 2-3 mins, watch closely.
- MISSED internal temp → Use thermometer, chicken 75°C (165°F).
Quick fixes and pantry swaps
- If skewers burn, splash with a little water and reduce oven temp.
- When chicken is dry, patch with a drizzle of marinade before serving.
- When edges are over-torched, shield with foil for even cooking.
- Dumped marinade on chicken? Marinate longer next time for deeper flavor.
- When in doubt, pantry swap smoked paprika for a splash of liquid smoke.
Prep, store, and reheat tips
- Marinate the chicken and thread onto skewers up to 2 hours ahead; keep covered in the fridge, the marinade develops richer flavor and the chicken stays juicy.
- Store baked skewers in an airtight container in the fridge for up to 3 days. The flavors mellow slightly, but they remain tender and smoky.
- Reheat gently in a 180°C (350°F) oven for about 10 minutes until warm and slightly crispy on the edges—smells like fresh out of the oven.
- For best texture, avoid microwaving directly; instead, cover with foil and reheat slowly to preserve juiciness and avoid rubbery meat.
- If freezing, wrap skewers tightly in plastic wrap and store for up to 1 month. Thaw in the fridge and reheat as above for a quick, satisfying meal.
Top questions about baked chicken skewers
1. Can I use chicken breasts instead?
Use boneless, skinless chicken thighs for juiciness and flavor. They stay tender and are forgiving if overcooked slightly.
2. Do I need to soak the skewers?
Soak wooden skewers in water for at least 30 minutes before threading chicken. This prevents them from burning in the oven.
3. How long should I bake the skewers?
Bake at 220°C (430°F) for about 25-30 minutes, flipping halfway. Look for golden, caramelized edges and clear juices.
4. How do I know when the chicken is cooked?
Check internal temperature with a probe; chicken is done at 75°C (165°F). The meat should be firm and no pink remains.
5. Can I get grill marks in the oven?
Broil for 2-3 minutes if edges aren’t caramelized enough. Watch closely to prevent burning and get smoky, crispy edges.
6. How long should I marinate the chicken?
Marinate for at least 15 minutes. Longer marination deepens flavor, but even a quick coat gives good caramelization and aroma.
7. Can I omit the smoked paprika?
Use a high-quality smoked paprika for that smoky depth. Regular paprika adds sweetness but less smoky flavor.
8. How should I store and reheat leftovers?
Refrigerate leftovers in an airtight container for up to 3 days. Reheat in a 180°C (350°F) oven until warm and crispy—about 10 minutes.
9. What if my skewers burn or overcook?
If skewers burn, splash with water and lower oven temp. For uneven browning, rotate skewers or broil in short bursts.
10. How can I tell if the skewers are done properly?
Use a probe thermometer to ensure chicken reaches 75°C (165°F). The meat should be firm but juicy, with a slight jiggle.
Cooking these skewers in the oven is a small rebellion against the grill, but the smoky edges and caramelized bits tell a different story. It’s a straightforward method that proves you don’t need fancy equipment to get a satisfying, flavorful bite.
Every time I make these, I’m reminded that simple ingredients and a hot oven can mimic those charred, juicy moments we usually chase on open flames. They’re perfect for busy nights or when weather keeps you indoors, but the flavor stays bold and memorable.

Hi, I’m Emily Carter, the creator and recipe developer behind Salt Strategist. I’m so happy you’re here. This blog is where my love for flavor, creativity, and thoughtful cooking comes together in one beautiful, ever evolving space.


