Hell’s Kitchen Mac and Cheese isn’t about slow, careful stirring; it’s about quick decisions and raw instinct. Working under pressure, I’ve learned to trust my gut—adding cheese, tasting, adjusting, all in a rush to keep the chaos at bay. This dish is a reflection of that high-stakes environment—bold, unapologetic, and satisfying in every gooey bite.
Making this in a busy kitchen teaches you to embrace the mess and the mistakes. No time for perfectionism here—just sharp timing and sharper flavors. It’s a dish that’s as much about the adrenaline as it is about the creamy, cheesy comfort that makes everyone feel at home, even in the middle of a rush.
Focusing on how a chaotic, high-pressure kitchen like Hell’s Kitchen influences the bold, no-nonsense approach to making mac and cheese, emphasizing the importance of quick instincts and adapting under stress.
Chaos-Inspired Comfort
- I’ve burned my fair share of roux, but each mistake taught me the importance of constant stirring and watching the heat.
- Nothing beats that moment when the cheese melts and stretches—like a gooey, salty ribbon—right before it all bubbles over.
- This dish reminds me of hurried Sunday dinners, where chaos turns into comfort in just a few cheesy spoonfuls.
- I once added a splash of hot sauce in a rush; it cut through the richness perfectly, even if it was unplanned.
- Making mac and cheese under pressure has taught me to trust my instincts, even when the chaos feels overwhelming.
Chaos-Inspired Comfort
- Hell’s Kitchen Mac and Cheese is born from chaos—fast, fierce, no time for finesse. Working in that high-pressure environment, I learned to trust my gut and move quickly, turning simple ingredients into something bold and comforting. This dish is my way of capturing that adrenaline rush, the rush of melted cheese and the smell of toasting breadcrumbs, all made in a flash.
- Every time I make it, I remember those frantic evenings, where timing is everything and mistakes are just part of the process. It’s about embracing the mess, tasting as you go, and knowing that sometimes, the best results come from the chaos. This isn’t a delicate dish—it’s a celebration of instinct and raw flavor, made in the heat of a busy kitchen.
- heading: “Chaos-Inspired Comfort”
Trivia and Origins
- Hell’s Kitchen, the infamous TV show, popularized a gritty, no-nonsense approach to cooking that’s reflected in this mac and cheese style.
- The dish evolved in high-pressure kitchens where speed and bold flavors trump delicate techniques, becoming a comforting chaos in a bowl.
- Originally, this recipe was a secret for chefs needing quick, satisfying comfort food after long, hectic shifts.
- The intense environment of Hell’s Kitchen inspired a version that emphasizes sharp, punchy flavors and quick assembly.
Ingredient breakdown: key components
- Cheddar cheese: I love a sharp, aged cheddar—its tangy bite cuts through the richness, making every cheesy pull more satisfying. Swap for Monterey Jack if you want milder, creamier melts that stretch endlessly.
- Elbow macaroni: The classic shape, it traps all that cheesy goodness perfectly. Use gluten-free if needed, but avoid overcooking—aim for al dente, just tender enough to hold its shape without becoming mushy.
- Cream: I prefer heavy cream for that silky, luscious texture. If you want a lighter version, try half-and-half, but be prepared for a slightly thinner sauce that needs extra cheese to compensate.
- Butter: Unsalted, for control over salt levels. If you only have salted, cut back on added salt later. The butter’s aroma when it bubbles is a comforting, toasty note you shouldn’t skip.
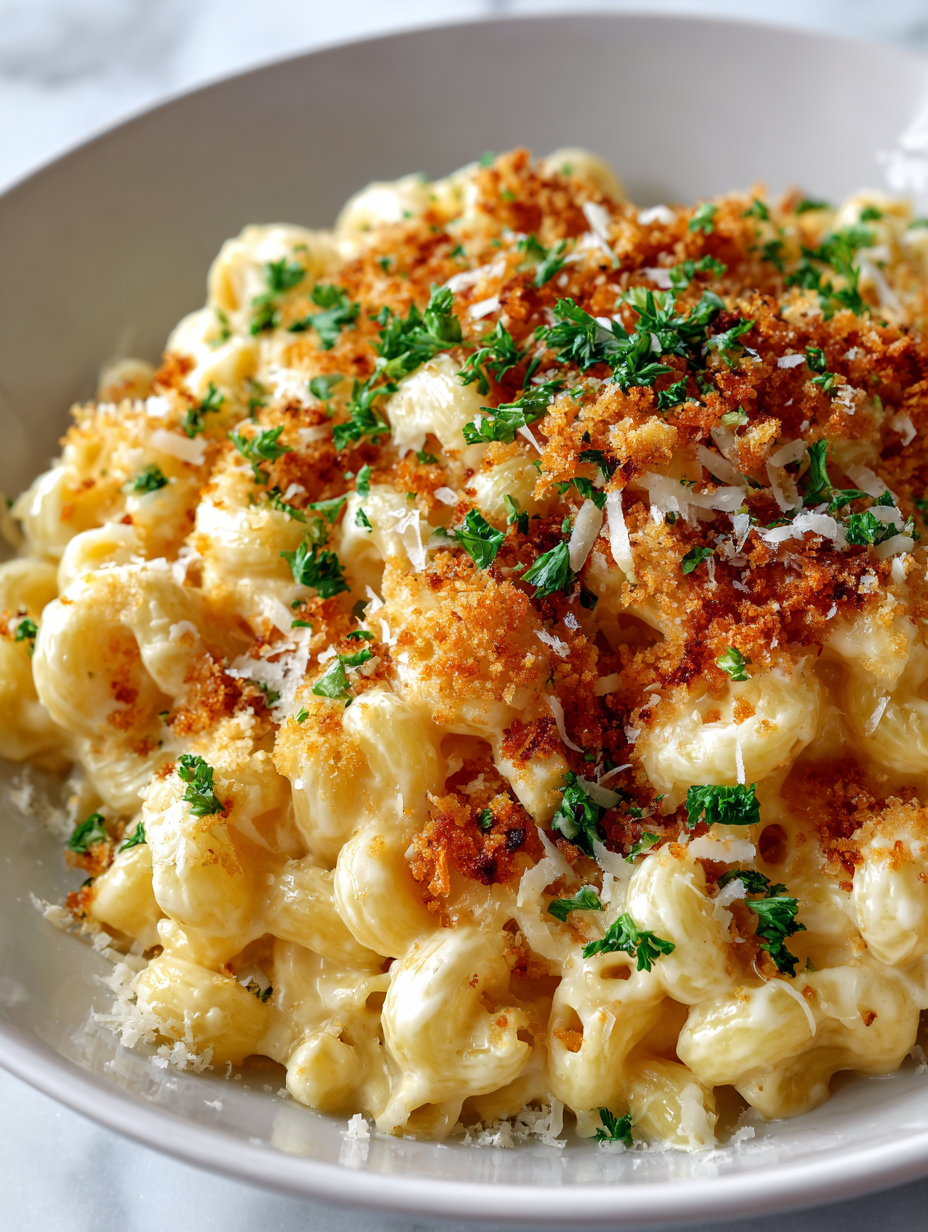
- Breadcrumbs: I toast mine with a splash of olive oil and a pinch of paprika for smoky crunch. Panko works best for a lighter, crisp topping—skip the fancy ones if you want that classic crunch.
- Mustard powder: Just a pinch awakens the cheese sauce—adds a subtle tang that balances the richness. Use Dijon in a pinch, but reduce the amount to avoid overpowering the cheese.
- Hot sauce: A splash adds a fiery kick, brightening up the dish’s overall flavor. Use your favorite, but don’t drown it—just enough for a subtle, smoky heat that lingers.
Spotlight on key ingredients
Cheddar cheese:
- I love a sharp, aged cheddar—its tangy bite cuts through the richness, making every cheesy pull more satisfying. Swap for Monterey Jack if you want milder, creamier melts that stretch endlessly.
- Elbow macaroni: The classic shape, it traps all that cheesy goodness perfectly. Use gluten-free if needed, but avoid overcooking—aim for al dente, just tender enough to hold its shape without becoming mushy.
Breadcrumbs:
- Cream: I prefer heavy cream for that silky, luscious texture. If you want a lighter version, try half-and-half, but be prepared for a slightly thinner sauce that needs extra cheese to compensate.
- I toast mine with a splash of olive oil and a pinch of paprika for smoky crunch. Panko works best for a lighter, crisp topping—skip the fancy ones if you want that classic crunch.
Notes for ingredient swaps
- Dairy-Free: Swap regular cheese for a dairy-free cheese blend. Expect a slightly different melt and less sharpness, but still creamy.
- Gluten-Free: Use gluten-free pasta and flour. The texture may be a bit firmer, but it’ll still soak up that cheesy goodness.
- Vegan: Replace cheese with a vegan cheese alternative and use plant-based milk. The flavor will be milder, with a nutty or tangy undertone.
- Cream Substitutes: Coconut cream gives a richer, slightly sweeter flavor. For lighter, try evaporated milk but expect less silkiness.
- Breadcrumbs: Panko makes for crunchier topping, but try crushed cornflakes or crushed chips for a different crispy texture. Toast well for extra flavor.
- Hot Sauce: Use your favorite hot sauce to add heat. A smoky chipotle or tangy sriracha can give it a new punch.
- Cheddar Variations: Swap for aged Gouda or smoked mozzarella for a different flavor profile—think deeper, more complex notes.
Equipment & Tools
- Large pot: Boil pasta quickly and evenly.
- Saucepan: Make the cheese sauce over medium heat.
- Baking dish: Bake the assembled mac and cheese for crisp topping.
- Skillet: Toast breadcrumbs for crunch and flavor.
- Whisk: Ensure smooth sauce without lumps.
Step-by-step guide to Hell’s Kitchen Mac and Cheese
- Gather your equipment: a large pot for boiling, a saucepan for the cheese sauce, a baking dish, and a skillet for breadcrumbs.
- Cook the pasta: Bring a large pot of salted water (about 2 liters) to a boil at 100°C (212°F). Add elbow macaroni and cook until just al dente, about 8 minutes. Drain and set aside.
- Make the cheese sauce: In the saucepan, melt 2 tablespoons of butter over medium heat (around 160°C/320°F). Once melted, whisk in 2 tablespoons of flour and cook for 1 minute until lightly golden.
- Add liquids: Slowly pour in 1 cup of heavy cream and 1 cup of milk, whisking constantly to prevent lumps. Bring to a gentle simmer, about 3-4 minutes, until slightly thickened.
- Incorporate cheese: Lower the heat to medium-low. Add 1 ½ cups of shredded sharp cheddar cheese, a pinch of mustard powder, and a splash of hot sauce. Stir until cheese melts and sauce is smooth.
- Combine pasta and sauce: Fold the cooked pasta into the cheese sauce, ensuring every piece is coated. Taste and adjust seasoning with salt if needed.
- Prepare breadcrumbs: In a skillet, toast ½ cup of panko breadcrumbs with a teaspoon of olive oil, a pinch of paprika, and a tiny bit of garlic powder over medium heat until golden and crispy, about 3 minutes.
- Assemble for baking: Pour the cheesy pasta into the prepared baking dish. Sprinkle the toasted breadcrumbs evenly over the top.
- Bake: Place in a preheated oven at 180°C (350°F). Bake for 15-20 minutes until bubbling and the breadcrumbs are crisp.
- Finish and serve: Remove from oven, let it rest for 5 minutes. Serve hot, with a little extra cheese or hot sauce on the side if desired.
Let the baked mac and cheese rest for 5 minutes before serving. This allows the sauce to set slightly, making it easier to scoop and ensuring the flavors meld together. Finish with a sprinkle of extra cheese or hot sauce if desired, then plate and enjoy while hot and gooey.
How to Know It’s Done
- Cheese sauce should be smooth, creamy, and bubbling around the edges.
- Breadcrumbs should be golden and crispy, not soggy or burned.
- Pasta should be tender but hold its shape—avoid mushiness.
Hell’s Kitchen Mac and Cheese
Ingredients
Equipment
Method
- Bring a large pot of salted water to a boil and cook the elbow macaroni until just al dente, about 8 minutes. Drain and set aside.
- In a saucepan over medium heat, melt the butter until it starts to bubble and smell toasty, about 1 minute.
- Whisk in the flour and cook for about 1 minute, stirring constantly, until the mixture turns a light golden color and smells slightly nutty.
- Gradually pour in the heavy cream and milk, whisking vigorously to keep the sauce smooth. Bring to a gentle simmer and cook for 3-4 minutes until it thickens slightly.
- Lower the heat and stir in the shredded cheddar, mustard powder, and a splash of hot sauce. Keep stirring until the cheese melts into a smooth, glossy sauce.
- Fold the cooked pasta into the cheese sauce, ensuring every piece is coated in that creamy, cheesy goodness. Taste and adjust seasoning if needed.
- In a skillet over medium heat, toast the panko breadcrumbs with olive oil and paprika until golden and crispy, about 3 minutes.
- Pour the cheesy pasta into a baking dish and sprinkle the toasted breadcrumbs evenly over the top.
- Bake in a preheated oven at 180°C (350°F) for 15-20 minutes until bubbling around the edges and the topping is crispy.
- Remove from oven, let it rest for 5 minutes to set, then serve hot with extra hot sauce or cheese if desired.
Pro tips for perfect mac and cheese
- cheese: Use freshly grated cheese for better meltability and a smoother sauce without graininess.
- Hot sauce: Add just a splash during cheese melting to brighten the flavor and cut through the richness.
- Stir constantly: Keep the cheese sauce moving over medium-low heat to prevent scorching and ensure smoothness.
- Breadcrumb crunch: Toast breadcrumbs in butter or oil until golden for a deeply satisfying, crispy topping.
- Pasta al dente: Slightly undercook the pasta so it doesn’t turn mushy when baked and retains a firm bite.
- Taste as you go: Adjust seasoning and cheese levels throughout to prevent blandness or over-saltiness.
- Rest briefly: Let the baked mac and cheese sit for 5 minutes before serving to allow flavors to meld and sauce to set.
Common mistakes and how to fix them
- FORGOT to adjust heat during cheese addition → Lower heat to prevent burning.
- DUMPED in all cheese at once → Add cheese gradually for smooth melting.
- OVER-TORCHED breadcrumbs → Toast until golden, not burnt, for perfect crunch.
- MISSED stirring when boiling pasta → Stir occasionally to prevent sticking and overcooking.
Quick fixes and pantry swaps
- When cheese clumps → Splash in a bit of hot milk and stir vigorously.
- If breadcrumbs burn → Reduce heat immediately and add a splash of butter to cool.
- DUMPED too much salt → Rinse pasta quickly, then start again with fresh water.
- Overcooked pasta → Save some pasta water, toss with sauce to loosen and balance texture.
- Splash of too much hot sauce → Mix in a dollop of sour cream or crème fraîche for balance.
Prep, store, and reheat tips
- You can prepare the cheese sauce and cook the pasta a day ahead; keep them separate in airtight containers in the fridge. Reheat the sauce gently to preserve its silky texture.
- Assemble the baked dish ahead of time, cover tightly, and refrigerate for up to 24 hours. The flavors meld better after resting a bit, and the top may soak up some moisture, so add a sprinkle of breadcrumbs before baking again.
- Shelf life in the fridge is about 2-3 days. After that, the cheese may start to break down, and the dish can become less creamy. Reheat thoroughly until bubbling around the edges, checking for a creamy, hot texture.
- Reheating in the oven at 180°C (350°F) for 15-20 minutes works best. For quicker reheats, microwave in 30-second bursts, stirring in between, until hot and gooey. Expect some separation, but stir vigorously to restore creaminess.
- For best sensory results, reheat until the dish is hot and the top is crispy again—beyond just steaming—so it retains that satisfying crunch and cheesy aroma.
Top questions about Hell’s Kitchen Mac and Cheese
1. Can I use a different cheese?
Use sharp cheddar for a bold, tangy flavor and great melt. Mild cheese will be less punchy.
2. How long should I cook the pasta?
Cook pasta until just al dente, about 8 minutes. It should be tender but still firm to bite.
3. How do I melt cheese smoothly?
Add cheese gradually over low heat, stirring constantly, to avoid clumping and ensure smooth melting.
4. How do I reheat leftovers?
Reheat in the oven at 180°C (350°F) until bubbling and crispy on top, about 15-20 minutes.
5. How do I get crispy breadcrumbs?
Toast breadcrumbs in butter or oil until golden for maximum crunch and flavor.
6. Can I use milk instead of cream?
Use heavy cream for a rich, silky sauce. Half-and-half can be used but may be less creamy.
7. Can I make this dish ahead?
Yes, you can prepare the sauce and cook pasta ahead. Store separately and assemble before baking.
8. Any tips for avoiding burnt cheese sauce?
Watch the sauce closely and stir constantly to prevent burning or sticking at the bottom.
9. How can I add more flavor?
Add a splash of hot sauce or mustard to brighten flavors and cut through richness.
10. What if my cheese sauce is lumpy?
If cheese clumps, stir in a bit of hot milk to smooth it out quickly.
In the chaos of a high-pressure kitchen, this mac and cheese becomes more than just comfort food—it’s a testament to quick thinking and bold flavors. Every cheesy pull and crispy topping reminds me that even in mess and rush, there’s something deeply satisfying about trusting your instincts.
Making this dish now feels like carrying a bit of that adrenaline into my own kitchen. It’s imperfect, lively, and full of character—just like those hectic nights that pushed me to cook faster, think sharper, and still come out with something worth sharing.

Hi, I’m Emily Carter, the creator and recipe developer behind Salt Strategist. I’m so happy you’re here. This blog is where my love for flavor, creativity, and thoughtful cooking comes together in one beautiful, ever evolving space.


