Making a perfect chocolate fondant always feels like pulling off a little magic, especially when it’s just a handful of ingredients and a few simple steps. I’ve learned that it’s less about complicated recipes and more about nailing that precise timing and technique—getting that gooey, molten center without overbaking is an art in itself.
There’s something chaotic and exhilarating about last-minute baking, the way the kitchen fills with rich cocoa aroma, and how a slightly underdone crust can turn into a luscious, oozing treasure. It’s a dessert that invites a bit of improvisation, a bit of chaos, but always rewards you with that perfect balance of crisp exterior and silky interior. That moment when you crack it open and the chocolate flows is pure, unfiltered joy.
Focusing on the surprising simplicity of making a perfect chocolate fondant with just a few ingredients, emphasizing how mastering this dessert is more about technique than complicated recipes, and sharing the personal joy and chaos that comes with last-minute baking attempts.
The Unexpected Charm of Molten Chocolate
- The first time I got that molten center perfect, I felt like I’d cracked a secret code.
- There’s a wild, almost rebellious joy in serving this warm, gooey chocolate surprise right from the oven.
- Baking this always feels like a chaotic dance—timing is everything, and I’ve learned to trust the jiggle.
- Nothing beats the look on someone’s face when they break into a fondant and that silky, dark chocolate oozes out.
- This dessert reminds me that sometimes, the simplest ingredients can create the most memorable moments.
The story behind this recipe
- I remember the first time I tried making a chocolate fondant, it was late at night, and I was chasing that elusive gooey center. The kitchen smelled like rich cocoa and a little chaos, but when I finally cracked one open and saw that molten chocolate flow, I felt like I’d discovered a secret. Ever since, I’ve chased that moment—perfecting timing, temperature, and a bit of instinct.
- This dessert became my go-to for dinner parties, not just because it’s impressive, but because it’s a reminder that simple ingredients—good chocolate, butter, eggs—can create something extraordinary. It’s messy, unpredictable, and always a little nerve-wracking, but that’s part of the charm. Every successful bake feels like a tiny victory in the chaos of the kitchen.
- heading: ‘The Unexpected Charm of Molten Chocolate’
Chocolate Fondant Trivia
- Chocolate fondant, also known as molten lava cake, originated in France in the 1980s, with various claims to its invention.
- Its name reflects the dessert’s key feature: a soft, flowing chocolate center that resembles molten lava.
- The dish gained rapid popularity worldwide, especially in the late 20th century, thanks to its dramatic presentation and rich flavor.
- Originally, it was a sophisticated French pastry, but today, it’s a beloved comfort dessert found in many home kitchens.
Key Ingredients Breakdown
- Dark chocolate: I prefer a high cocoa percentage—around 70%—for that intense, slightly bitter edge that balances sweetness. Use good quality, shiny, and rich; it melts into a luscious, velvety center.
- Butter: Unsalted, preferably European-style for depth. It melts smoothly, giving the fondant that tender, melt-in-your-mouth texture. Don’t skimp; richness makes all the difference.
- Eggs: Large, fresh eggs are essential. They give structure and help create that delicate contrast between the firm exterior and molten interior. Whisk well to incorporate air for a lighter crumb.
- Sugar: Fine caster sugar dissolves more easily, ensuring a smooth batter. It also contributes to that slight crackly crust on the outside—crucial for the texture contrast.
- Flour: Just a touch—about a tablespoon—to stabilize the batter. Too much, and it dulls the gooey center; too little, and it might be too fragile to handle. Sift to avoid lumps.
- Optional flavorings: A splash of vanilla or a pinch of sea salt can elevate the chocolate flavor. I love a hint of sea salt—brings out that smoky richness and depth.
- Ramekins: Small, sturdy ramekins—around 150 ml—are perfect. Grease generously with butter and dust with cocoa powder for easy unmolding and that glossy finish.
Spotlight on key ingredients
Dark chocolate:
- I prefer a high cocoa percentage—around 70%—for that intense, slightly bitter edge that balances sweetness. Use good quality, shiny, and rich; it melts into a luscious, velvety center.
- Butter: Unsalted, preferably European-style for depth. It melts smoothly, giving the fondant that tender, melt-in-your-mouth texture. Don’t skimp; richness makes all the difference.
- Eggs: Large, fresh eggs are essential. They give structure and help create that delicate contrast between the firm exterior and molten interior. Whisk well to incorporate air for a lighter crumb.
Butter:
- European-style butter adds a deep, creamy richness that melts beautifully, giving your fondant that silky, luxurious center. Make sure it’s good quality for best flavor.
- Eggs: Fresh eggs provide the right structure and help achieve that perfect jiggle. Whisking them well creates a light, airy batter that puffs up just right during baking.
- Chocolate: The key to that oozing center—rich, shiny, and smooth. The better the quality, the more intense the flavor and the more glossy that molten look.
Notes for ingredient swaps
- Dairy-Free: Swap butter with coconut oil or dairy-free margarine. Expect a slightly different richness and a softer crust.
- Vegan Chocolate: Use a good-quality vegan dark chocolate and coconut oil. The molten centre might be a tad less glossy.
- Sugar Alternatives: Replace caster sugar with coconut sugar or maple syrup. Be aware of slight changes in sweetness and texture.
- Flour: Almond flour or gluten-free blend can work; expect a denser crumb and maybe a slightly fudgier texture.
- Eggs: Flaxseed meal or applesauce can replace eggs—use 1 tablespoon flaxseed mixed with 3 tbsp water per egg. The texture will be a bit more tender and less gooey.
- Chocolate: Unsweetened cocoa powder plus a little extra fat can substitute for dark chocolate, but the melting and flavor will differ.
- Cocoa Powder: Dutch-processed cocoa for a smoother, less acidic taste; natural cocoa for a brighter, more intense chocolate flavor.
Equipment & Tools
- Ramekins: Holds individual portions and shapes the fondant.
- Heatproof bowl: Melts the chocolate and butter smoothly via bain-marie.
- Whisk: Combines eggs and sugar until frothy, ensuring lightness.
- Spatula: Folds ingredients gently, preserving airy texture.
- Oven thermometer (optional): Ensures accurate baking temperature for perfect doneness.
- Knife or small offset spatula: Loosen edges and invert the fondants cleanly.
Step-by-step guide to making chocolate fondant
- Preheat your oven to 200°C (390°F). Grease your ramekins generously with butter and dust with cocoa powder, tapping out the excess. This prevents sticking and gives a glossy finish.
- Chop 200g of high-quality dark chocolate into small pieces. Melt it with 100g of unsalted butter in a heatproof bowl over a simmering pot of water (bain-marie), stirring until smooth. Remove from heat and let cool slightly.
- In a separate bowl, whisk 3 large eggs and 80g of caster sugar until well combined and slightly frothy—about 2 minutes. Add a pinch of sea salt and a splash of vanilla if desired.
- Fold the melted chocolate and butter into the egg mixture gently, using a spatula. Be careful not to deflate the mixture. Sift in 1 tablespoon of all-purpose flour and fold just until combined—don’t overmix.
- Divide the batter evenly among the prepared ramekins—about 150ml each—filling them just below the rim. Smooth the tops with the back of a spoon.
- Bake in the preheated oven for exactly 12-14 minutes. The edges should be set, but the center still jiggles slightly when shaken—this is key to that molten core.
- Once baked, remove from oven and let sit for 1 minute. Use a small knife to loosen the edges if needed, then invert each ramekin onto a plate carefully. Let rest for 30 seconds before serving.
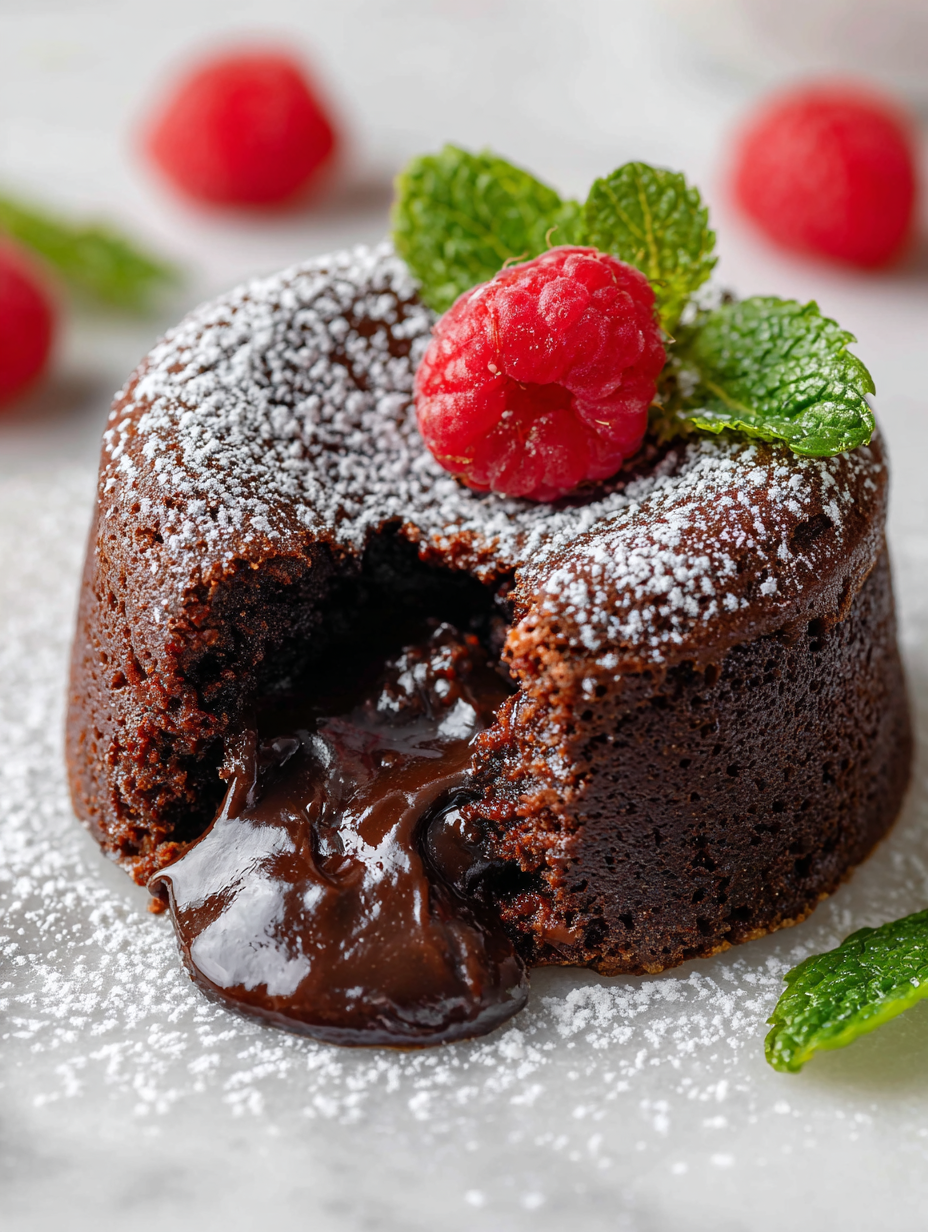
- Serve immediately while the center is still oozy—cut into the side to see the molten chocolate flow out. The exterior should be crisp, with a tender, slightly cracked top.
- To finish, dust with a little cocoa powder or powdered sugar for presentation. Pair with a scoop of vanilla ice cream or a dollop of whipped cream, if you like.
Let the baked fondants rest for 30 seconds before inverting onto plates. Dust with cocoa powder or powdered sugar. Serve immediately with your choice of accompaniments for that warm, molten experience.
How to Know It’s Done
- Crust should be crisp and slightly crack when gently pressed.
- Center jiggles slightly when ramekin is shaken, but edges are firm.
- Chocolate flows out smoothly when opened, not clumpy or grainy.
Chocolate Fondant
Ingredients
Equipment
Method
- Preheat your oven to 200°C (390°F). Generously butter each ramekin and dust with cocoa powder, tapping out the excess to prevent sticking and help achieve a shiny finish.
- Chop the dark chocolate into small pieces, then melt it together with the butter in a heatproof bowl over simmering water, stirring until smooth and glossy. Remove from heat and let cool slightly.
- In a separate bowl, whisk the eggs and caster sugar together until the mixture becomes pale, frothy, and slightly increased in volume, about 2 minutes. Add a splash of vanilla extract or a pinch of sea salt if desired.
- Gently fold the melted chocolate and butter into the egg mixture using a spatula, being careful not to deflate the airy batter. Sift in the flour and fold just until combined, maintaining a light texture.
- Divide the batter evenly among the prepared ramekins, filling each about three-quarters full. Smooth the tops with the back of a spoon to ensure even baking.
- Bake the fondants in the preheated oven for exactly 12 to 14 minutes. The edges should be set and firm, while the center still jiggles slightly when gently shaken—this is key to that molten core.
- Once baked, remove the ramekins from the oven and let them rest for about 1 minute to settle. Carefully run a small knife around the edges to loosen them, then invert each onto a serving plate.
- Let the fondants rest for about 30 seconds before gently lifting the ramekin off, revealing a shiny, cracked surface with a luscious, flowing center.
- Serve immediately, optionally dusted with cocoa powder or powdered sugar, paired with ice cream or whipped cream if desired, to enjoy that perfect molten chocolate experience.
Pro tips for perfect fondant
- Bolded mini-head: Use high-quality chocolate—melts more smoothly and creates a glossy, oozy center.
- Bolded mini-head: Ensure butter and chocolate are gently melted—overheating can cause a grainy texture and dull shine.
- Bolded mini-head: Don’t overmix after adding flour—to keep that delicate, molten interior intact.
- Bolded mini-head: Bake just until edges are set—center should jiggle slightly for that signature gooeyness.
- Bolded mini-head: Rest the fondants briefly before inverting—this helps set the shape and prevents cracks.
- Bolded mini-head: Serve immediately—waiting too long causes the center to thicken and lose that luscious flow.
Common mistakes and how to fix them
- FORGOT to preheat oven → Always heat oven early to ensure proper baking temperature.
- DUMPED batter too quickly → Pour gently to avoid deflation and uneven textures.
- OVER-TORCHED edges → Reduce baking time or check earlier for molten center.
- MISSED cooling time → Rest briefly before inverting to prevent breakage and ensure ooze.
Fast Fixes for Fondant Flaws
- If a crack appears, quick splash of warm water on edges seals it.
- When center is too firm, reheat briefly for a softer, gooey texture.
- If chocolate flow is dull, gently rewarm the fondant for gloss and ooze.
- Dumped batter unevenly? Use a spoon to even out before baking for consistency.
- When underbaked, add a minute or two; avoid overcooking to keep that molten core.
Prep, store, and reheat tips
- Prepare the batter and portion into ramekins up to 2 hours ahead; keep covered in the fridge for best freshness.
- Baked fondants can be stored in an airtight container in the fridge for up to 24 hours; reheat directly from cold for a gooey center.
- Reheating in a 180°C (350°F) oven for 5-8 minutes restores warmth and ooze; watch for overcooking to avoid drying out.
- Freezing baked fondants is possible for up to a month; thaw at room temperature and reheat gently, checking for that perfect molten texture.
- The flavors deepen slightly after a day, so they’re still delicious the next day, but the texture may become slightly firmer.
Top questions about chocolate fondant
1. How do I get the perfect molten center?
A gooey center is achieved by baking just enough for the edges to set while the middle remains slightly jiggly. Timing is key; underbake slightly for ooze, overbake for a firm center.
2. What chocolate is best for fondant?
Use high-quality dark chocolate with at least 70% cocoa. It melts smoothly and gives that rich, intense flavor and glossy finish to your fondant.
3. How important is oven temperature?
Ensure your oven is fully preheated to 200°C (390°F). Baking at the right temperature prevents over- or under-cooking the delicate center.
4. How long should I bake it?
Baking times can vary slightly depending on your oven and ramekin size. Start checking at 12 minutes; the edges should be firm but the center still jiggles.
5. Why does my fondant crack?
If your fondant cracks when you invert it, let it rest for an extra 2-3 minutes after baking. This helps the structure set so it’s easier to unmold smoothly.
6. How do I know when it’s done?
Overbaking will turn the center into a solid, fudgy mass. Underbaking might make it too runny or cause it to collapse. Timing and a gentle jiggle are your clues.
7. What ramekins should I use?
Use ramekins that are around 150 ml, sturdy, and well-greased with butter and cocoa powder. This prevents sticking and helps achieve a shiny, neat presentation.
8. How long should I rest before serving?
Allow the fondant to rest for about 30 seconds after baking before inverting. This helps the shape set and prevents cracks or spills.
9. Can I reheat it?
Reheat in a 180°C (350°F) oven for 5-8 minutes if you want to serve leftovers warm. Keep an eye on the edges to prevent over-drying.
10. Can I make it in advance?
Yes, you can prepare the batter a few hours ahead, cover, and refrigerate. Bake straight from the fridge, but add an extra minute or two to the cooking time.
There’s something about a warm, molten chocolate fondant that feels like a quiet celebration in the chaos of a kitchen. It’s unpolished, a little messy, but always honest in its promise of that perfect flow of rich, dark chocolate.
In the end, it’s less about the flawless presentation and more about trusting your instincts—knowing when it’s just right, and embracing the chaos that comes with chasing that gooey center. It’s a small, imperfect joy worth every attempt.

Hi, I’m Emily Carter, the creator and recipe developer behind Salt Strategist. I’m so happy you’re here. This blog is where my love for flavor, creativity, and thoughtful cooking comes together in one beautiful, ever evolving space.


