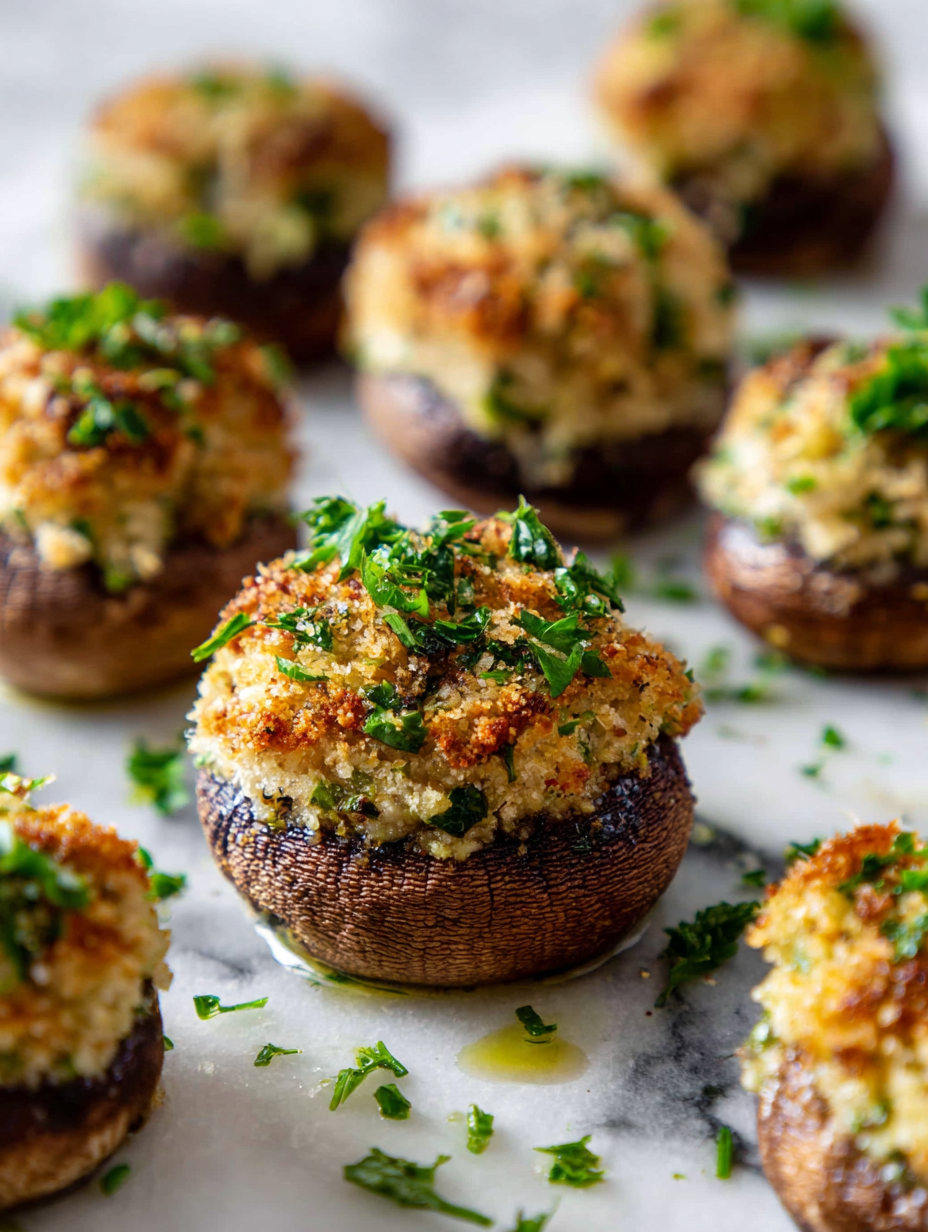
Stuffed mushrooms might seem like a fancy appetizer, but honestly, they’re just a good reason to keep your kitchen smelling like garlic and herbs. I love how those earthy caps act like little edible bowls, holding all the cheesy, savory filling in a way that feels both rustic and a bit elegant. It’s satisfying to see a simple mushroom transform into something rich and satisfying with just a few tricks up your sleeve.
What really draws me to this recipe is how adaptable it is. You can make it vegetarian or add some sausage or bacon for extra punch. Plus, the process of hollowing out the caps and filling them feels like a tiny, satisfying project—kind of meditative. It’s one of those dishes that feels special but is so straightforward, I always keep the ingredients on hand.
These stuffed mushrooms are perfect for any season—warm, cheesy bites that still feel like comfort food. They’re a little bit fancy, a little bit casual, and always disappear faster than I expect. I like to serve them as a starter or even as a side dish that somehow steals the show at the table. They remind me that sometimes, the simplest ingredients can create the biggest flavor moments.
Focusing on how the earthy, umami-rich mushroom caps act like edible bowls, transforming the filling into a self-contained flavor bomb that’s both rustic and elegant.
Mushrooms as Edible Bowls
- These stuffed mushrooms remind me of my grandma’s kitchen, where the aroma of garlic and herbs filled every corner, making everything feel warm and familiar.
- There’s a chaotic joy in prepping these—hollowing out the caps, stuffing them full—and watching them turn golden and irresistible in the oven.
- I get pride from seeing guests’ surprised faces when they realize how a simple mushroom can be transformed into such a rich, cheesy bite.
- Sometimes, I just need the comfort of crispy edges and oozy filling, and these mushrooms deliver that in every bite.
- There’s a nostalgic thrill in making these for friends, knowing they’ll remind everyone of cozy dinners and good company.
The story behind this recipe
- I first stumbled upon stuffed mushrooms during a chaotic holiday dinner. The kitchen was a mess, but those little caps, filled with everything cheesy and savory, somehow made it all feel manageable. That moment of pulling a tray out of the oven, smelling garlic and herbs, was a quiet victory. It’s funny how a simple dish like this can turn a hectic night into a warm memory.
- What keeps me coming back to this recipe is how it’s become a sort of culinary therapy. Hollowing out the mushrooms is oddly satisfying, like small, mindful work that results in something truly delicious. It’s a dish I make when I need comfort and a little bit of pride—knowing I can turn humble ingredients into a crowd-pleaser.
- heading
- story_type
Historical & Cultural Trivia
- Stuffed mushrooms date back to medieval Europe, where they were served as a luxurious appetizer at aristocratic tables.
- In the 20th century, American chefs popularized stuffed mushrooms as a versatile party finger food, especially in New England and the Midwest.
- The concept of using mushroom caps as edible bowls aligns with the rustic, foraged food trend that gained momentum in the ’70s and ’80s.
- Different regions have unique fillings—Italian versions might include breadcrumbs and herbs, while Asian styles often feature soy and sesame.
- Modern takes often incorporate plant-based ingredients, making stuffed mushrooms both gourmet and vegan-friendly.
Ingredient breakdown: key components
- Mushroom caps: I look for firm, plump caps with no sliminess, almost like little edible bowls waiting to be filled. Swap for large portobellos if you want more meatiness.
- Cream cheese: I prefer full-fat for that rich, silky texture that melts into the filling. For a lighter version, sour cream or Greek yogurt works—just keep an eye on moisture.
- Herbs and garlic: Fresh garlic and parsley brighten the filling with a lemon-bright punch and aromatic freshness. Dried herbs can be a decent stand-in if fresh isn’t available, but use half the amount.
- Breadcrumbs: I toast mine slightly before mixing to add crunch and depth. Use gluten-free if needed, but keep in mind they might not absorb flavors quite the same way.
- Cheese: I love a sharp Parmesan that adds a salty, umami kick, but grated Gruyère or Pecorino can give a different, equally satisfying flavor. Shred just before mixing for best melt.
- Olive oil: I drizzle a little over the stuffed caps before baking for golden edges and extra flavor. Use a good-quality extra virgin for that fruity, peppery note.
- Lemon juice: Just a squeeze brightens the whole dish with a subtle tang and cuts through the richness—don’t skip it, even if it seems small.
Spotlight on Key Ingredients
Cream cheese:
- Mushroom caps: I look for firm, plump caps with no sliminess, almost like little edible bowls waiting to be filled. Swap for large portobellos if you want more meatiness.
- I prefer full-fat for that rich, silky texture that melts into the filling. For a lighter version, sour cream or Greek yogurt works—just keep an eye on moisture.
- Herbs and garlic: Fresh garlic and parsley brighten the filling with a lemon-bright punch and aromatic freshness. Dried herbs can be a decent stand-in if fresh isn’t available, but use half the amount.
Mushroom caps:
- Their earthy aroma intensifies as they bake, becoming tender and almost smoky, acting like edible bowls that hold all the savory goodness.
- Cream cheese: Its melt-in-your-mouth texture is the backbone of the filling, becoming oozy and creamy, contrasting beautifully with the crisp edges of the mushroom caps.
Notes for ingredient swaps
- Dairy-Free: Swap cream cheese for blended silken tofu or cashew cream. Keeps it creamy but loses a touch of tang.
- Vegan: Use vegan cheese and skip the Parmesan. The flavor will be slightly milder but still satisfying.
- Low-Sodium: Opt for unsalted butter or cheese, and add extra herbs or lemon to boost flavor.
- Gluten-Free: Replace breadcrumbs with crushed gluten-free crackers or toasted almond meal for crunch.
- Herb Variations: Fresh thyme or basil can replace parsley for a different aromatic punch.
- Olive Oil: Use avocado oil or a mild flavored oil if you prefer a different richness or for allergen considerations.
- Cheese: Pecorino Romano or aged Gouda can add unique flavor nuances while maintaining melty texture.
Equipment & Tools
- Oven: Bake the stuffed mushrooms evenly.
- Skillet: Cook mushroom stems and develop flavor.
- Mixing bowl: Combine filling ingredients smoothly.
- Small spoon: Fill mushroom caps precisely.
- Baking sheet: Hold mushrooms during baking.
- Parchment paper: Prevent sticking and facilitate cleaning.
Step-by-step guide to stuffed mushrooms
- Preheat your oven to 190°C (375°F). Gather your mushroom caps, about 20 medium-sized ones, stems removed and cleaned gently with a damp cloth.
- Chop the stems finely; set aside. In a skillet, heat 1 tbsp olive oil over medium. Add stems, cook until fragrant and slightly browned, about 3-4 minutes. Let cool slightly.
- In a mixing bowl, combine 4 oz cream cheese, 1/4 cup grated Parmesan, 2 minced garlic cloves, a handful of chopped parsley, and the cooked stems. Mix well until smooth and creamy.
- Use a small spoon to hollow out the mushroom caps further if needed, creating a little cavity for the filling. Be gentle—don’t break the caps.
- Stuff each mushroom cap generously with the filling. Place them on a baking sheet lined with parchment paper, stem side up. Drizzle with a touch of olive oil.
- Bake in the preheated oven for 18-20 minutes. Check for golden edges and bubbling filling. The tops should be slightly crispy and fragrant.
- Once out, let rest for 5 minutes. Garnish with extra parsley or a sprinkle of Parmesan if desired. Serve warm, with a little squeeze of lemon for brightness.
Let the mushrooms rest for 5 minutes out of the oven to settle. Serve on a platter, garnished with herbs or lemon wedges. They’re best warm but still good at room temperature if needed.
How to Know It’s Done
- Mushroom caps are tender and golden around the edges.
- Filling is bubbling and slightly browned on top.
- Aromatic garlic and herbs fill the air, with a crisp edge on the mushrooms.
Stuffed Mushrooms
Ingredients
Equipment
Method
- Preheat your oven to 190°C (375°F). Gently clean the mushroom caps with a damp cloth and remove stems, setting aside the stems for later use.
- Finely chop the mushroom stems. In a skillet, heat 1 tablespoon of olive oil over medium heat, then add the stems. Cook for about 3-4 minutes until fragrant and slightly browned, then remove from heat and let cool slightly.
- In a mixing bowl, combine the cream cheese, grated Parmesan, minced garlic, chopped parsley, toasted breadcrumbs, and the cooked mushroom stems. Mix until smooth and well incorporated.
- Use a small spoon to carefully hollow out the mushroom caps further if needed, creating a cavity for the filling without breaking the caps.
- Stuff each mushroom cap generously with the prepared filling, pressing slightly to fill the cavity completely.
- Arrange the stuffed mushrooms on a baking sheet lined with parchment paper, stem side up. Drizzle a little olive oil over each for golden edges.
- Bake in the preheated oven for about 18-20 minutes until the tops are bubbling and golden brown, with crispy edges on the caps.
- Remove the mushrooms from the oven and let them rest for 5 minutes. Squeeze a little lemon juice over the tops to brighten the flavors.
- Garnish with extra parsley if desired and serve warm for a rich, savory bite that combines rustic and elegant flavors.
Pro tips for stuffed mushrooms
- Use a small, sharp spoon to neatly fill each mushroom cap, avoiding overfilling and mess.
- Toast breadcrumbs lightly before mixing to add crunch and deepen flavor.
- Drizzle olive oil over stuffed caps before baking for golden, crispy edges.
- Bake at 190°C (375°F) until filling is bubbling and tops are golden—about 20 minutes.
- Let mushrooms rest for 5 minutes after baking to allow flavors to settle and filling to firm up.
- Use a baking sheet lined with parchment for easy cleanup and even heat distribution.
- If filling bubbles over, reduce oven temperature slightly or use a smaller baking dish to prevent spills.
Common mistakes and how to fix them
- FORGOT to remove stems before stuffing → Always chop stems finely for even filling.
- DUMPED cheese directly into hot filling → Let cream cheese soften first for smoother mix.
- OVER-TORCHED mushroom caps → Bake until tops are golden and bubbling, not burnt.
- MISSED to check filling consistency → Should be creamy, not runny or too thick.
Quick fixes and pantry swaps
- When mushrooms release excess moisture, splash a little vinegar to brighten their flavor.
- If filling is too runny, dump in a handful of breadcrumbs for better absorption.
- Over-baked caps turn dark; shield edges with foil for even cooking.
- When cheese isn’t melting smoothly, patch by adding a tiny splash of milk or cream.
- If filling cracks or splits, rescue by adding a small dollop of cream cheese before baking.
Prep, store, and reheat tips
- Prep the filling mixture up to a day in advance; keep covered in the fridge to preserve freshness and aroma. The garlic and herbs will intensify overnight, making the filling even more fragrant.
- Stuffed mushroom caps can be assembled a few hours ahead. Cover them loosely and store in an airtight container in the fridge. The caps stay firm and prevent the filling from drying out.
- Shelf life is best within 24 hours for optimal texture and flavor. After that, the mushrooms may release moisture, so reheat promptly to avoid sogginess.
- Reheat in a 180°C (350°F) oven for about 10 minutes until heated through and the tops regain a slight crisp. The aroma of garlic and cheese will fill the kitchen again, and the filling should be creamy and bubbling.
Top questions about stuffed mushrooms
1. How do I choose the best mushroom caps?
Look for caps that are firm, plump, and dry, with no sliminess. Portobellos can be a meaty substitute if preferred.
2. Can I use a different cheese or dairy?
Use full-fat cream cheese for richness. For a lighter version, try Greek yogurt or sour cream—just watch the moisture.
3. What herbs are best for the filling?
Fresh garlic and herbs give the best aroma and flavor. Dried herbs work in a pinch but are less vibrant.
4. Should I toast the breadcrumbs first?
Toast breadcrumbs lightly before mixing for extra crunch. Use gluten-free if needed, but they may absorb less flavor.
5. How can I tell when they’re done?
Bake at 190°C (375°F) until the filling bubbles and the edges are golden, about 20 minutes. Check for a crispy top.
6. Can I make these in advance?
Stuffed mushrooms can be prepped up to a day ahead. Cover and refrigerate, then bake when ready.
7. What if the filling is too wet or dry?
If filling is too runny, stir in a spoonful of breadcrumbs or extra cheese. For dry filling, add a splash of broth or lemon juice.
8. Any tips for filling and baking?
Use a small spoon for neat filling; drizzle olive oil before baking for crispy edges and added flavor.
9. How do I reheat leftovers without drying them out?
Reheat gently in a 180°C (350°F) oven for about 10 minutes until warmed through and bubbling.
10. What if the mushrooms get too watery during baking?
If mushrooms release excess moisture, add a splash of vinegar or increase baking time slightly to crisp edges.
These stuffed mushrooms are more than just an appetizer; they’re a little project that turns humble ingredients into something memorable. The earthy aroma, the cheesy ooze, and the crispy edges make them a dish I keep coming back to, especially when I want something comforting yet special.
In a busy world, they remind me that simple, honest cooking can still be a moment of pride and connection. Whether served as a starter or a side, they always seem to spark a bit of joy around the table, making even ordinary evenings feel a little more deliberate.

Hi, I’m Emily Carter, the creator and recipe developer behind Salt Strategist. I’m so happy you’re here. This blog is where my love for flavor, creativity, and thoughtful cooking comes together in one beautiful, ever evolving space.


