Making sausage rolls from scratch feels like reclaiming a little bit of childhood chaos—rolling out flaky pastry that’s buttery and crisp, all while knowing every ingredient is made with care. It’s not about perfection, but about that satisfying crunch and juicy filling that hits just right with every bite.
There’s something deeply comforting about kneading dough that’s tender and flaky, especially when it’s filled with seasoned sausage that’s bursting with flavor. It’s a messy, honest process—messy in the best way—and it reminds me that good food doesn’t have to be complicated, just honest and a little bit fun.
This recipe is my go-to when I want to impress without fuss, or when I need a snack that’s equal parts nostalgic and fresh. Making pastry from scratch may take a bit more time, but that extra effort turns ordinary sausage rolls into something memorable—crisp, flaky, and filled with love.
Focusing on creating sausage rolls with a homemade, flaky pastry that rivals store-bought perfection, emphasizing the satisfaction of making everything from scratch.
A nostalgic twist on homemade sausage rolls
- Baking these sausage rolls always takes me back to weekend mornings at my grandma’s house, where the smell of butter and sausage would fill the air.
- There’s a quiet pride in making my own flaky pastry—I love how it crackles at the edges when baked just right.
- Filling these with a spicy sausage blend always sparks a bit of chaos in the kitchen, but the mess is worth the flavor explosion.
- Getting the perfect golden-brown on the pastry makes me feel like I’ve achieved something simple but truly satisfying.
- Sharing these hot from the oven with friends always stirs up a little nostalgia and a lot of happy, messy hands.
A nostalgic twist on homemade sausage rolls
- Making sausage rolls from scratch always takes me back to my grandmother’s kitchen, where she’d roll out pastry with a flick of her wrist and fold in her secret spice mix. Those weekends spent baking together felt like a small adventure, full of flour dust and laughter. Now, every time I make these, I try to capture that feeling — simple, honest, and a little bit messy.
- This recipe isn’t just about getting flaky pastry right (though that’s a big part), but about reconnecting with that childhood joy of pulling something warm and savory from the oven. It’s funny how something so straightforward can carry so much nostalgia, yet still surprise with its perfect balance of crispy edges and juicy filling. It’s a reminder that good food often starts with good memories.
- heading
- story_type
History and Fun Facts
- Sausage rolls have roots in British pub fare, dating back to the Victorian era, when handheld snacks became popular among workers.
- The traditional pastry is believed to have originated in France, evolving into the flaky, buttery layers we love today after cross-channel influences.
- Early versions used simple sausage meat wrapped in rough pastry, but over time, bakers perfected the puff pastry technique to achieve that signature crispness.
- During wartime rationing, creative cooks used available ingredients to keep sausage rolls a staple, often substituting with home-rendered fats and homemade sausage.
- Modern recipes often celebrate local flavors—like adding herbs, cheeses, or spicy chorizo—to reinvent this classic snack with contemporary flair.
Key ingredients and tips
- Pork sausage: I prefer a good, seasoned pork sausage that’s juicy and flavorful. Look for one with a nice fat content for moistness — it’s the filling’s heart, really.
- Puff pastry: Flaky, buttery, and golden when baked. If you’re short on time, store-bought works, but homemade is worth the effort for that crisp, layered crunch.
- Egg wash: A beaten egg brushed over the pastry gives that shiny, golden finish. For a softer shine, add a splash of milk; for a richer color, use just yolk.
- Herbs and spices: A pinch of sage, thyme, or a dash of smoked paprika can elevate the sausage filling. Fresh herbs give brightness, dried are more concentrated.
- Breadcrumbs: They soak up excess fat and keep the filling tender. If you want a lighter roll, use less; for extra juiciness, a little more.
- Onion or garlic: Finely chopped, they add depth and aroma. Sauté until soft and fragrant — the smell alone gets everyone excited.
- Optional extras: Chopped chives, cheese, or a dash of hot sauce can customize your sausage rolls. Just don’t overdo it — keep that savory balance.
Spotlight on key ingredients
Pork sausage:
- I prefer a good, seasoned pork sausage that’s juicy and flavorful. Look for one with a nice fat content for moistness — it’s the filling’s heart, really.
- Puff pastry: Flaky, buttery, and golden when baked. If you’re short on time, store-bought works, but homemade is worth the effort for that crisp, layered crunch.
- Egg wash: A beaten egg brushed over the pastry gives that shiny, golden finish. For a softer shine, add a splash of milk; for a richer color, use just yolk.
Puff pastry:
- Flaky, buttery, and golden when baked. Expect a crisp, layered texture that shatters at the first bite, releasing rich aromas.
- Egg wash: It creates that irresistible glossy sheen and deep golden hue. Applying it evenly ensures a beautiful, professional look every time.
- Herbs and spices: They infuse the filling with aromatic brightness. Fresh herbs add lively notes, dried lend a concentrated punch, especially when baked.
Notes for ingredient swaps
- Meat-Free: Use seasoned lentil or mushroom mixture. It’s a different texture, but still satisfying and savory.
- Gluten-Free: Swap puff pastry for gluten-free sheet. Expect a denser bite, less flaky but still delicious.
- Vegan: Replace sausage with plant-based sausage and egg wash with almond or soy milk. Flavors stay hearty, but less rich.
- Low-Fat: Use lean turkey or chicken sausage. You’ll lose some juiciness but gain a lighter feel.
- Spicy Kick: Add chopped jalapeños or red pepper flakes to the filling. Expect a smoky heat that lingers.
- Herb Variations: Swap sage or thyme for rosemary or oregano. Adjust the aromatic punch to your taste.
- Cheesy: Mix in grated cheese like cheddar or parmesan into the filling. Adds richness, melts into the sausage for extra gooeyness.
Equipment & Tools
- Rolling pin: To roll out the pastry evenly.
- Baking sheet: To bake the sausage rolls on.
- Parchment paper: Prevent sticking and facilitate cleanup.
- Pastry brush: To apply egg wash for shine.
- Sharp knife or pizza cutter: To cut pastry into rectangles and slice finished rolls.
- Mixing bowl: To combine sausage filling ingredients.
Step-by-step guide to sausage rolls
- Gather all ingredients and equipment before starting. Preheat your oven to 200°C (390°F).
- Prepare the pastry: On a lightly floured surface, roll out the puff pastry to about 3mm thickness. Cut into rectangles roughly 10x15cm.
- Mix the sausage filling: In a bowl, combine the sausage meat, finely chopped herbs, grated onion, breadcrumbs, and seasonings. Mix until well combined.
- Shape the filling: Divide the sausage mixture into 4-6 portions. Form each into a log about the length of your pastry rectangles.
- Assemble the rolls: Place a sausage log along the short edge of each pastry rectangle. Roll tightly to enclose the filling, sealing the edges with a beaten egg.
- Brush the tops with egg wash: Use a pastry brush to coat the surface with beaten egg for a shiny, golden finish.
- Arrange on a baking sheet: Line a baking tray with parchment paper. Place the assembled rolls seam-side down, spaced apart.
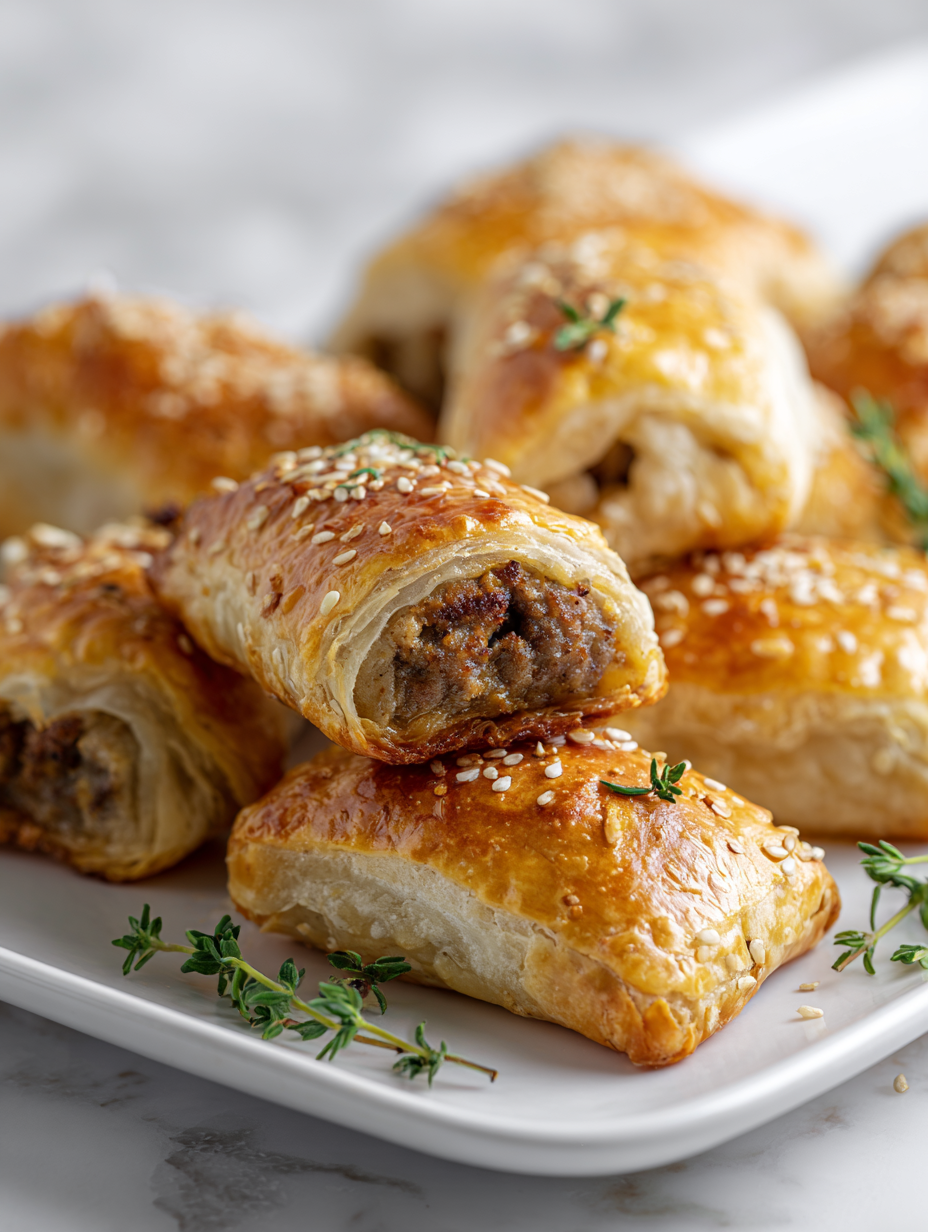
- Bake: Place in the oven for 25-30 minutes, or until the pastry is puffed, golden, and crisp. Check for bubbling filling and a rich aroma.
- Cool slightly: Let the sausage rolls rest for 5 minutes on a wire rack. The filling will set slightly, making them easier to cut.
- Serve: Slice if desired, or serve whole with your favorite condiments. Enjoy the crisp exterior and juicy interior.
Allow the sausage rolls to rest for 5 minutes on a wire rack. Serve warm or at room temperature, cutting into halves or thirds if serving as finger food. For best texture, eat soon after baking, but leftovers can be stored in an airtight container for up to 2 days and reheated in a warm oven until crisp.
How to Know It’s Done
- Pastry is golden and flaky, with even browning.
- Filling is hot, bubbling, and cooked through — internal temp around 70°C (160°F).
- Outer crust crackles when gently pressed, indicating perfect crispness.
Homemade Sausage Rolls
Ingredients
Equipment
Method
- Preheat your oven to 200°C (390°F) and line a baking sheet with parchment paper.
- Roll out the puff pastry on a lightly floured surface until it's about 3mm thick. Cut the pastry into rectangles approximately 10x15cm—these will be your sausage roll wrappers.
- In a mixing bowl, combine the sausage meat, finely chopped onion, minced garlic, breadcrumbs, and dried sage. Mix everything together until well incorporated, creating a seasoned, cohesive filling.
- Divide the sausage mixture into 4 to 6 portions, then shape each into a long log roughly the same length as the shorter side of your pastry rectangles.
- Place a sausage log along the short edge of each pastry rectangle. Carefully roll the pastry around the filling, sealing the edge with a little beaten egg to secure it.
- Use a pastry brush to lightly coat the tops of each roll with the beaten egg mixture, which will give the baked rolls a shiny, golden finish.
- Arrange the assembled sausage rolls seam-side down on the prepared baking sheet, spacing them a few centimeters apart to allow for puffing.
- Bake in the preheated oven for 25-30 minutes, or until the pastry is deep golden brown and crisp, and the filling is bubbling inside.
- Remove the sausage rolls from the oven and let them rest for about 5 minutes on a wire rack—this helps set the filling and makes slicing easier.
- Cut the sausage rolls into halves or thirds if you like, and serve warm with your favorite condiments. The pastry should be flaky and golden, with a juicy, flavorful filling inside.
Notes
Pro tips for perfect sausage rolls
- Keep pastry cold → Cold butter creates flaky layers, so chill your dough before rolling.
- Use a sharp knife → Clean cuts prevent tearing; a serrated or very sharp knife is best.
- Egg wash evenly → Brush lightly but thoroughly for a shiny, golden finish without pooling.
- Don’t overfill → Too much filling causes bursting; aim for a snug but not tight roll.
- Bake until golden → Look for a deep amber color and crisp edges for perfect texture.
- Rest before slicing → Cooling for 5 minutes helps set the filling and prevents sogginess.
- Keep an eye on oven → Every oven varies; check at 25 minutes to prevent over-browning.
Common sausage roll mistakes and fixes
- TOO MUCH FILLING: Overstuffed rolls split during baking. Use less filling for a tidy bake.
- UNDERCOOKED: Pastry remains pale and soft. Bake longer until golden and crisp, around 30 minutes.
- FILLING IS DRY: Sausage mixture too lean. Add a splash of water or a little grated onion for moisture.
- EGG WASH DRIPS: Excess egg causes pooling. Brush lightly and evenly for a smooth, shiny finish.
Quick fixes and pantry swaps
- If rolls split, splash cold water on the seam and press gently to seal.
- When pastry is too soft, refrigerate for 10 minutes before baking for crispness.
- Dumped filling? Mix in a little breadcrumbs to absorb excess moisture quickly.
- Over-torched edges? Shield with foil and lower oven to prevent burning.
- When in doubt, rescue with a quick brush of egg wash for glossy, golden tops.
Prep, store, and reheat tips
- Prepare the sausage filling and assemble the rolls up to a day in advance. Keep covered in the fridge to let the flavors meld and the dough stay firm.
- Unbaked sausage rolls can be stored in an airtight container in the fridge for up to 24 hours. The pastry may soften slightly, but a quick brush with egg wash before baking restores shine.
- Baked sausage rolls are best enjoyed the day they’re made. Store leftovers in an airtight container in the fridge for up to 2 days, keeping the crust crisp by reheating at 180°C (350°F) for 8-10 minutes.
- Reheating in the oven is preferable for maintaining crispness. For a quick fix, microwave at medium power for 30 seconds, then crisp up in the oven if needed. Expect some softening if reheated in the microwave, but the filling stays juicy and flavorful.
Top questions about sausage rolls
1. Can I use different meat for the filling?
Use a good seasoned pork sausage for juicy, flavorful filling. Look for one with a bit of fat to keep it moist.
2. Can I make the pastry from scratch?
Store-bought puff pastry works fine, but homemade adds extra flaky layers. Keep it cold to prevent tearing.
3. How do I get that perfect glossy finish?
Brush with beaten egg for a shiny, golden crust. Add a splash of milk for softer shine or yolk for richness.
4. How do I know when they are done?
Bake until the pastry is deep golden and crisp, about 25-30 minutes at 200°C (390°F). The filling should be bubbling hot.
5. Can I make these in advance?
You can prepare the sausage filling and assemble the rolls a day ahead. Keep covered in the fridge and bake straight from cold.
6. What if my sausage rolls split?
If the rolls split open, brush the seam with a little water and press gently to seal before baking.
7. How should I reheat leftovers?
Reheat in a warm oven at 180°C (350°F) for about 8-10 minutes to keep the crust crisp. Store leftovers in an airtight container.
8. Can I add other ingredients to the filling?
Adding chopped herbs, grated cheese, or spicy paprika can customize the flavor. Keep balance so the filling stays juicy.
9. How do I cut the sausage rolls neatly?
Use a sharp serrated knife for clean cuts to prevent tearing the pastry. Keep your cuts precise for a tidy look.
10. What if the pastry over-browns or burns?
If the edges burn, shield with foil and lower the oven temperature slightly. Check at 25 minutes for perfect color.
These sausage rolls are more than just a snack; they’re a little piece of comfort that’s easy to share. Making them from scratch means you get to control the flavors and get that flaky, buttery crust just right. It’s one of those recipes that feels like a small, satisfying victory every time.
They’re perfect for weekend gatherings or a cozy night in when you want something hearty and homemade. Once you get the hang of it, they come together quickly and smell incredible as they bake. Honestly, there’s nothing quite like biting into a warm, crisp sausage roll with that savory, juicy filling inside.

Hi, I’m Emily Carter, the creator and recipe developer behind Salt Strategist. I’m so happy you’re here. This blog is where my love for flavor, creativity, and thoughtful cooking comes together in one beautiful, ever evolving space.


