Chicken popcorn is one of those snacks that brings me straight back to childhood fairs and movie nights. There’s something about biting into that crispy, tender chicken that makes everything feel simpler and a little more fun. Making it at home feels like a small act of reclaiming that joy, especially when you can tweak the spice level to your liking.
This recipe isn’t about perfecting restaurant-style crunch or precision cooking, though. It’s honest, a bit chaotic, and built for those evenings when you want something crispy and satisfying without fuss. Plus, it’s surprisingly easy to make at home—no deep fryer needed, just a good skillet and a little patience. The smell alone when the chicken hits the oil is enough to get everyone talking.
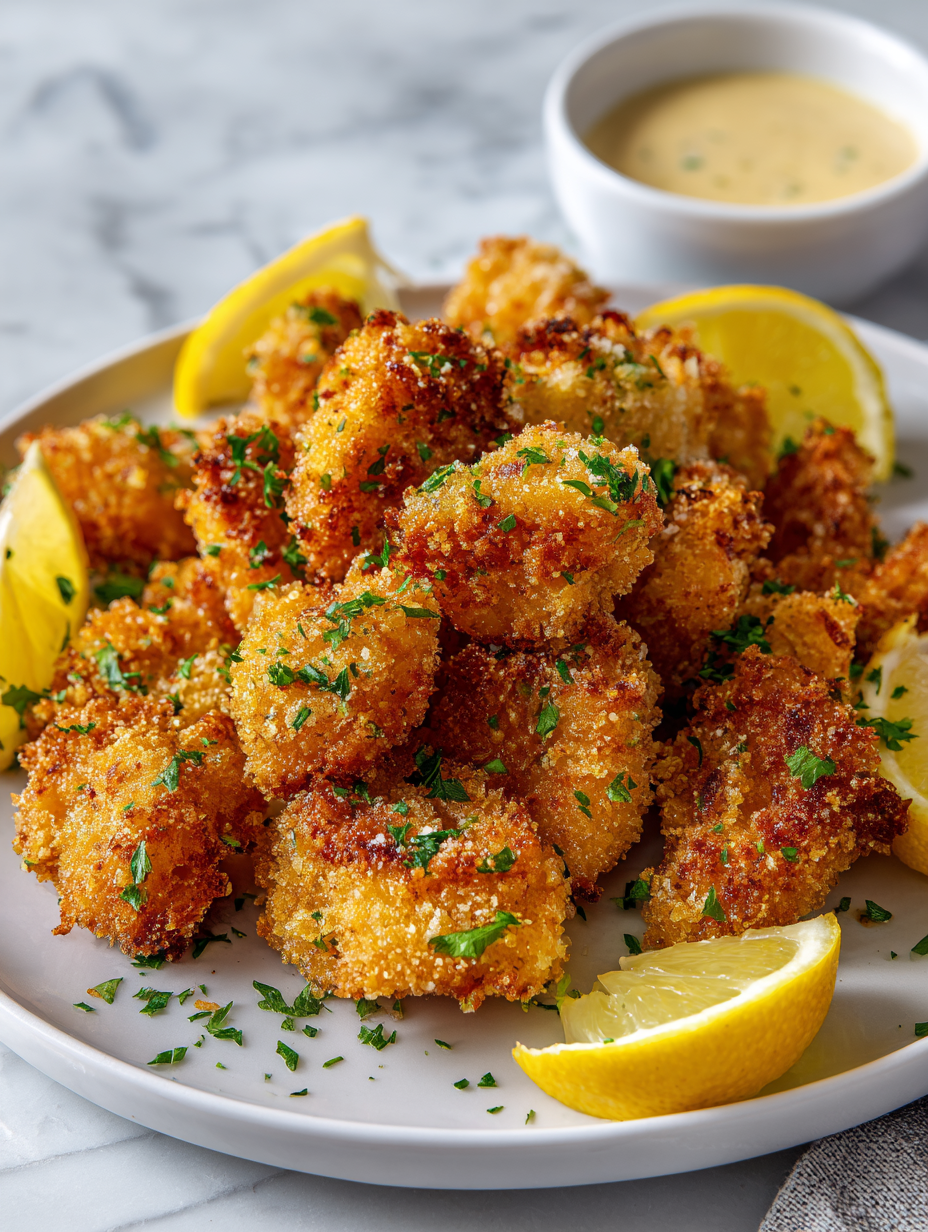
Focusing on the nostalgic joy of recreating childhood fairground snacks with a homemade twist, turning simple chicken into crispy, bite-sized comfort food.
A Nostalgic Snack Reborn
- Cooking this recipe takes me back to late-night street fairs, the smell of fried chicken filling the air.
- I love how crispy and tender the chicken turns out, a perfect crunch with every bite.
- There’s a tiny thrill in making this at home instead of grabbing takeout, like reclaiming a childhood treat.
The story behind this recipe
- Making chicken popcorn at home started from a craving for that perfect crunch and juicy bite, but I wanted to skip the greasy takeout. It’s funny how a simple snack can remind you of carefree afternoons and childhood fairs, where the smell of fried food mingled with laughter. This recipe is my way of bringing that nostalgic joy into my own kitchen, with a bit more control and less mess.
- I experimented a lot, trying to get the coating just right—crispy but not greasy, tender chicken inside. Over the years, I kept tweaking the spice blend and oil temperature, learning that patience and heat are everything. Now, it’s become a go-to for quick dinners, snack emergencies, or even game nights with friends.
- heading: ‘A Nostalgic Snack Reborn’
Trivia and Origins
- Chicken popcorn likely evolved as a fun finger food at fairs and carnivals, combining ease of eating with a satisfying crunch.
- In some regions, it’s tied to street food traditions where quick, portable snacks became popular among busy crowds.
- The concept of breaded, bite-sized chicken dates back to early fried chicken recipes, but the popcorn style gained fame in American snack culture during the late 20th century.
- It shares roots with other snack foods like chicken nuggets and fish sticks, all born from the desire to turn familiar ingredients into easy, shareable bites.
Ingredient breakdown: key components
- Chicken breast: I prefer skinless, boneless breasts—they stay juicy but need a good pounding to tenderize and ensure even cooking. You want that tender bite that’s not dry or rubbery.
- Egg wash: It’s the glue that makes the coating stick. A little water or milk in the egg makes it cling better—plus, it adds a slight richness when fried.
- Breadcrumbs: I use panko for maximum crunch, but regular fresh bread crumbs work fine if you want a softer bite. Look for that loose, airy texture that crisps up beautifully.
- Spice blend: A pinch of smoked paprika and garlic powder gives it a smoky, savory depth. Adjust the heat with cayenne or chili powder—don’t be shy, but balance it so it’s not overpowering.
- Oil for frying: Neutral oils like vegetable or canola heat evenly and stay stable at high temps. The sizzle and crackle when the chicken hits the oil should be loud and inviting, not faint.
- Coating mixture: A mix of flour and breadcrumbs helps create that perfect crispy shell. If it feels too dry, spritz a little water into the coating for better adhesion—crispy magic happens when it’s just right.
- Optional: cornstarch or potato starch in the coating can add extra crispness, like that irresistible crunch that lasts even after cooling.
Spotlight on key ingredients
Chicken breast:
- I prefer skinless, boneless breasts—they stay juicy but need a good pounding to tenderize and ensure even cooking. You want that tender bite that’s not dry or rubbery.
- Egg wash: It’s the glue that makes the coating stick. A little water or milk in the egg makes it cling better—plus, it adds a slight richness when fried.
- Breadcrumbs: I use panko for maximum crunch, but regular fresh bread crumbs work fine if you want a softer bite. Look for that loose, airy texture that crisps up beautifully.
Breadcrumbs & Oil:
- Spice blend: A pinch of smoked paprika and garlic powder gives it a smoky, savory depth. Adjust the heat with cayenne or chili powder—don’t be shy, but balance it so it’s not overpowering.
- Oil for frying: Neutral oils like vegetable or canola heat evenly and stay stable at high temps. The sizzle and crackle when the chicken hits the oil should be loud and inviting, not faint.
- Coating mixture: A mix of flour and breadcrumbs helps create that perfect crispy shell. If it feels too dry, spritz a little water into the coating for better adhesion—crispy magic happens when it’s just right.
Notes for ingredient swaps
- Dairy-Free: Use almond milk or water instead of eggs; it might slightly affect the coating’s adhesion but keeps it vegan-friendly.
- Gluten-Free: Swap regular breadcrumbs for almond flour or gluten-free panko; expect a nuttier flavor and slightly less crunch.
- Low-Sodium: Opt for unsalted breadcrumbs and skip added salt in the coating; you’ll want to enhance with herbs or spices instead.
- Spicy Kick: Add cayenne or chili powder to the coating for extra heat; balance it with a touch of honey or sugar if desired.
- Herb Variations: Mix dried herbs like thyme or oregano into the breadcrumb coating for aromatic twists; fresh herbs work too, just chop finely.
- Oil Choices: Use coconut or avocado oil for different flavors and higher smoke points; note that these oils can influence the final taste subtly.
- Sweet Touch: Brush cooked chicken with honey or maple syrup before serving for a glossy, slightly sweet finish—be cautious of splatters during frying.
Equipment & Tools
- Sharp knife: For cutting and pounding chicken.
- Shallow bowls: For egg wash and coating mixture.
- Large skillet with high sides: For frying evenly and safely.
- Slotted spoon: To turn and remove chicken from hot oil.
- Paper towels or wire rack: For draining excess oil.
Step-by-step guide to chicken popcorn
- Equipment & Tools: Use a sharp knife for pounding chicken, a shallow bowl for egg wash, a large skillet with high sides for frying, and a slotted spoon for turning. Have paper towels ready for draining.
- Cut chicken breasts into bite-sized pieces, about 2 cm (3/4 inch). Pound gently to even thickness, around 1 cm (0.4 inch). Set aside.
- Prepare the coating stations: In one bowl, beat 2 eggs with a splash of water; in another, mix 1 cup panko breadcrumbs, 1/4 cup flour, 1 tsp smoked paprika, 1/2 tsp garlic powder, and a pinch of salt.
- Dip each chicken piece into the egg wash, letting excess drip off. Coat thoroughly in breadcrumb mixture, pressing gently so it sticks well.
- Heat about 1.5 cm (half inch) of oil in the skillet over medium-high heat (around 180°C/355°F). Test with a breadcrumb — it should sizzle immediately.
- Carefully place chicken pieces into hot oil in batches. Fry for about 3-4 minutes, turning once, until golden and crispy. Watch for a rich, golden color and a crackling sound.
- Remove chicken with a slotted spoon. Drain on paper towels. Repeat with remaining chicken, maintaining oil temperature.
- Resting & Finishing: Let the chicken cool slightly on a wire rack for 2 minutes. Serve immediately with your favorite dipping sauces, or as a snack on the go.
- Checkpoints & How to Know It’s Done: The coating should be golden and crispy, not pale or soggy. The chicken should register 75°C (165°F) internally. It should feel firm but tender when pressed, with no raw pink inside.
Let the chicken rest for 2 minutes on a wire rack. Serve hot with dips or as part of a snack platter, ensuring the coating remains crispy and the chicken juicy.
How to Know It’s Done
- Golden brown color and crackling sound indicate doneness.
- Internal temperature reaches 75°C (165°F).
- Chicken feels firm but tender when pressed, with no pink.
Chicken Popcorn
Ingredients
Equipment
Method
- Begin by cutting the chicken breasts into small, bite-sized pieces, about 2 centimeters each. Gently pound them with a meat mallet or the back of a heavy pan to ensure an even, tender thickness.
- Set up your breading station: in one shallow bowl, beat the eggs with a splash of water; in another, combine panko breadcrumbs, flour, smoked paprika, garlic powder, and a pinch of salt if using.
- Dip each piece of chicken into the egg mixture, making sure it’s coated evenly, then transfer it to the breadcrumb mixture, pressing gently to help the coating stick well.
- Pour vegetable oil into a large skillet to a depth of about 1.5 centimeters and heat it over medium-high heat until it reaches around 180°C (355°F). To test if it’s ready, drop a small piece of breadcrumb — it should sizzle loudly and turn golden quickly.
- Carefully place the coated chicken pieces into the hot oil in small batches, avoiding overcrowding. Fry each batch for about 3 to 4 minutes, turning occasionally, until the chicken is golden brown and crispy.
- Use a slotted spoon to remove the chicken popcorn from the oil and drain on paper towels or a wire rack to remove excess oil. Repeat with remaining pieces, maintaining the oil temperature.
- Once all the chicken is cooked, let it rest for a couple of minutes. The coating will firm up further, and the aroma of crispy fried chicken will fill your kitchen.
- Serve your homemade chicken popcorn hot, paired with your favorite dipping sauces like honey mustard, ranch, or spicy mayo for a nostalgic, crunchy snack that’s perfect for sharing.
Notes
Pro tips for perfect chicken popcorn
- Use panko breadcrumbs for maximum crunch and airy texture that crisps up beautifully.
- Keep the oil temperature steady at around 180°C (355°F) to avoid soggy coating or burnt crust.
- Dip chicken pieces into the egg wash thoroughly—this helps the coating stick better and creates a crispy shell.
- Rest the cooked chicken popcorn on a wire rack for 2 minutes to maintain crispiness and avoid sogginess from condensation.
- When frying in batches, don’t overcrowd the pan—this cools the oil and leads to uneven cooking and soggy coating.
- Add a pinch of salt to the breadcrumb mixture for enhanced flavor—skip if using salted breadcrumbs or seasoning.
- For extra crispness, sprinkle a little cornstarch into the flour or breadcrumb coating before frying—crunch that lasts.
Common mistakes and how to fix them
- FORGOT to dry chicken properly → Pat dry to prevent splatter.
- DUMPED excess oil too quickly → Let it drain for crunch and safety.
- OVER-TORCHED coating → Lower heat slightly to avoid burnt crust.
- MISSED seasoning in coating → Add spices directly into breadcrumbs for even flavor.
Quick fixes and pantry swaps
- If oil splatters, splash some flour on the chicken first to reduce mess.
- When coating feels too sticky, patch with a little extra breadcrumbs and press gently.
- Splash a small amount of water if coating isn’t sticking well—crispness benefits from a light spritz.
- When chicken isn’t crispy enough, rescue by increasing oil temperature slightly and frying in smaller batches.
- Pan with shimmer when oil is ready? Swap for fresh oil if it’s dull or faintly smoky.
Prep, store, and reheat tips
- Prepping the chicken: Cut and pound the chicken pieces a day ahead, then refrigerate covered for up to 24 hours. The texture remains tender and ready for coating.
- Breading station: You can set up your egg wash and breadcrumb mixture in advance, cover with plastic wrap, and keep in the fridge for up to 2 hours—just give it a quick stir before use to keep ingredients combined.
- Storage of fried chicken: Once cooled, store leftovers in an airtight container in the fridge for up to 3 days. The coating may lose some crispness, but the juicy interior stays nice.
- Reheating: Warm in a hot oven at 180°C (355°F) for about 8-10 minutes until the coating crisps again and smells freshly fried. Avoid microwaving, as it makes the coating soggy and loses crunch.
Top questions about chicken popcorn
1. Can I use chicken thighs instead?
Use skinless, boneless chicken breasts for tenderness and juiciness. Cut into bite-sized pieces to ensure even cooking and easy eating.
2. Can I substitute chicken with another meat?
Yes, but thighs have more fat and are juicier. They may require slightly less cooking time to avoid dryness.
3. What breadcrumbs should I use?
Panko breadcrumbs give the best crunch, but regular breadcrumbs work fine if you prefer a softer shell or don’t have panko.
4. How do I know when the oil is hot enough?
Keep the oil temperature steady at around 180°C (355°F). If too hot, coating burns; if too cool, chicken gets soggy.
5. How many chicken pieces can I fry at once?
Fry in small batches to maintain oil temperature and ensure crispy coating. Overcrowding cools the oil and soggifies the chicken.
6. Can I bake instead of fry?
Yes, you can bake the coated chicken at 200°C (390°F) for about 15-20 minutes, flipping halfway. Expect slightly less crispness.
7. How long does cooked chicken popcorn last?
Store leftovers in an airtight container in the fridge for up to 3 days. Reheat in a hot oven for best crispiness.
8. How do I know when it’s fully cooked?
Ensure chicken reaches an internal temperature of 75°C (165°F). The coating should be golden and crispy, not soggy or pale.
9. Can I make it less spicy?
Adjust spices in the coating to taste. For extra heat, add cayenne or chili powder; for milder flavor, keep it simple.
10. What oil should I use for frying?
Use neutral oils like vegetable or canola for a clean flavor and high smoke point. Olive oil can burn easily at high temps.
Chicken popcorn might seem like a simple snack, but it’s surprisingly satisfying when made right. The aroma of crispy, seasoned chicken filling the kitchen is a reminder of how comforting good homemade food can be. It’s a messy, honest process—perfect for those nights when you want something crunchy and familiar.
This recipe is a little nostalgic, a little chaotic, but totally worth it for that first perfect bite. When the chicken hits your tongue—crispy outside, juicy inside—it all makes sense. Sometimes, the best bites come from a bit of improvisation and a lot of love.

Hi, I’m Emily Carter, the creator and recipe developer behind Salt Strategist. I’m so happy you’re here. This blog is where my love for flavor, creativity, and thoughtful cooking comes together in one beautiful, ever evolving space.


