Mini sliders might seem like casual party food, but there’s a real art to balancing their flavors and textures. It’s about tiny adjustments—like a splash of tangy pickles or a smear of smoky sauce—that can turn a simple bite into something memorable. I love experimenting with toppings, trying to find that perfect harmony between juicy meat, crisp toppings, and soft buns. Sometimes, it’s the little details that make all the difference.
These sliders are my go-to for making a crowd feel special without fuss. They’re flexible enough for any occasion—weekend get-togethers, game nights, even quick weeknight dinners. What keeps me coming back is how a small change in condiments or cheese can completely shift the vibe of each slider. It’s honest cooking, but with a touch of personal flair.
There’s a kind of charm in their simplicity, but don’t let that fool you into thinking they’re basic. I’m always tweaking my toppings, aiming for that perfect bite—something juicy, a little tang, with a hint of crunch. It’s a reminder that great flavor doesn’t have to come from complicated techniques, just thoughtful tweaks and good ingredients.
Focusing on the art of balancing flavors and textures in mini sliders, this recipe emphasizes how small changes in toppings and condiments can elevate the entire experience, making each bite feel like a gourmet treat despite its humble size.
Small Bites, Big Flavors
- I love how these sliders bring back childhood memories of summer cookouts, simple and smoky in the best way.
- There’s a thrill in customizing each mini slider with unique toppings—it feels like tiny personal pizzas.
- Sometimes, I get a little proud when I see friends devour multiple sliders without a second thought.
- These bites are chaos on a plate—messy, juicy, and perfectly imperfect—and I wouldn’t have it any other way.
- Nothing beats the satisfaction of assembling a tray of sliders that looks as inviting as it tastes.
The story behind this recipe
- This recipe was born out of a lazy Sunday afternoon experiment. I had some leftover ground beef and a handful of buns, but I wanted to elevate that simple snack into something a bit more special. I started playing around with toppings—things I’d normally overlook—and suddenly, each slider felt like a tiny, flavorful package. It’s funny how an ordinary moment in the kitchen can spark a small idea that sticks around.
- The real inspiration came from a memory of childhood summer barbecues, where everyone piled their sliders high with pickles and mustard. I wanted to recreate that feeling—simple, satisfying, and a little messy. Over time, I’ve tweaked the ingredients, but the core idea remains the same: small bites that pack a punch. It’s honest, unpretentious cooking that’s all about enjoying the little things.
- heading: ‘The story behind this recipe’
Mini Sliders Trivia & Origins
- Mini sliders gained popularity in the 1980s as a fun, handheld party snack, perfect for casual gatherings.
- The term ‘slider’ reportedly comes from the small size, making them easy to eat in one or two bites, ideal for bar settings.
- Early versions of sliders were often made with leftover hamburger patties, turning everyday leftovers into a crowd-pleaser.
- In the 2000s, gourmet variations with fancy cheeses and unique toppings started to emerge, elevating their status.
- Despite their simple appearance, sliders have become a versatile canvas for flavor, blending comfort and creativity.
Key Ingredients and Tips
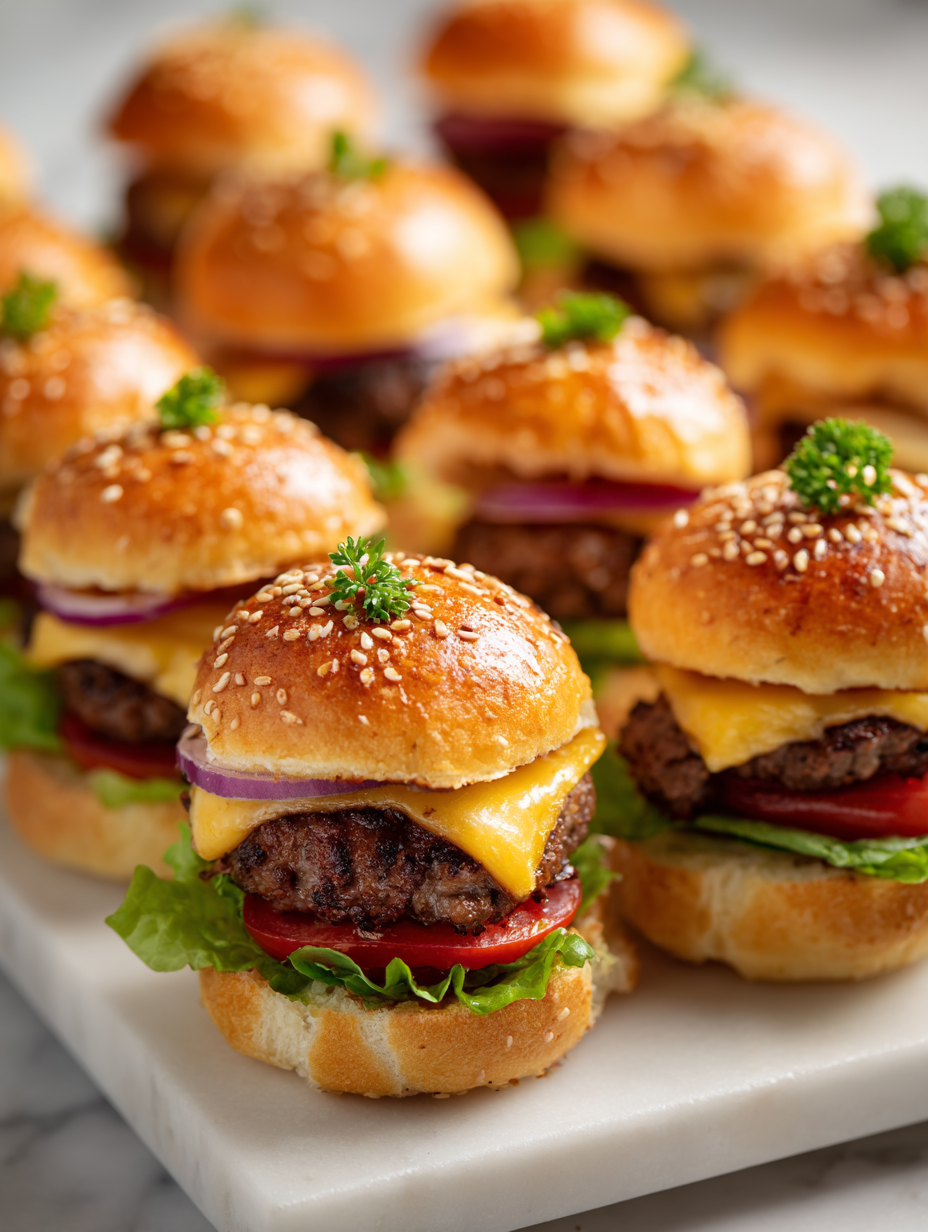
- Ground beef: I prefer a blend of chuck and brisket, which gives a juicy, flavorful bite. Swap with turkey for a leaner option, but expect less richness and more seasoning to compensate.
- Slider buns: Soft, slightly sweet buns hold everything together without falling apart. Consider brioche for extra buttery richness or whole wheat for a nuttier flavor.
- Cheese slices: Melty cheddar or American are classic, adding creamy saltiness. Try pepper jack for a spicy kick or Swiss for a milder, nutty note.
- Pickles: Crisp, vinegary slices cut through the richness and add brightness. Ditch them if you prefer a cleaner, milder flavor or use bread-and-butter for sweetness.
- Onions: Thinly sliced red onions bring a sharp crunch, but caramelized onions add sweetness and depth. Use fresh herbs for a burst of freshness instead.
- Condiments: Ketchup, mustard, and mayo are staples, but mixing in a touch of hot sauce or smoky BBQ sauce can elevate the flavor profile. Adjust to your taste for more punch or creaminess.
- Toppings: Lettuce, tomato, and bacon are my favorites for contrast and texture. Feel free to skip or substitute with sautéed mushrooms or jalapeños for a different vibe.
Spotlight on key ingredients
Ground beef & Slider buns:
- Ground beef: I prefer a blend of chuck and brisket, which gives a juicy, flavorful bite. Swap with turkey for a leaner option, but expect less richness and more seasoning to compensate.
- Slider buns: Soft, slightly sweet buns hold everything together without falling apart. Consider brioche for extra buttery richness or whole wheat for a nuttier flavor.
Notes for ingredient swaps
- Dairy-Free: Swap regular cheese for plant-based slices—still melty, but less creamy and a bit milder in flavor.
- Gluten-Free: Use lettuce wraps or gluten-free slider buns—might lose some softness but keep the handheld vibe.
- Lower-Sodium: Opt for low-sodium condiments and cheese—your sliders will taste less salty but still flavorful with fresh toppings.
- Vegan: Replace beef with seasoned lentil or mushroom patties—earthy and hearty, just a different kind of bite.
- Sweet Buns: Substitute with brioche or croissant halves—rich, buttery, and a touch more decadent, if that’s your thing.
Equipment & Tools
- Cast-iron skillet or heavy pan: Provides even heat for searing the patties.
- Spatula: To flip and press the sliders gently.
- Small knife: For slicing buns and preparing toppings.
- Baking sheet or tray: For toasting buns evenly.
Step-by-step guide to mini sliders
- Equipment & Tools: Gather a cast-iron skillet or heavy-bottomed pan, a spatula, a small knife, and a baking sheet for toasting buns.
- Prepare the Patties: Divide 500g ground beef into 4 equal portions (~125g each). Gently form into small, flat rounds about 2 inches in diameter. Avoid overworking the meat to keep sliders tender.
- Preheat your skillet over medium-high heat (~200°C / 390°F). When hot, add a little oil if needed—just enough to prevent sticking.
- Cook the Patties: Place each beef patty in the skillet. Cook for about 2-3 minutes per side until browned, juices run clear, and internal temp reaches 71°C / 160°F. If juices pool, press lightly to encourage even searing.
- Check for color and smell: the edges should be deeply caramelized, and the beef should smell rich and meaty. If they stick, give a gentle nudge with your spatula—they should release easily when ready.
- Toast the Buns: While patties cook, slice buns in half and toast cut sides in a dry skillet or oven at 180°C / 350°F for 2-3 minutes until golden and slightly crispy.
- Assemble the Sliders: Add cheese slices (cheddar or American) on hot patties, allowing them to melt for about 30 seconds. Place each patty on the toasted buns.
- Finish & Serve: Add toppings like pickles, onions, and condiments. Cap with the top bun, give a gentle press, and serve immediately for best juiciness.
- Rest & Plate: Let sliders sit for 1 minute to settle juices. Serve on a platter with napkins—messy bites are part of the charm.
- Check for doneness: The beef should be juicy, slightly caramelized on the outside, with cheese melted and toppings fresh. The buns should be crispy and warm.
Let the assembled sliders rest for 1 minute. Serve immediately with extra napkins. For presentation, arrange on a platter, letting the toppings peek out for a casual, inviting look.
How to Know It’s Done
- Juices run clear from the beef and internal temperature hits 71°C / 160°F.
- Burgers are deeply caramelized on the edges, with a rich aroma.
- Cheese is fully melted, buns are toasted golden, and toppings are fresh and vibrant.
Mini Sliders
Ingredients
Equipment
Method
- Gather your ingredients and tools: a cast-iron skillet, spatula, small knife, and baking sheet.
- Divide the ground beef into four equal portions and gently form each into small, flat patties about 2 inches in diameter. Avoid overworking the meat to keep the sliders tender and juicy.
- Preheat your skillet over medium-high heat until it’s hot and slightly shimmering. Add a tiny bit of oil if needed to prevent sticking.
- Place the beef patties in the skillet, leaving space between each. Cook for about 2-3 minutes until the edges are deeply caramelized and browned.
- Flip each patty carefully with the spatula and cook for another 2-3 minutes until the second side is browned and the juices run clear. Place a slice of cheese on each patty during the last 30 seconds to melt.
- While the patties cook, slice the buns in half and toast them cut-side down in the skillet or in a preheated oven at 180°C (350°F) for 2-3 minutes until golden and crispy.
- Mix mayonnaise and mustard in a small bowl to make a simple sauce. Spread this mixture on the bottom buns for a flavorful base.
- As the cheese melts, assemble each slider by placing a beef patty on the bottom bun, then topping with pickles, thinly sliced red onions, and a dollop of sauce.
- Cap each slider with the top bun, gently pressing down to secure the toppings. Serve immediately while the patties are juicy and the buns are crispy.
- Enjoy these messy, flavorful mini sliders with extra napkins—the perfect crowd-pleaser for any occasion!
Pro Tips for Perfect Sliders
- Bolded mini-head: Use high heat to sear the patties quickly, developing a flavorful crust and locking in juices.
- Bolded mini-head: Press down gently when flipping to ensure even contact and a nice caramelized surface.
- Bolded mini-head: Toast buns cut-side down in the pan for a few seconds until golden, adding extra crunch.
- Bolded mini-head: Let the cooked sliders rest for a minute before assembling, to keep the juices from spilling out.
- Bolded mini-head: Mix a splash of water into the skillet after cooking to loosen browned bits for a quick, flavorful pan sauce.
- Bolded mini-head: Keep toppings simple but vibrant—fresh pickles and crisp lettuce add just the right contrast.
- Bolded mini-head: For extra flavor, lightly season the beef with salt and pepper just before forming the patties.
Common mistakes and how to fix them
- FORGOT to adjust heat → Keep an eye on flame to prevent burning the sliders.
- DUMPED ingredients too early → Let patties develop a deep caramelization before flipping.
- OVER-TORCHED buns → Toast buns gently, watching for golden edges, not dark char.
- MISSED resting time → Allow sliders to sit for 1 minute to lock in juices and flavors.
Quick Fixes and Pantry Swaps
- When sauce shimmers and smells rich, it’s ready to coat your sliders.
- Splash a little water in the pan if beef sticks—quick steam helps loosen bits.
- Patch over burnt buns with a damp cloth—no one will notice the crisp edges.
- Dumped out too much juice? Rest sliders for 1 minute to redistribute juices inside.
- When in doubt, swap breadcrumbs for crushed crackers—adds crunch and stabilizes texture.
Prep, store, and reheat tips
- Prepping the patties ahead: Shape the beef into small discs, wrap tightly, and refrigerate up to 24 hours for easy assembly.
- Storage: Keep cooked sliders in an airtight container in the fridge for up to 2 days. Reheat within 2 days for best texture.
- Shelf life: Flavors may mellow slightly after a day or two, but they stay juicy if stored properly. Avoid freezing to keep buns fresh.
- Reheating: Warm in a skillet over medium heat (~150°C / 300°F) for 3-4 minutes, covered loosely, until heated through and cheese melts. Check for steam and hotness.
Top questions about mini sliders
1. How do I know when the sliders are cooked properly?
Use a meat thermometer to ensure the beef reaches 71°C / 160°F for safety. Juices should run clear, and the outside should be deeply caramelized.
2. Can I prepare the patties in advance?
Yes, you can make the patties ahead of time, wrap them tightly, and refrigerate for up to 24 hours. Assemble and cook just before serving.
3. How do I keep the buns from getting soggy?
If the buns are too soft and soggy, toast them lightly in a hot skillet or oven for 2-3 minutes until golden.
4. Can I use different meat for the sliders?
Switch to ground turkey or chicken for a leaner slider. Expect a milder flavor and slightly less juiciness; add seasoning to boost flavor.
5. How do I get a good sear on the patties?
Use a spatula to gently press the patties during cooking for a better sear. Avoid pressing too hard to keep the juices inside.
6. Should I season the beef before cooking?
Add a pinch of salt just before forming the patties to enhance flavor. Consider seasoning the meat mixture for more depth.
7. How do I reheat sliders without drying them out?
Reheat sliders in a skillet over medium heat until warmed through and cheese melts, about 3-4 minutes. Cover loosely for even heating.
8. What if my sliders are too greasy?
If the sliders are too greasy, drain excess fat from the pan or pat the cooked patties on paper towels before assembling.
9. What cheese works best for melting?
Use a mixture of cheddar and American cheese for a melty, flavorful topping. For a different twist, try pepper jack or Swiss.
10. How can I add extra flavor after cooking?
Splash a little water or broth into the pan after cooking to loosen browned bits and create a quick, flavorful pan sauce.
These mini sliders are more than just finger food; they’re a canvas for flavor and texture that make any gathering feel a little more special. The way the savory beef, melty cheese, and crisp toppings come together — it’s honest, simple, and deeply satisfying.
Whenever I make these, I remember that good food doesn’t need to be complicated. Sometimes, it’s just about balancing a few key ingredients and enjoying the mess and the moments that come with it. They’re perfect for sharing, and honestly, they remind me to keep things straightforward in the kitchen.

Hi, I’m Emily Carter, the creator and recipe developer behind Salt Strategist. I’m so happy you’re here. This blog is where my love for flavor, creativity, and thoughtful cooking comes together in one beautiful, ever evolving space.


