Mini empanadas started as a way for me to enjoy a hearty, satisfying snack without feeling overwhelmed by a big plate. There’s something about the perfect pocket of flaky crust filled with savory goodness that feels just right, especially when I want something portable and easy to share. It’s also a clever way to use up leftovers, turning them into something new and exciting.
I love how these little bites make me feel like I’ve got control—smaller portions mean less waste, more variety on the table, and a fun challenge to get the filling just right. Plus, they’re perfect for unexpected guests or quick lunches, and I can batch them ahead for busy mornings. It’s honestly a small act that turns into a small celebration every time I make them.
Focusing on making mini empanadas as a way to control portion sizes and reduce waste, turning a traditional dish into a practical, snackable treat that’s perfect for sharing or solo indulgence.
Portion Control with a Classic Twist
- These tiny empanadas remind me of lazy Sunday afternoons at my grandmother’s house, where the smell of sizzling filling would fill the air, making everyone smile.
- There’s a quiet joy in shaping each little pocket—kind of meditative, like a small act of love that turns into a snack.
- Sometimes I get frustrated trying to roll out the dough evenly, but then I remember that imperfection makes them charm even more.
- Baking these always sparks a rush of pride—especially when they come out golden, flaky, and just the right size for popping in your mouth.
- Sharing a tray of these at a party feels like passing out tiny, savory hugs—simple, satisfying, and just enough to keep everyone coming back.
The story behind this recipe
- Making these mini empanadas took me back to a trip I took to Argentina, where street vendors constantly handed out warm, flaky pockets filled with spicy beef. It was the first time I realized how a simple handheld snack could be so full of life, with textures that crunch and fillings that burst with flavor.
- I started experimenting in my own kitchen, trying to recreate that perfect bite—smaller, more manageable, but just as satisfying. Each batch became a little adventure, tweaking fillings and perfecting that flaky crust. Now, they’re my go-to for casual gatherings, and I love how versatile they are for leftovers or spontaneous bites.
- heading: ‘The story behind this recipe’
Mini Empanadas’ Surprising Heritage
- Mini empanadas have roots in Spanish and Latin American cuisine, where portable snacks were essential for busy markets and festivals.
- Traditionally, these small pockets were filled with leftovers, turning day-old stews into fresh, hand-held bites that traveled easily.
- In Argentina, street vendors have been serving warm, flaky empanadas for over a century, each region boasting its own filling and spice blend.
- The concept of tiny, shareable snacks gained popularity in recent years, aligning with the modern desire for manageable, mess-free eating.
- Making mini empanadas at home connects me to generations of cooks who valued practicality and flavor, wrapped into one little package.
Key Ingredients Breakdown
- Flour: I prefer a mix of all-purpose and a touch of cake flour for a tender, flaky crust that melts in your mouth. Feel free to use just all-purpose if that’s what you have, but watch the texture.
- Cold butter: I cut my butter into small cubes and keep it chilled until mixing. The cold fat creates those flaky layers when baked—don’t skip this step if you want that crispy bite.
- Filling options: I love a savory beef and onion mix seasoned with smoked paprika and cumin—smoky and rich. But you can swap in shredded chicken or even seasoned lentils for a vegetarian twist, just adjust the spices accordingly.
- Egg wash: Brushed on just before baking, it gives the empanadas a shiny, golden crust. For a vegan version, I sometimes use a little plant-based milk with a pinch of turmeric for color.
- Onion and garlic: Sauté until fragrant and golden, filling the kitchen with that comforting smell. Skip or reduce if you need a milder filling, but I find they add a warm depth.
- Seasonings: I keep it simple with salt, pepper, and a hint of chili flakes for a little kick. Feel free to add fresh herbs like cilantro or parsley for brightness, especially if serving with a fresh salsa.
- Optional extras: I sometimes toss in a handful of chopped olives or raisins for a salty-sweet contrast. These little surprises make each batch unique and memorable.
Spotlight on key ingredients
Flour and Butter:
- Flour: I prefer a mix of all-purpose and a touch of cake flour for a tender, flaky crust that melts in your mouth. Feel free to use just all-purpose if that’s what you have, but watch the texture.
- Cold butter: I cut my butter into small cubes and keep it chilled until mixing. The cold fat creates those flaky layers when baked—don’t skip this step if you want that crispy bite.
- Filling options: I love a savory beef and onion mix seasoned with smoked paprika and cumin—smoky and rich. But you can swap in shredded chicken or even seasoned lentils for a vegetarian twist, just adjust the spices accordingly.
Onion and Garlic:
- Sauté until fragrant and golden, filling the kitchen with that comforting smell. Skip or reduce if you need a milder filling, but I find they add a warm depth.
- Seasonings: I keep it simple with salt, pepper, and a hint of chili flakes for a little kick. Feel free to add fresh herbs like cilantro or parsley for brightness, especially if serving with a fresh salsa.
- Optional extras: I sometimes toss in a handful of chopped olives or raisins for a salty-sweet contrast. These little surprises make each batch unique and memorable.
Notes for ingredient swaps
- Gluten-Free: Use a blend of rice flour and tapioca starch. The texture will be a bit more delicate and less flaky, but still satisfying.
- Dairy-Free: Swap butter for coconut oil or vegan margarine. Expect a slightly different flavor profile and a softer crust.
- Low-Sodium: Omit or reduce added salt in the dough and filling. Enhance flavor with herbs or a splash of lemon juice instead.
- Vegetarian: Replace the meat filling with seasoned lentils, mushrooms, or a mixture of sautéed vegetables for a hearty, plant-based option.
- Spice Variations: Add cumin, smoked paprika, or chili powder to customize the heat and smoky notes to your preference.
- Egg Wash: Use a plant-based milk mixed with a teaspoon of maple syrup for a shiny, golden finish without eggs.
- Filling Add-ins: Incorporate chopped olives, raisins, or cheese for added flavor surprises, adjusting spices accordingly.
Equipment & Tools
- Small rolling pin: To roll out the dough evenly.
- Round cutter (8cm diameter): To cut perfect circles for filling.
- Baking sheet: To hold and bake the empanadas.
- Pastry brush: To brush the tops with egg or plant milk.
- Mixing bowl: To prepare and combine the dough and filling ingredients.
Step-by-step guide to mini empanadas
- Equipment ready: a small rolling pin, a round cutter (about 8cm diameter), a baking sheet, a pastry brush, and a mixing bowl.
- Prepare the dough: In a large bowl, whisk 2 cups all-purpose flour with 1/2 teaspoon salt. Add 1/2 cup cold, diced butter. Using your fingertips or a pastry cutter, quickly rub the butter into the flour until the mixture resembles coarse crumbs. Add 1/4 cup ice-cold water gradually, mixing until the dough just comes together. Knead lightly, then wrap in plastic and chill for 20 minutes.
- Make the filling: While the dough chills, heat a tablespoon of oil in a skillet over medium heat (around 160°C/320°F). Add 1 finely chopped onion and 2 minced garlic cloves; sauté until fragrant and golden, about 5 minutes. Stir in 200g ground beef or shredded chicken, season with salt, pepper, smoked paprika, and cumin. Cook until browned and cooked through, about 8 minutes. Let cool slightly.
- Roll out the dough: Lightly flour a clean surface and your rolling pin. Divide the chilled dough in half. Roll each portion out to about 3mm thickness, aiming for a roughly 20cm square. Keep the remaining dough covered to prevent drying.
- Cut out circles: Use the round cutter to stamp out 8cm diameter circles from the rolled dough. Gather the scraps and reroll if necessary, but don’t overwork the dough.
- Fill and fold: Place a heaping teaspoon of filling in the center of each circle. Fold the dough over to create a half-moon shape. Pinch the edges firmly together, then crimp with a fork to seal.
- Bake: Preheat your oven to 200°C (390°F). Arrange the empanadas on a parchment-lined baking sheet. Brush the tops with beaten egg or plant-based milk for shine. Bake for 20-25 minutes, until golden and crispy.
- Cooling and serving: Let the empanadas rest for 5 minutes on a wire rack. Serve warm or at room temperature, perhaps with a dollop of salsa or a squeeze of lemon for extra brightness.
Allow the baked empanadas to rest for 5 minutes on a wire rack. Serve warm or at room temperature, pairing with your favorite salsa or fresh herbs for a bright finish.
How to Know It’s Done
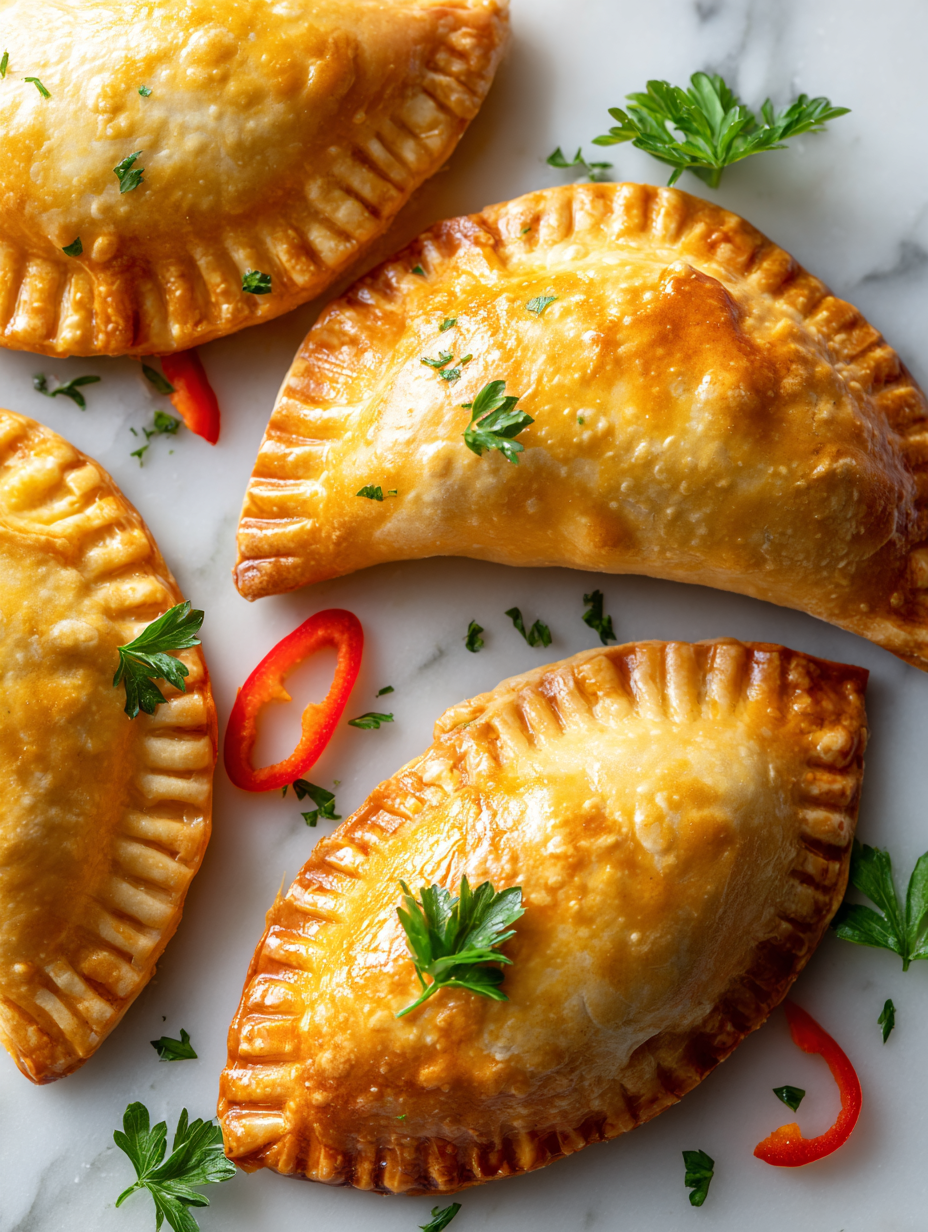
- Crust is golden and flaky, with visible layers and a slight crackle when bitten.
- Filling is cooked through, hot, and slightly juicy inside the crust.
- Edges are sealed tightly, with no filling oozing out during baking.
Mini Empanadas
Ingredients
Equipment
Method
- In a mixing bowl, whisk together the flour and salt. Add the chilled butter cubes and quickly rub them into the flour with your fingertips or a pastry cutter until the mixture resembles coarse crumbs.
- Gradually add ice-cold water, a tablespoon at a time, mixing gently until the dough just comes together. Knead lightly, then shape into a flat disk, wrap in plastic, and chill in the fridge for 20 minutes.
- While the dough chills, heat a tablespoon of oil in a skillet over medium heat. Add the chopped onion and minced garlic; sauté until fragrant and golden, about 5 minutes.
- Add the cooked ground beef or shredded chicken to the skillet, season with smoked paprika and cumin, then cook until heated through, about 8 minutes. Remove from heat and let cool slightly.
- Preheat your oven to 200°C (390°F). Lightly flour a clean surface and your rolling pin. Roll out the chilled dough to about 3mm thickness, aiming for a 20cm square.
- Use the round cutter to stamp out 8cm diameter circles from the dough. Reroll scraps if needed, but avoid overworking the dough.
- Place about a teaspoon of filling in the center of each circle. Fold the dough over to form a half-moon shape and pinch the edges together, then crimp with a fork to seal.
- Arrange the filled empanadas on a parchment-lined baking sheet. Brush the tops with beaten egg for a shiny finish.
- Bake in the preheated oven for 20-25 minutes, until golden brown and crispy. The crust should crackle gently when done.
- Remove from oven and let cool for 5 minutes. Serve warm or at room temperature, perhaps with a side of salsa or fresh herbs.
Pro tips for perfect empanadas
- Keep ingredients cold → Cold butter creates flaky, layered crusts that shatter when you bite.
- Don’t overwork dough → Handle minimally to prevent tough, dense empanadas; just enough to bring it together.
- Seal edges well → Pinch or crimp firmly to keep filling from escaping during baking.
- Use egg wash sparingly → Lightly brush for a shiny, golden finish without pooling or drips.
- Watch oven temp → Bake at 200°C (390°F) until tops are deeply golden and crusts crackle gently.
- Rest before serving → Let baked empanadas sit for 5 minutes to settle and avoid sogginess.
- Fill with cooled filling → Warm filling can leak or make crust soggy; cool slightly for neat pockets.
Common mistakes and how to fix them
- FORGOT to chill the butter → Use cold butter for flaky layers.
- DUMPED filling in hot → Let filling cool slightly before filling empanadas.
- OVER-TORCHED edges → Shield edges with foil if browning too fast.
- MISSED sealing → Crimp edges firmly or use a fork to prevent leaks.
Quick fixes and pantry swaps
- When filling leaks, seal edges quickly with a damp finger or fork.
- If empanadas are too dry, brush with a little butter or oil before baking.
- Splash a few drops of water on the dough if it feels too stiff to roll out smoothly.
- Patch cracked crusts by gently pressing the edges back together with a finger or fork.
- Shield over-browning edges with foil if they turn golden too fast, especially in hot ovens.
Prep, store, and reheat tips
- Prep the dough and filling a day ahead; keep both wrapped tightly in the fridge. The dough will be firmer, making it easier to handle later.
- Empanadas can be assembled up to 24 hours in advance; store them on a baking sheet covered with plastic wrap in the fridge. The crust may soften slightly, so bake straight from cold for best crunch.
- Shelf life: Keep baked empanadas in an airtight container in the fridge for up to 3 days. They may lose some crispness but can be refreshed in the oven.
- Reheating: Warm in a 180°C (350°F) oven for 10-12 minutes until crispy and heated through. For a quick fix, microwave for 30 seconds, but crust won’t be as crunchy.
- Sensory note: Reheated empanadas smell warm and savory, with a crispy exterior and tender filling that retains its flavor even after a day.
Top questions about mini empanadas
1. How do I prevent filling from leaking out?
Use a sharp knife or a round cutter to get clean, even circles that seal well. Dampen edges slightly for a better seal.
2. How do I know when they’re done?
Bake at 200°C (390°F) until golden and crispy, about 20-25 minutes. The crust should crackle when you bite into it.
3. Should I let them cool before eating?
Let them rest for 5 minutes after baking. The filling stays hot and juicy, and the crust firms up.
4. Can I prepare the filling ahead of time?
Use room temperature or slightly chilled filling to prevent sogginess and help maintain a crisp crust.
5. Can I freeze these for later?
Yes, freeze unbaked empanadas on a tray, then transfer to a bag for up to 3 months. Bake directly from frozen, adding 5-7 minutes.
6. What’s the best way to get a shiny crust?
Brush with a beaten egg or plant-based milk before baking for a shiny, golden finish. Vegan options give a softer crust.
7. How do I get flaky crusts?
Use cold butter and don’t overwork the dough to keep it flaky. Handle minimally and chill well before rolling.
8. Should the filling be hot or cooled?
Fill cooled filling into the dough to prevent sogginess. Keep filling slightly chilled for easier handling.
9. Can I customize the filling?
Stir in chopped olives or raisins for extra flavor. Adjust spices to match your taste or dietary needs.
10. What if the crust cracks or browns unevenly?
If edges crack, seal with a damp finger or fork. For uneven browning, shield edges with foil during baking.
Making these mini empanadas is a simple way to bring a bit of tradition into the chaos of everyday life. The smell of flaky crust and seasoned filling baking fills the house with warmth, even on the busiest days. They’re not just snacks—they’re small moments of comfort that you can share or keep to yourself.
Every batch feels like a tiny victory, especially when you see how everyone reaches for just one more. In a world that moves fast, these little pockets remind me to slow down and savor the familiar, honest flavors. They’re a humble reminder that good food doesn’t have to be complicated to be meaningful.

Hi, I’m Emily Carter, the creator and recipe developer behind Salt Strategist. I’m so happy you’re here. This blog is where my love for flavor, creativity, and thoughtful cooking comes together in one beautiful, ever evolving space.


