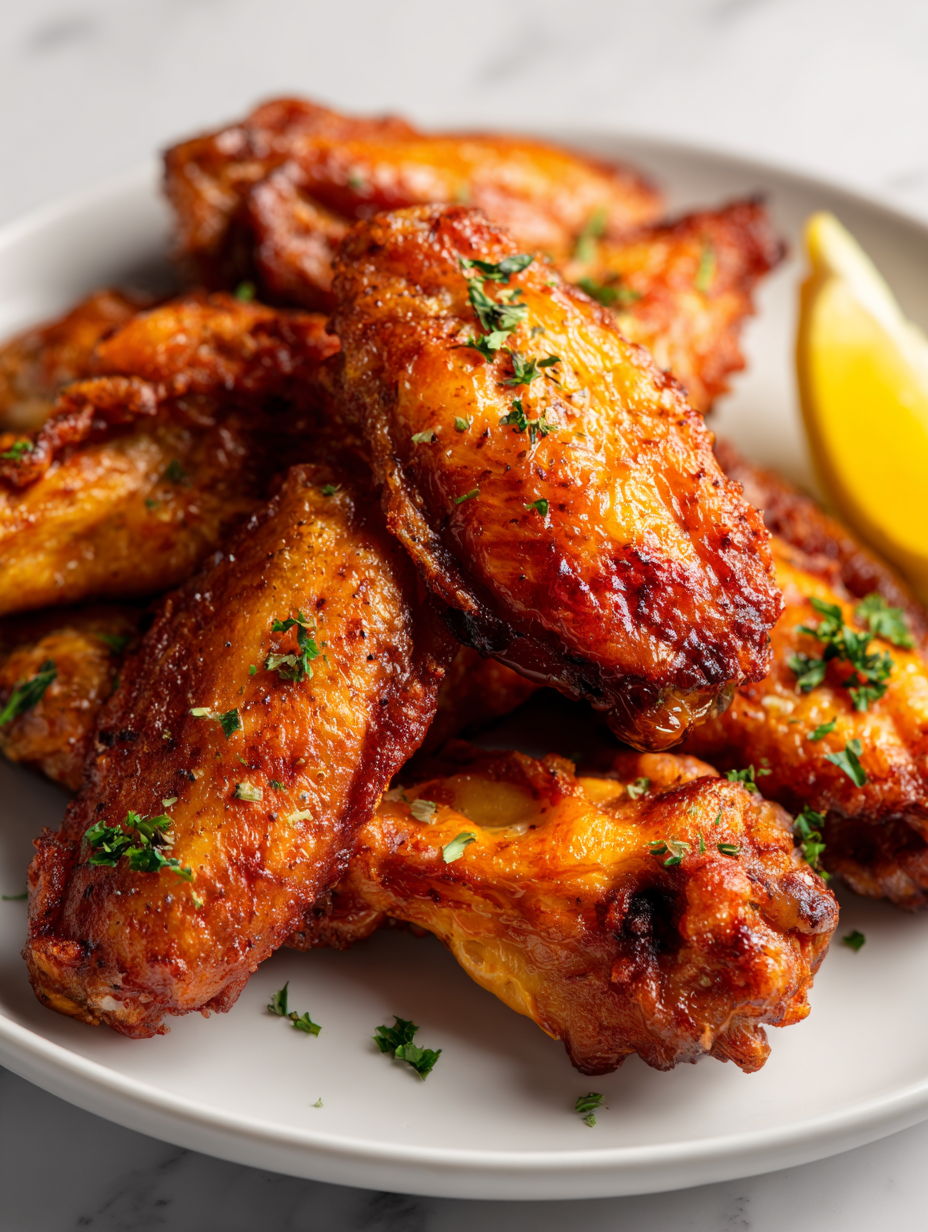
Baking chicken wings might seem straightforward, but if you focus on how they caramelize and develop crispy edges slowly, the game changes. It’s about giving the wings time, patience, and a gentle heat that coax out a smoky, sweet crust while keeping the meat tender and juicy inside. This approach is perfect for those who want that layered flavor without frying or drowning everything in sauce.
I’ve always been drawn to the contrast of textures—those crackly, caramelized bits against tender meat. When I started baking wings this way, it felt like uncovering a hidden secret. The oven’s gentle heat amplifies the natural sugars in the skin, creating a deep, smoky aroma that fills the kitchen and makes every bite feel special. No fuss, just honest, slow-cooked flavor that surprises every time.
Focusing on the overlooked flavor layer of crispy, caramelized edges that develop when baking wings slowly, highlighting the contrast between tender meat and smoky, sweet crust.
The story behind this recipe
- I once had a weekend where I was just craving something familiar, but with a twist—these baked wings came from that need to keep it simple yet satisfying. The idea was to focus on slow caramelization, not rushing through the process, letting the natural sugars develop that smoky, crispy crust. It’s a technique I stumbled upon when I wanted wings that weren’t greasy or overly sauced, but still packed with flavor.
- That first batch was a revelation—the aroma of the baking skin, smoky and sweet, filled the whole house. It became a go-to for casual get-togethers, especially when I wanted something that felt indulgent but didn’t require deep frying or fuss. Every time I make these, I remember how good simple, honest cooking can be—just patience, good heat, and a little attention.
- heading
- story_type
Key ingredients and tips
- Chicken wings: I prefer organic, free-range wings—they’re juicier and have a richer flavor. If you can’t find them, regular wings work fine, just watch the skin for crisping.
- Baking powder: I use aluminum-free baking powder for a cleaner, less metallic taste. It helps the skin crisp up without any weird aftertaste; skip it if you want a leaner option.
- Salt: I like a generous sprinkle of coarse sea salt—adds a lovely crunch and enhances the natural chicken flavor. Cut back if you’re watching sodium, but don’t skimp too much.
- Black pepper: Freshly cracked makes all the difference—sharp and bright. If you want a smoky kick, add a pinch of smoked paprika here, it’s a game-changer.
- Optional spices: I often toss in garlic powder or a dash of cayenne for heat. These add depth to the flavor, but keep it subtle if you prefer milder wings, especially if serving kids.
- Oil or fat: I lightly brush the wings with neutral oil (canola or avocado) for even browning. Too much can make them greasy—less is more for that perfect crisp.
- Lemon juice or vinegar: A squeeze of lemon after baking brightens everything up and cuts through the richness. Skip if you want a more traditional, savory profile.
Spotlight on key ingredients
Chicken wings:
- I prefer organic, free-range wings—they’re juicier and have a richer flavor. If you can’t find them, regular wings work fine, just watch the skin for crisping.
- Baking powder: I use aluminum-free baking powder for a cleaner, less metallic taste. It helps the skin crisp up without any weird aftertaste; skip it if you want a leaner option.
- Salt: I like a generous sprinkle of coarse sea salt—adds a lovely crunch and enhances the natural chicken flavor. Cut back if you’re watching sodium, but don’t skimp too much.
Seasonings & oil:
- Black pepper: Freshly cracked makes all the difference—sharp and bright. If you want a smoky kick, add a pinch of smoked paprika here, it’s a game-changer.
- Optional spices: I often toss in garlic powder or a dash of cayenne for heat. These add depth to the flavor, but keep it subtle if you prefer milder wings, especially if serving kids.
- Oil or fat: I lightly brush the wings with neutral oil (canola or avocado) for even browning. Too much can make them greasy—less is more for that perfect crisp.
Notes for ingredient swaps
- Dairy-Free: Use a splash of apple cider vinegar instead of milk or buttermilk to add tang and moisture.
- Low-Sodium: Swap regular salt with sea salt or Himalayan pink salt for a more nuanced flavor, but keep the amount similar.
- Sweetener: Replace honey with maple syrup for a richer, earthier sweetness that pairs well with smoky spices.
- Gluten-Free: Use cornstarch instead of wheat flour for a light, crispy coating without gluten.
- Herbs & Spices: Omit or swap paprika or garlic powder with smoked paprika or onion powder for different smoky or savory notes.
- Oil: Substitute vegetable oil with avocado oil for a milder flavor and higher smoke point, maintaining crispiness.
- Lemon Juice: Use lime juice or a splash of vinegar for brightness, adjusting acidity based on your taste.
Equipment & Tools
- Wire rack: Elevates the wings for even air circulation and crisping.
- Baking sheet: Supports the wire rack and catches drips.
- Mixing bowl: Tosses the wings with seasoning evenly.
- Tongs: Handles hot wings safely and efficiently.
- Oven thermometer (optional): Ensures accurate oven temperature for consistent results.
Step-by-step guide to baked wings
- Preheat your oven to 220°C (430°F). Set a wire rack inside a baking sheet lined with foil for easy cleanup.
- Pat the chicken wings dry with paper towels. Removing moisture helps them crisp better during baking.
- In a large bowl, toss the wings with 1 tablespoon baking powder and 1 teaspoon salt. The baking powder promotes crispiness.
- Arrange wings in a single layer on the wire rack, skin-side up. Make sure they’re not touching for even heat circulation.
- Bake for 45-50 minutes. After 30 minutes, rotate the tray if your oven heats unevenly. Look for golden, crispy edges.
- Check for doneness: the skin should be deep amber and crackly, juices should run clear, and the meat should jiggle slightly when moved.
- If wings aren’t crispy enough, turn on the broiler for 2-3 minutes, keeping a close eye to prevent burning. They should shimmer with a smoky hue.
- Remove from oven. Let the wings rest for 5 minutes to allow the juices to settle, then toss with your favorite sauce or serve as is.
- Finish by sprinkling with a squeeze of lemon or a sprinkle of fresh herbs for brightness before plating.
Let the wings rest for 5 minutes out of the oven before serving. Toss with sauce or herbs if desired, then plate promptly to enjoy the crispy texture.
How to Know It’s Done
- The skin is deeply golden and crackly, not pale or soggy.
- Juices run clear when pierced, indicating cooked meat.
- The wings jiggle slightly but hold their shape, with no raw or rubbery spots.
Slow-Baked Crispy Chicken Wings
Ingredients
Equipment
Method
- Preheat your oven to 220°C (430°F). Place a wire rack inside a baking sheet lined with foil for easy cleanup.
- Pat the chicken wings thoroughly dry with paper towels to remove excess moisture, which helps them crisp during baking.
- In a large mixing bowl, toss the wings with baking powder, salt, black pepper, and smoked paprika if using. This coating promotes a crispy, caramelized skin.
- Arrange the seasoned wings on the wire rack in a single layer, skin-side up, making sure they aren’t crowded to allow air circulation for even crisping.
- Bake the wings in the oven for 45 to 50 minutes. After about 30 minutes, rotate the tray to ensure even browning. The skin should turn deep amber and crackly as they crisp up.
- Check the wings; they should be deeply golden and crackly, with juices running clear when pierced. If they aren’t crispy enough, turn on the broiler for 2-3 minutes, watching carefully to prevent burning.
- Remove the wings from the oven and let them rest on the rack for about 5 minutes. This allows the juices to redistribute and the skin to firm up further.
- Once rested, squeeze fresh lemon juice over the wings for a bright, tangy finish, if desired. Toss gently to coat or serve as is for maximum crispness.
- Serve immediately to enjoy the full crispy texture and smoky flavor. Pair with your favorite dips or enjoy plain for a satisfying, layered bite.
Essential tips for crispy wings
- Use baking powder sparingly, it’s key to crispy skin—just a light sprinkle makes a difference.
- Pat wings thoroughly dry before seasoning—moisture is the enemy of crispness.
- Arrange wings with space on the rack—crowding traps steam and softens the skin.
- Broil for the last 2-3 minutes—watch closely for that smoky, crackly finish.
- Toss wings in hot sauce or glaze immediately after baking—warmth helps the coating stick and enhances flavor.
Common mistakes and how to fix them
- FORGOT to pat wings dry → Wings won’t crisp; always pat thoroughly with paper towels.
- DUMPED too much oil → Use a light brush; excess oil causes greasy wings and uneven browning.
- OVER-TORCHED in broiler → Watch closely; broil in short bursts to prevent burning and bitterness.
- MISSED resting time → Rest wings 5 minutes for juices to redistribute, ensuring juicy bites.
Quick fixes and pantry swaps
- If wings aren’t crispy, splash a little more baking powder and crank up the oven temp.
- When wings look pale, bump the baking time or briefly broil for extra crackle.
- Splash some lemon juice after baking for brightness if flavors seem dull.
- Patch soggy wings by broiling for 2 minutes; shimmer and crackle will return.
- Shield from moisture by storing wings in a paper-lined container; swap baking powder with cornstarch for quick crisp.
Prep, store, and reheat tips
- You can prep the wings up to a day ahead; dry and season them, then keep covered in the fridge. The skin stays crispy if kept dry.
- Store cooked wings in an airtight container in the fridge for up to 3 days. Reheat in the oven at 180°C (350°F) for 10-15 minutes until crisp, with a smoky aroma filling the air.
- Freeze unbaked wings for up to 2 months; thaw overnight in the fridge. Bake directly from frozen, adding a few extra minutes for crispness.
- Reheating wings can sometimes soften the skin; broil for 2-3 minutes to restore that crackly, smoky crust. Keep an eye to prevent burning.
- Flavor may intensify after sitting; consider tossing with a fresh squeeze of lemon or herbs right before serving for that bright, fresh note.
Top questions about baked chicken wings
1. How long do I bake chicken wings?
Baking wings at 220°C (430°F) for 45-50 minutes usually gets them crispy and golden, with a smoky aroma. Check for crackly skin and juicy meat before serving.
2. Should I dry the wings before baking?
Pat the wings dry thoroughly before seasoning. Excess moisture keeps the skin from crisping and can cause steaming instead of roasting.
3. What’s the role of baking powder?
Use baking powder sparingly—about a tablespoon per pound of wings. It helps create that crackly, crispy skin without adding weird flavors.
4. How should I arrange wings for baking?
Arrange wings on a wire rack with space between each piece. Crowding traps steam, making the skin soggy instead of crispy.
5. Can I crisp the wings further?
Broil the wings for 2-3 minutes at the end if you want extra smoky, crackly edges. Keep a close eye to prevent burning.
6. Should I rest the wings before serving?
Let the wings rest for about 5 minutes after baking. This helps juices redistribute and keeps the meat tender and moist.
7. How do I reheat baked wings?
To reheat, warm the wings in a 180°C (350°F) oven for 10-15 minutes. For extra crispness, broil for a few minutes at the end.
8. Can I prepare wings in advance?
You can prep seasoned wings a day ahead. Keep them uncovered in the fridge to maintain crispness, then bake straight from cold.
9. What if my wings aren’t crispy?
If wings turn out soggy, broil briefly to restore crispness. For a quick fix, a splash of vinegar can brighten flavors if they taste dull.
10. Which spices should I use?
Use fresh cracked black pepper for brightness and depth. Smoked paprika adds a smoky aroma, enhancing the natural chicken flavor.
These baked chicken wings are a reminder that good flavor often comes from patience and simple techniques. When the skin crackles and the aroma of smoky, caramelized edges fills the air, you know you’ve done something right. It’s one of those recipes that feels honest and satisfying, no matter how many times you make it.
In a world of quick fixes, sometimes slow, thoughtful cooking keeps us grounded. Whether for a casual dinner or just because you want to enjoy that perfect balance of tender meat and crispy crust, these wings hold their own. They’re a small, delicious act of taking your time in the kitchen.

Hi, I’m Emily Carter, the creator and recipe developer behind Salt Strategist. I’m so happy you’re here. This blog is where my love for flavor, creativity, and thoughtful cooking comes together in one beautiful, ever evolving space.


