These baked stuffed peppers are my go-to when I want something hearty but not heavy, and I often think about how they remind me of lazy weekend afternoons at my grandmother’s house. She’d fill these peppers with whatever was left in the fridge—leftover rice, bits of cheese, a little ground meat—and somehow, they always turned out perfect, blistered just enough on top, fragrant with herbs. It’s a dish that’s forgiving, honest, and practically a hug in edible form.
What I love about this recipe is how adaptable it is—no two peppers have to be exactly the same, which makes it feel like a little kitchen adventure every time. Sometimes I toss in a handful of spinach, other times I swap in spicy chorizo if I want a kick. It’s about embracing what’s in your pantry and making something comforting without fuss, a reminder that simplicity often makes the best kind of meal.
This recipe is inspired by my grandmother’s old kitchen, where she used to stuff peppers with whatever was in the fridge—no fancy ingredients, just homey, honest flavors. It’s a reminder that good food doesn’t need a fuss, just a little patience and a lot of heart. I like to think of these peppers as edible memories, simple but packed with stories.
The story behind this recipe
This recipe sprang from a lazy Sunday afternoon in my tiny kitchen, where I was rummaging through the fridge and found a lonely bell pepper. I remembered my aunt’s stories of childhood, how she’d stuff peppers with whatever she had—no fuss, no fancy ingredients. That moment made me realize how simple ingredients, prepared with care, can tell a story. Now, I keep that tradition alive, tweaking it with what’s seasonal and fresh, always aiming for that perfect balance of smoky, tender, and bright flavors.
Ingredient breakdown: key components
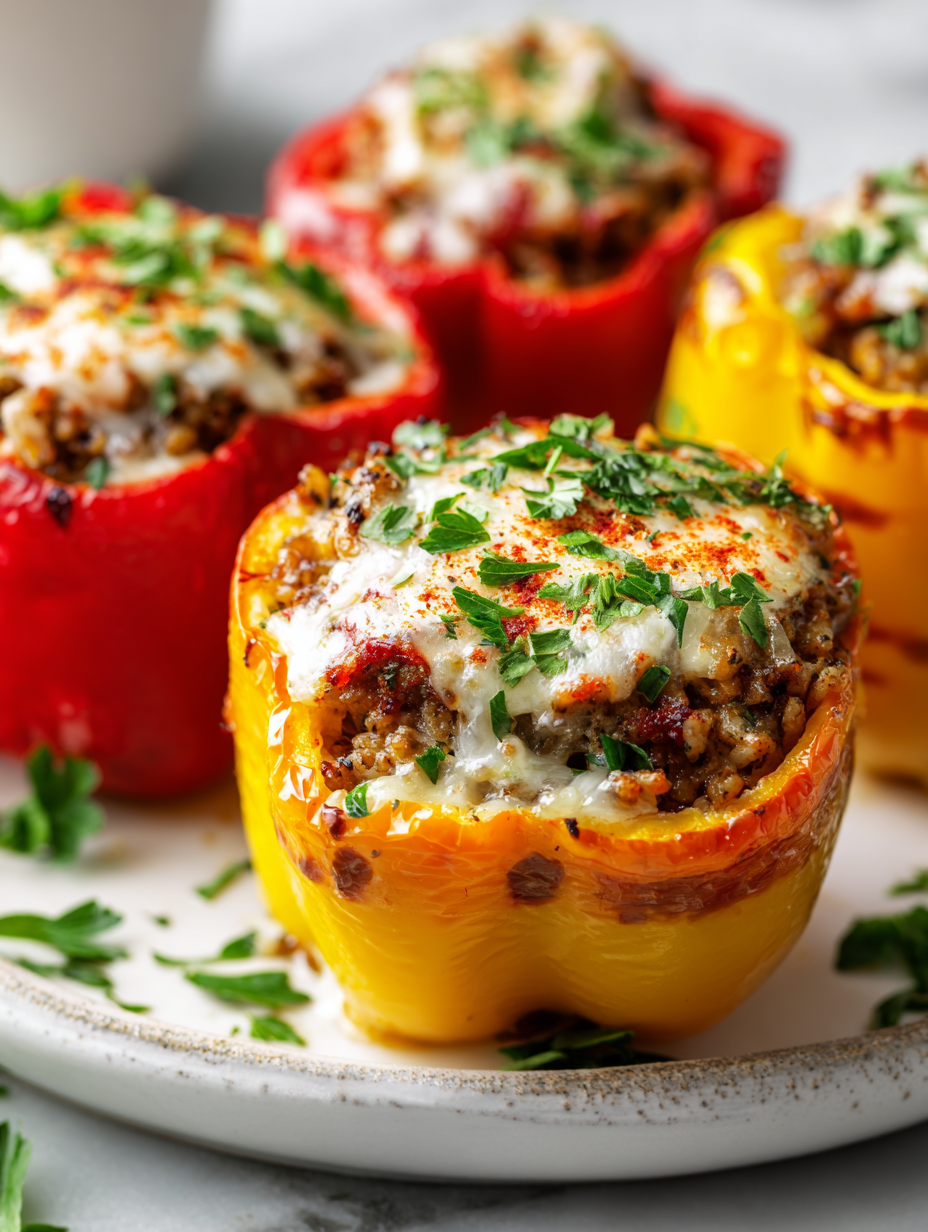
- Bell peppers: I prefer the large, sturdy red ones—they hold more filling and turn beautifully blistered in the oven. If you only have smaller peppers, just adjust the filling quantities slightly.
- Cooked rice: I like using day-old rice because it’s drier and absorbs flavors better, but fresh rice works too—just let it cool a bit before mixing to prevent sogginess.
- Cheese: Sharp cheddar adds a smoky bite that contrasts nicely with the sweet peppers. For a milder flavor, mozzarella melts into a gooey, stretchy layer—good for kids or a subtle twist.
- Ground meat: I often use turkey for a leaner option, but beef or even spicy chorizo can add richness. Brown it until just cooked, so it’s tender and juicy inside the peppers.
- Herbs & spices: Fresh parsley brightens the dish, but dried oregano works well if that’s what you’ve got. Adjust salt and pepper last—it’s easy to overdo on seasoning here.
- Tomato paste: I love the concentrated richness it adds—look for a jar with a deep, savory aroma. If you want a lighter dish, skip it or replace with a splash of tomato sauce.
- Olive oil: A drizzle before baking helps blister the peppers and keeps the filling moist. Use good-quality oil for a subtle fruity note that makes all the difference.
Spotlight on key ingredients
Bell peppers:
- I prefer the large, sturdy red ones—they hold more filling and turn beautifully blistered in the oven. If you only have smaller peppers, just adjust the filling quantities slightly.
- Cooked rice: I like using day-old rice because it’s drier and absorbs flavors better, but fresh rice works too—just let it cool a bit before mixing to prevent sogginess.
- Cheese: Sharp cheddar adds a smoky bite that contrasts nicely with the sweet peppers. For a milder flavor, mozzarella melts into a gooey, stretchy layer—good for kids or a subtle twist.
Cooked rice:
- Ground meat: I often use turkey for a leaner option, but beef or even spicy chorizo can add richness. Brown it until just cooked, so it’s tender and juicy inside the peppers.
- Herbs & spices: Fresh parsley brightens the dish, but dried oregano works well if that’s what you’ve got. Adjust salt and pepper last—it’s easy to overdo on seasoning here.
- Tomato paste: I love the concentrated richness it adds—look for a jar with a deep, savory aroma. If you want a lighter dish, skip it or replace with a splash of tomato sauce.
Notes for ingredient swaps
- Dairy-Free: Swap cheese for mashed avocado or a nut-based cheese alternative—adds creaminess without dairy, but expect a different melt and texture.
- Vegetarian: Use lentils or mushrooms instead of meat—these provide umami and moisture, though they may change the filling’s density.
- Gluten-Free: Ensure rice and fillers are gluten-free; skip breadcrumbs or use gluten-free options—this keeps the filling cohesive without wheat.
- Low-Sodium: Opt for unsalted cheese and low-sodium seasonings—allows control over salt levels, but may need extra herbs for flavor.
- Extra-Virgin Olive Oil: Use a good-quality oil for drizzling—boosts flavor and helps blister peppers, but can be replaced with avocado oil if preferred.
- Spicy Kick: Add diced jalapeños or cayenne—gives heat and zing, but adjust quantity based on heat tolerance.
- Herb Variations: Substitute parsley with basil or cilantro—different fresh aromatics that brighten or change the dish’s flavor profile.
Equipment & Tools
- Sharp knife: Slice peppers and chop ingredients.
- Paring knife: Hollow out peppers with precision.
- Baking dish: Hold peppers during baking.
- Mixing bowls: Combine filling ingredients.
- Spoon: Stuff peppers evenly.
Step-by-step guide to stuffed peppers
- Equipment & Tools: Gather a sharp knife, paring knife, baking dish (around 20cm x 20cm), mixing bowls, and a spoon for stuffing.
- Preheat your oven to 190°C (375°F). Slice the tops off the peppers and remove seeds and membranes carefully.
- In a skillet over medium heat (about 160°C/320°F), cook the ground meat until browned and crumbly, about 5-7 minutes. Break it apart as it cooks.
- While the meat cooks, chop any herbs or vegetables you want to mix in. In a bowl, combine cooked rice, cheese, herbs, and a splash of olive oil. Season with salt and pepper.
- Once meat is cooked, add it to the rice mixture. Mix well. Check seasoning—adjust salt or herbs if needed.
- Stuff each pepper generously with the filling, pressing slightly to pack it in. Place stuffed peppers upright in the baking dish.
- Drizzle a little olive oil over the peppers’ tops and bake in the oven for about 30-35 minutes, or until the peppers are blistered and tender, and the filling is hot and bubbly.
- Check for doneness: peppers should be blistered and slightly charred around edges, filling hot and bubbly, and the tops golden brown.
- Remove from oven. Let rest for 5 minutes. Serve warm, perhaps with a sprinkle of extra herbs or a drizzle of olive oil.
Let the stuffed peppers rest for 5 minutes to settle the filling. Serve directly from the dish, garnished with fresh herbs if desired.
How to Know It’s Done
- Peppers are blistered and tender with slightly charred edges.
- Filling is hot, bubbling, and has a cohesive texture.
- Internal temperature of filling reaches at least 75°C (165°F).
Baked Stuffed Peppers
Ingredients
Equipment
Method
- Preheat your oven to 190°C (375°F). Slice the tops off the peppers and carefully scoop out the seeds and membranes with a paring knife, creating a hollow cavity.
- In a skillet over medium heat, cook the ground meat until browned and crumbly, about 5-7 minutes, breaking it apart with a spoon as it cooks. Let the meat rest for a minute before mixing.
- In a large mixing bowl, combine the cooked rice, shredded cheese, chopped herbs, tomato paste, and a drizzle of olive oil. Season with salt and pepper, then stir everything together until well mixed.
- Add the cooked ground meat to the rice mixture and fold gently to incorporate all ingredients evenly. Adjust seasoning if needed.
- Use a spoon to generously stuff each hollowed-out pepper with the filling, pressing slightly to pack it in. Place the peppers upright in a baking dish.
- Drizzle a little olive oil over the tops of the peppers to help blister the skin and promote browning. Bake in the oven for 30-35 minutes, until the peppers are blistered and tender, and the filling is hot and bubbly.
- Once cooked, remove the dish from the oven and let the peppers rest for 5 minutes. The filling will set slightly, making them easier to serve.
- Garnish with extra herbs or a drizzle of olive oil if desired, then serve warm, enjoying the tender peppers with the flavorful, cheesy filling.
Pro tips for perfect stuffed peppers
- & crispy: Use a hot oven—around 200°C (400°F)—to blister peppers quickly and develop a smoky, charred flavor.
- Moist & tender: Cover peppers loosely with foil halfway through baking to trap steam and keep them juicy.
- Color check: Peppers should be blistered and slightly charred around edges—don’t wait until they look perfect, or they may overcook.
- Filling consistency: Ensure your mixture isn’t too wet—if it’s runny, add a bit more rice or cheese to help it stay in place.
- Cheese topping: Broil for the last 2-3 minutes to get a bubbly, golden crust on top—watch closely to prevent burning.
- Peppers’ skin: For easier peeling and a nicer blistered look, run peppers under a quick broiler blast or torch briefly.
- Rest time: Let baked peppers sit for 5 minutes after removing from oven—this helps the filling set and makes serving neater.
Common mistakes and how to fix them
- FORGOT to remove seeds → Seeds cause bitterness; scoop thoroughly for clean flavor.
- DUMPED filling too quickly → Pack gently to avoid spilling and uneven cooking.
- OVER-TORCHED peppers → Lower oven temp or cover with foil to prevent burning.
- MISSED resting time → Rest peppers for 5 minutes; helps filling set and flavors meld.
Quick fixes and pantry swaps
- When peppers are too firm, splash a little water in the baking dish and cover; steam softens them fast.
- If filling is too dry, patch with a splash of broth or a drizzle of olive oil for moisture.
- Splash lemon juice over peppers if they turn bitter or dull in color during baking.
- When peppers blister unevenly, shield with foil to prevent over-charring while finishing the bake.
- DUMPED filling spills—rescue with a spoon and gently pack it back into peppers before returning to oven.
Prep, store, and reheat tips
- Prepare the filling mixture a day in advance; keep refrigerated for up to 24 hours. The flavors meld and intensify overnight, making stuffing quicker on the day of baking.
- Stuffed peppers can be assembled a few hours ahead, then covered tightly with plastic wrap and kept in the fridge. The peppers absorb some flavors and become easier to handle.
- Refrigerated stuffed peppers will last 2-3 days. The peppers may soften slightly, and flavors deepen, especially if stored with the tops on to retain moisture.
- To reheat, bake covered at 180°C (350°F) for about 15-20 minutes or until heated through. The peppers will be softer, and the filling should be hot and bubbly. Check for even warmth and a slight shimmer of oil on top.
Top questions about stuffed peppers
1. How do I prepare peppers without tearing them?
Use a sharp knife to pierce the pepper’s skin easily, but be gentle so they don’t split during baking.
2. Should I cook the filling before stuffing?
Pre-cook the filling slightly if it contains raw meat or vegetables, so everything is evenly heated and safe to eat.
3. What’s the ideal oven temperature and time?
Bake at 190°C (375°F) until peppers are blistered and filling is bubbling, about 30-35 minutes.
4. Can I use only one type of cheese?
Use a mixture of cheeses like cheddar and mozzarella for flavor and a gooey top, or just one if you prefer.
5. Can I make stuffed peppers ahead of time?
Yes, you can prepare the stuffed peppers in advance, cover tightly, and refrigerate for up to 24 hours before baking.
6. What if the peppers stay hard after baking?
If peppers are too firm, cover them loosely with foil and bake a little longer, or splash with water and steam to soften.
7. How can I fix dull flavors after baking?
Add a pinch of lemon juice or a drizzle of olive oil after baking to brighten flavors and enhance aroma.
8. How do I get a crispy cheese top?
Use a broiler for 2-3 minutes at the end to get a golden, bubbly cheese topping—watch closely to prevent burning.
9. How do I know when the filling is cooked through?
Ensure the internal filling reaches at least 75°C (165°F) with a probe thermometer for safety and proper doneness.
10. What should I do if the filling leaks out?
If filling spills, gently scoop it back into peppers before baking again, or use a spoon to tidy up the dish.
These stuffed peppers are more than just a weeknight fix; they’re a reminder that simple ingredients, when treated with care, can create something deeply satisfying. The smoky aroma of blistered peppers and the gooey cheese topping make every bite feel like a small celebration.
In a world of endless food trends, this dish keeps it honest—warm, hearty, and built on tradition. It’s a humble dish that’s good enough to make you slow down and appreciate the little moments in your own kitchen.

Hi, I’m Emily Carter, the creator and recipe developer behind Salt Strategist. I’m so happy you’re here. This blog is where my love for flavor, creativity, and thoughtful cooking comes together in one beautiful, ever evolving space.


