Baking onion rings might sound like a compromise, but honestly, it’s a revelation. The oven gives them a surprising crunch and a natural caramelized sweetness that deep frying often drowns out. Plus, no greasy splatters, no lingering smell—just straightforward comfort food with a healthier twist.
This method feels like a small rebellion against the usual fried frenzy. It’s simple, honest, and less chaotic—something I appreciate when I want that crispy punch without the fuss. The aroma of baked onion rings turning golden in the oven is a quiet, satisfying kind of magic that makes me want to bake them again and again.
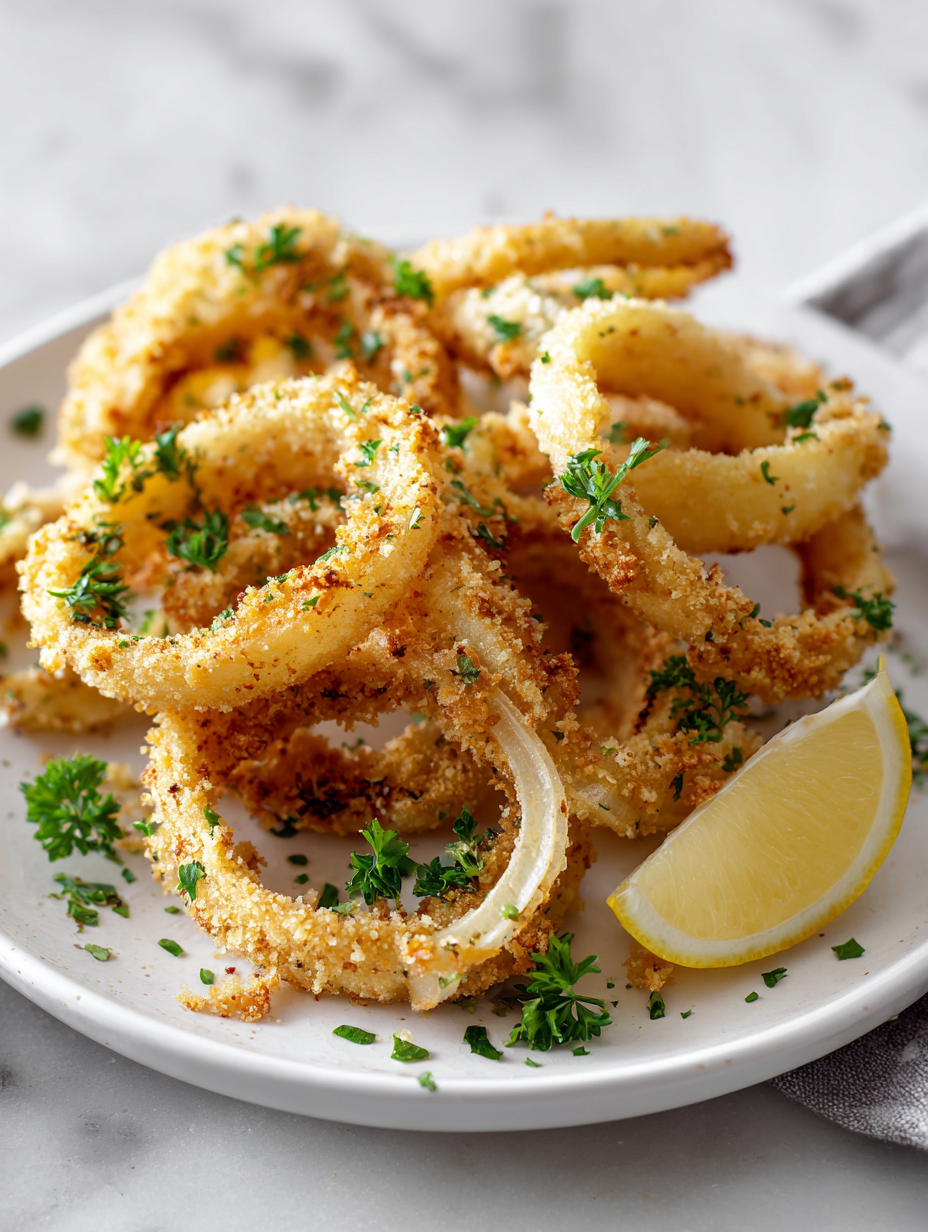
Focusing on the surprising crunch and sweetness you can achieve by baking onion rings instead of frying, highlighting how this method preserves flavor without the mess or guilt.
The story behind this recipe
One lazy Sunday, I was craving something crispy but didn’t want the usual greasy mess. I remembered how my grandma used to bake onion rings for a lighter treat, and I decided to tweak her method. The smell of caramelizing onions mixed with toasty breadcrumbs became my quiet moment of joy. Since then, baking these rings has become my go-to for a crunch that’s honest, simple, and just a little nostalgic.
Ingredient breakdown: key components
- Onion: I prefer sweet yellow onions—they caramelize beautifully and add a rich, natural sweetness that makes every bite pop. Swap for red onions if you want a sharper flavor, but expect a brighter, less mellow taste.
- Breadcrumbs: Panko gives that extra crunch I love, light and airy with a satisfying crispness. If you only have regular breadcrumbs, toast them a little first to boost their texture and flavor.
- Eggs: They help the coating stick, but if you’re out or want a vegan option, try plant-based milk with a little flour—still keeps everything together without losing that crispy bite.
- Flour: I use all-purpose flour for the base, but rice flour gives an even crunch. It’s a tiny tweak that makes the coating lighter and crunchier, especially good if you like a delicate crust.
- Spices: A pinch of smoked paprika or cayenne adds warmth and a smoky undertone, making the flavor more layered. Keep it simple if you prefer the onion’s natural sweetness, though.
- Oil spray: I swear by a good spray of neutral oil—just enough to help the breadcrumbs brown evenly. Too much, and they end up greasy; too little, and they won’t crisp up properly.
- Optional herbs: Fresh thyme or parsley can brighten the flavor right before baking. A sprinkle at the end keeps them vibrant and fragrant, especially if you love herby notes.
Spotlight on key ingredients
Onion:
- I prefer sweet yellow onions—they caramelize beautifully and add a rich, natural sweetness that makes every bite pop. Swap for red onions if you want a sharper flavor, but expect a brighter, less mellow taste.
- Breadcrumbs: Panko gives that extra crunch I love, light and airy with a satisfying crispness. If you only have regular breadcrumbs, toast them a little first to boost their texture and flavor.
Breadcrumbs:
- Eggs: They help the coating stick, but if you’re out or want a vegan option, try plant-based milk with a little flour—still keeps everything together without losing that crispy bite.
- Panko gives that extra crunch I love, light and airy with a satisfying crispness. If you only have regular breadcrumbs, toast them a little first to boost their texture and flavor.
Notes for ingredient swaps
- Dairy-Free: Use almond or soy milk instead of eggs. Keeps the coating vegan without losing moisture.
- Gluten-Free: Swap regular breadcrumbs for gluten-free panko. Maintains crunch but with a different texture.
- Low-Sodium: Reduce salt in the flour mix or use a salt-free seasoning blend for less saltiness.
- Sweetener Twist: Mix a touch of honey or maple syrup into the breadcrumbs for a sweet, caramelized finish.
- Herb Variations: Add dried herbs like thyme or oregano to the breadcrumb mixture for extra flavor.
- Onion Types: Use shallots or leeks for a milder, sweeter onion flavor with a softer bite.
- Oil Choice: Spray with avocado or light olive oil for a richer, slightly fruity aroma and healthier fat.
Equipment & Tools
- Oven: Bakes the onion rings evenly with a crispy crust.
- Baking sheet: Holds the onion rings during baking, ensures they don’t stick.
- Wire rack: Allows excess oil to drip off and keeps the crust crispy.
- Sharp knife: Slices onions into even rings.
- Two shallow bowls: Holds the flour mixture and beaten eggs for coating.
- Tongs: Handles coated onion rings for flipping and serving.
- Parchment paper or silicone mat: Prevents sticking and makes cleanup easier.
Step-by-step guide to baked onion rings
- Preheat your oven to 220°C (430°F). Line a baking sheet with parchment paper or a silicone mat for easy cleanup. Gather your equipment: a sharp knife, two shallow bowls, a baking sheet, and a wire rack.
- Slice the onions into rings about 1/4 inch thick. Separate the rings carefully, trying to keep them intact. Pat them dry with a paper towel to remove excess moisture—this helps the coating stick and crisp.
- Set up your coating station: in one bowl, whisk together 1 cup all-purpose flour, 1 teaspoon salt, and 1/2 teaspoon black pepper. In the second bowl, beat 2 large eggs until smooth.
- Prepare the breadcrumb mixture: in another shallow dish, combine 1 1/2 cups panko breadcrumbs with 1 teaspoon smoked paprika, 1/2 teaspoon garlic powder, and a pinch of cayenne if you like heat. Toss well.
- Dip each onion ring first into the flour mixture, making sure to coat all sides evenly. Shake off excess. Then dip into the beaten eggs, letting any excess drip off. Finally, coat generously with the seasoned breadcrumbs, pressing slightly to adhere.
- Arrange the coated onion rings on the prepared baking sheet in a single layer. Lightly spray them with neutral oil (like canola or vegetable) for a golden finish. Place in the oven and bake for 15-20 minutes.
- Halfway through baking, flip the onion rings carefully with tongs. Continue baking until they are golden brown and crispy, with the coating crackling and bubbling slightly. Check for even browning.
- Once done, transfer the onion rings to a wire rack set over a baking sheet. Let them rest for 2-3 minutes. This allows any residual steam to escape, keeping them crisp.
- Serve immediately while warm and crunchy. If needed, reheat in a 180°C (350°F) oven for 5 minutes, checking that they regain their crunch without burning.
Transfer baked onion rings to a wire rack. Rest for a few minutes to maintain crispness. Serve immediately or reheat briefly in a warm oven for best crunch.
How to Know It’s Done
- Coating is golden and crispy, not soggy or pale.
- Onion rings feel firm but not hard; easy to bite through.
- Breadcrumbs crackle when you tap them gently.
Baked Onion Rings
Ingredients
Equipment
Method
- Preheat your oven to 220°C (430°F). Line a baking sheet with parchment paper or a silicone mat to prevent sticking and ensure easy cleanup.
- Peel the onions and slice them into 1/4-inch thick rings. Carefully separate the rings, patting them dry with a paper towel to remove excess moisture. This helps the coating stick and become crispy.
- Set up your coating stations: in one shallow bowl, mix the flour with salt, pepper, and smoked paprika. In another, beat the eggs until smooth. Prepare a third shallow dish with the panko breadcrumbs.
- Take each onion ring and dip it into the seasoned flour, ensuring all sides are coated evenly. Shake off any excess flour.
- Next, dip the floured onion ring into the beaten eggs, letting any excess drip off for a smooth coating.
- Finally, coat the onion ring generously with panko breadcrumbs, pressing lightly to make sure the crumbs adhere well.
- Place the coated onion rings on the prepared baking sheet in a single layer. Lightly spray the tops with neutral oil to help them turn golden and crispy in the oven.
- Bake the onion rings for 15-20 minutes, flipping them halfway through. Keep an eye on them until they are golden brown and the coating feels crisp and crackly.
- Once baked, transfer the onion rings to a wire rack to cool slightly. This helps maintain their crispness by letting excess steam escape.
- Serve the baked onion rings warm, perhaps with your favorite dipping sauce. Enjoy their satisfying crunch and sweet, caramelized flavor!
Tips for perfect baked onion rings
- coating: Use panko breadcrumbs for a airy, extra-crispy texture that crackles with each bite.
- onion prep: Slice rings evenly and pat dry; excess moisture helps the coating stick and crisp better.
- spray: Lightly spray onion rings with neutral oil before baking for a golden, crunchy finish.
- flipping: Turn rings halfway through baking; ensures even browning and maximum crunch.
- temperature: Bake at 220°C (430°F); high heat promotes rapid crisping without burning.
- resting: Let baked onion rings sit on a wire rack for a few minutes; keeps them crisp and avoids sogginess.
- fix: If coating is soggy, increase oven temperature slightly or give rings a quick broil, watching carefully.
Common mistakes and how to fix them
- FORGOT to preheat oven → Always preheat for even crispiness.
- DUMPED too much oil → Use a light spray to avoid sogginess.
- OVER-TORCHED the breadcrumbs → Keep an eye; golden brown is perfect.
- MISSED the resting step → Rest briefly to keep rings crispy.
Quick fixes and pantry swaps
- When onions release too much moisture, splash them with a little vinegar to balance sweetness.
- If coating isn’t sticking, patch it with a quick brush of beaten egg or oil spray.
- Splash a few drops of lemon juice if rings turn out bland or too greasy.
- DUMPED too much oil? Shield with a paper towel and re-bake briefly for extra crunch.
- When breadcrumbs shimmer unevenly, swap to fresh panko or toast stale crumbs for better adhesion.
Prep, store, and reheat tips
- Prep the onion rings: Slice and dry them a day ahead. Keeps the onions firm and ready for coating.
- Store coated rings: Place on a parchment-lined tray, cover tightly, and refrigerate up to 24 hours. The coating stays crispy and fresh.
- Shelf life: Best enjoyed within 24 hours for maximum crunch and flavor. After that, they may soften or lose crispness.
- Reheating: Warm in a 180°C (350°F) oven for 5-7 minutes. Expect a slight loss in crispness but still satisfyingly crunchy.
- Sensory note: Reheated rings smell toasty and the coating crackles again, though the onion may soften slightly.
Top questions about baked onion rings
1. How do I get perfect onion rings?
Use a sharp knife to cut clean, even rings; dull blades make uneven slices that can be tricky to coat.
2. What’s the ideal oven temperature for baking onion rings?
Preheat your oven to 220°C (430°F) and line a baking sheet with parchment—this prevents sticking and promotes crispiness.
3. How dry should the onion rings be before baking?
Pat onions dry thoroughly before coating; excess moisture can make the coating soggy and prevent crisping.
4. Do I need oil on the onion rings before baking?
Spray lightly with neutral oil before baking. It helps the breadcrumbs turn golden and crispy, without excess greasiness.
5. Should I flip the onion rings during baking?
Flip the rings halfway through baking to ensure they brown evenly and turn out crispy on all sides.
6. How do I know when baked onion rings are done?
Bake until the coating cracks and turns a deep golden brown. They should feel firm but not hard when pressed.
7. Can I make baked onion rings ahead of time?
Store leftovers in an airtight container for up to 24 hours in the fridge. Reheat in a hot oven to revive crunch.
8. What if my onion rings aren’t crispy enough?
If coating feels loose, spray with a little more oil and pop back in the oven for a few minutes.
9. Can I substitute the breadcrumbs?
Use panko breadcrumbs for maximum crunch. Regular breadcrumbs work but won’t be as light and crispy.
10. Which onions are best for baking rings?
Choose sweet yellow onions for a mellow, caramelized flavor. Red onions add a sharper bite and vibrant color.
Baked onion rings might not have the same instant crunch as fried, but the oven’s gentle heat creates a satisfying crispness and a mellow sweetness. It’s a simple way to enjoy that crispy onion flavor without the splatter or guilt, especially when you’re craving comfort food with a lighter touch.
Once you get the hang of it, these rings become your go-to snack or side. They’re honest, straightforward, and quietly impressive—perfect for lazy weekends or when you want something crispy without the fuss.

Hi, I’m Emily Carter, the creator and recipe developer behind Salt Strategist. I’m so happy you’re here. This blog is where my love for flavor, creativity, and thoughtful cooking comes together in one beautiful, ever evolving space.


