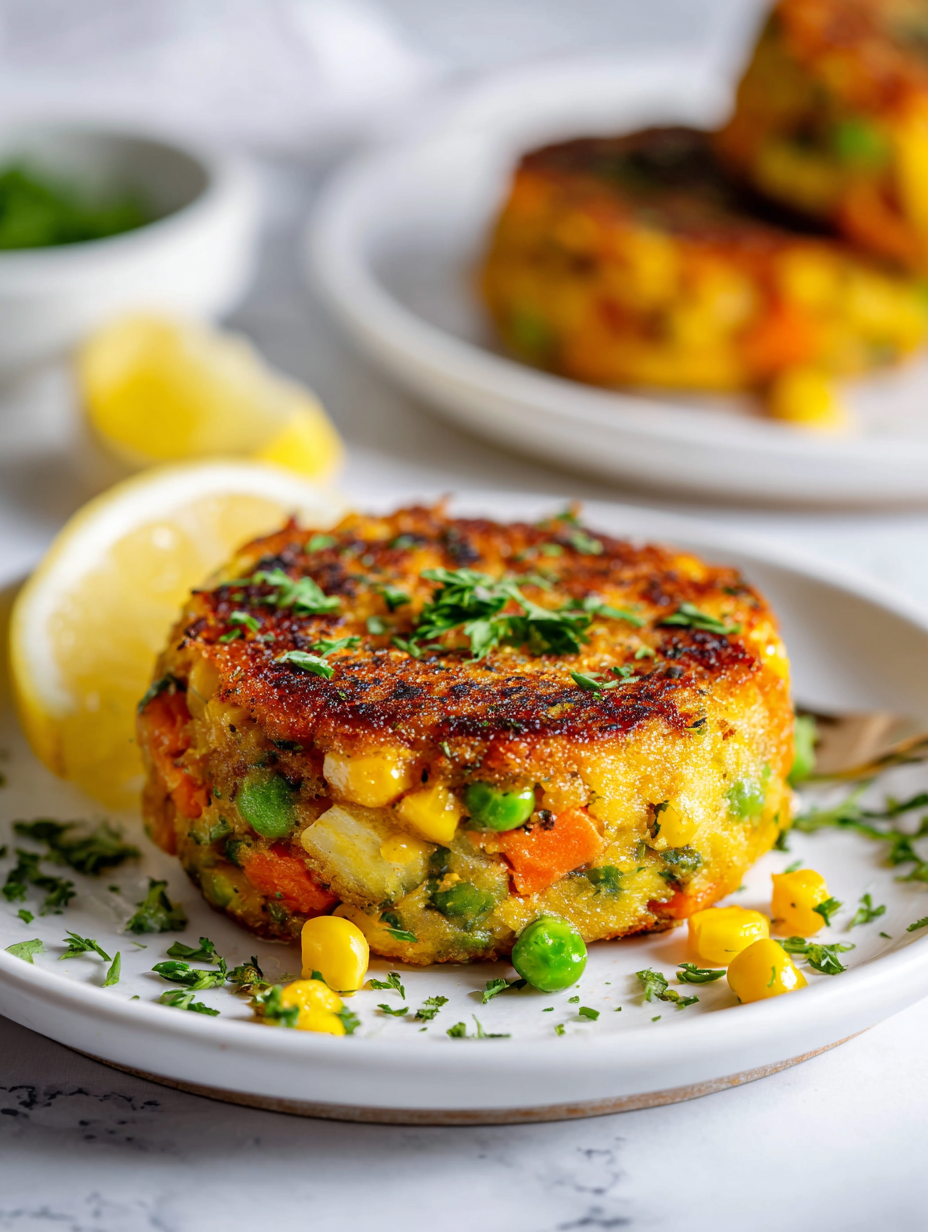
Author: Resao

  • Autumn’s Hidden Gem: Roasted Butternut Squash & Carrot Soup

    Autumn’s Hidden Gem: Roasted Butternut Squash & Carrot Soup

    As the leaves turn and a crispness fills the air, my culinary pursuits shift towards comforting, earthy flavors. Today, I decided to explore the underrated charm of butternut squash and carrots, roasted to deepen their natural sweetness. This soup isn’t just warming—it’s a celebration of seasonal produce, lightly touched by hints of caramelization that bring out their full richness.

    The process of roasting amplifies their flavors, transforming simple ingredients into something surprisingly complex. The gentle aroma of roasting squash mingling with sweet carrots creates a nostalgic sensory experience. It’s a humble yet luxurious dish perfect for cozy nights or a quick, satisfying lunch.

    Roasted Butternut Squash and Carrot Soup

    This soup is made by roasting chunks of butternut squash and carrots until caramelized and tender, then blending them into a smooth, velvety puree. The roasting process enhances their natural sweetness and creates a rich, hearty texture with a slightly charred flavor. The final dish has a warm orange hue and a creamy consistency, perfect for fall and winter comfort.
    Prep Time 15 minutes
    Cook Time 40 minutes
    Total Time 55 minutes
    Servings: 4
    Course: Main Course
    Cuisine: Seasonal
    Calories: 180

    Ingredients
      

    • 1 lb butternut squash peeled and cubed
    • 3 large carrots peeled and chopped
    • 2 tablespoons olive oil for roasting
    • 1 small onion diced
    • 2 cloves garlic minced
    • 4 cups vegetable broth
    • to taste salt and pepper
    • 1 tablespoon olive oil or butter for sautéing

    Equipment

    • Baking sheet
    • Blender or immersion blender

    Method
     

    1. Preheat your oven to 400°F (200°C). Spread the cubed butternut squash and chopped carrots evenly on a baking sheet. Drizzle with 2 tablespoons of olive oil and toss to coat well.
    2. Roast the vegetables in the oven for about 30-40 minutes, until they are soft and caramelized around the edges, and a fork slides in easily.
    3. While the vegetables are roasting, heat a tablespoon of olive oil or butter in a large pot over medium heat. Add the diced onion and sauté until translucent and fragrant, about 5 minutes.
    4. Add the minced garlic to the pot and cook for another minute until fragrant, stirring constantly so it doesn’t burn.
    5. Remove the roasted vegetables from the oven and add them to the pot with the sautéed onions and garlic.
    6. Pour in the vegetable broth and bring the mixture to a gentle simmer. Let it cook for 10 minutes to allow flavors to meld.
    7. Use an immersion blender or transfer the mixture carefully into a blender, then purée until smooth and creamy.
    8. Return the soup to the pot (if blended in a blender) and reheat gently. Season with salt and pepper to taste.
    9. Serve hot, garnished with a drizzle of olive oil or a sprinkle of herbs if desired.

    Notes

    For an extra layer of flavor, add a splash of cream or a dash of smoked paprika before serving.

    This roasted soup is a reminder of how the simplest ingredients can create something extraordinary with just a little oven time. It’s one of those recipes that feels almost meditative—a warm hug in a bowl that has roots in seasonal comfort.

    Whichever October or November day calls for a bit of warmth, this soup delivers. Its hearty texture and sweet, smoky undertones make it a versatile staple. No matter how busy life gets, this dish offers a moment of peace and hearty nourishment.

  • Hidden Gem: Roasted Butternut Squash Soup with a Twist

    Hidden Gem: Roasted Butternut Squash Soup with a Twist

    Cooking during the chilly months often leads me to seek comfort in familiar flavors. But this time, I decided to go a bit rogue: roasting butternut squash with a splash of cinnamon and a drizzle of honey before turning it into a velvety soup. The roasting process caramelizes the natural sugars and gives the soup an unexpectedly sweet depth.

    The smell alone of roasting squash with warm spices is enough to make anyone’s stomach rumble. It’s a symphony of cozy, autumnal aromas that fill the kitchen and evoke childhood memories of fall festivals and hayrides. It’s simple, yet each spoonful feels like a tiny celebration of seasonal bounty.

    Roasted Butternut Squash Soup

    This soup is made by roasting butternut squash until caramelized and tender, then blending it into a smooth, velvety purée. The roasting process enhances natural sweetness, while cinnamon and honey add warm, cozy flavors. The final dish has a creamy texture with a slightly thick, vibrant orange appearance.
    Prep Time 10 minutes
    Cook Time 45 minutes
    Total Time 55 minutes
    Servings: 4
    Course: Main Course
    Cuisine: comfort food
    Calories: 180

    Ingredients
      

    • 1 medium butternut squash peeled, seeded, and cut into chunks
    • 2 tbsp olive oil for roasting
    • 1 tsp ground cinnamon adds warm spice
    • 1 tbsp honey for natural sweetness
    • 4 cups vegetable broth or chicken broth
    • 1 cup cream or coconut milk optional, for creaminess
    • to taste salt and black pepper

    Equipment

    • Baking sheet
    • Blender or immersion blender
    • Large pot

    Method
     

    1. Preheat your oven to 400°F (200°C). Spread the butternut squash chunks evenly on a baking sheet, drizzle with olive oil, and sprinkle with ground cinnamon. Roast for about 25-30 minutes, or until the squash is golden and caramelized around the edges.
    2. Remove the roasted squash from the oven and transfer it to a large pot. Pour in the vegetable broth, add the honey, and bring the mixture to a gentle simmer over medium heat.
    3. Simmer the soup for about 10 minutes, allowing the flavors to meld and the squash to soften further.
    4. Use an immersion blender or transfer the soup in batches to a blender, then blend until completely smooth and creamy.
    5. If you like a richer texture, stir in the cream or coconut milk. Season the soup with salt and black pepper to taste, then warm it through for a few more minutes.
    6. Pour the velvety soup into bowls, garnish with a sprinkle of cinnamon or roasted seeds if desired, and serve hot.
    This roasted butternut squash soup is my current favorite because it changes the way I think about fall vegetables. Its rich, sweet flavor and creamy texture make it a perfect starter or cozy dinner. Plus, it’s a reminder that a little roasting elevates humble ingredients into something truly special.

  • Earthy Warmth: Ginger-Infused Butternut Squash Soup

    Earthy Warmth: Ginger-Infused Butternut Squash Soup

    Imagine a bowl that captures the crisp essence of autumn, yet with a surprising twist. This butternut squash soup with ginger isn’t your average fall comfort food; it’s a celebration of seasonal flavors with a zing. The roasted squash’s milky sweetness is perfectly balanced by the sharp, fragrant ginger, making each spoonful an adventure.

    Cooking this soup is like inviting a cozy, spicy hug into your kitchen. It’s simple to prepare, but the flavors unfold beautifully over time. Perfect for chilly nights when you crave something nourishing and a little unexpected.

    Butternut Squash and Ginger Soup

    This butternut squash soup features roasted squash blended with fresh ginger, resulting in a smooth, velvety texture with a vibrant, spicy aroma. The process involves roasting the squash to enhance sweetness, then simmering and pureeing the mixture for a creamy finish. Its appearance is a bright, orange-hued soup with a silky consistency.
    Prep Time 15 minutes
    Cook Time 40 minutes
    Total Time 55 minutes
    Servings: 4
    Course: Main Course
    Cuisine: Contemporary
    Calories: 150

    Ingredients
      

    • 1 large butternut squash peeled and cubed
    • 2 inch fresh ginger root peeled and minced
    • 1 tablespoon olive oil for roasting
    • 1 medium onion diced
    • 2 cups vegetable broth or chicken broth
    • to taste salt and pepper for seasoning

    Equipment

    • Baking sheet
    • Chef’s knife
    • Cutting board
    • Large pot
    • Immersion Blender or Regular Blender
    • Measuring cups
    • Spoon

    Method
     

    1. Preheat the oven to 400°F (200°C). Place the peeled and cubed butternut squash on a baking sheet, drizzle with olive oil, and toss to coat.
    2. Roast the squash in the oven for about 25-30 minutes, until it becomes tender and begins to caramelize around the edges, filling your kitchen with sweet, nutty aromas.
    3. While the squash roasts, heat a large pot over medium heat and add a splash of oil. Sauté the diced onion until translucent and fragrant, about 5 minutes.
    4. Add the minced ginger to the onions and cook for another minute until it releases a spicy, aromatic scent.
    5. Once the squash is roasted and has cooled slightly, add it to the pot with the sautéed onion and ginger.
    6. Pour in the vegetable broth and bring the mixture to a gentle simmer, allowing the flavors to meld for about 10 minutes.
    7. Use an immersion blender to carefully blend the soup directly in the pot until smooth and creamy, or transfer to a blender in batches and puree.
    8. Taste the soup and season with salt and pepper as needed, blending again briefly if necessary to incorporate.
    9. Reheat gently if needed and serve hot, garnished with a drizzle of olive oil or a dollop of sour cream if desired.
    This recipe is a beautifully imperfect reflection of the season’s bounty. It encourages improvisation, letting the ginger and squash take center stage. Every spoonful feels like a little celebration of fall’s fleeting magic.

    With its bright, earthy flavors and comforting warmth, this soup is more than just a meal—it’s a little moment of peace. Whether you serve it as a starter or a main, it’s guaranteed to stir feelings of home and harmony. A bowl of this soup is sure to make any day feel a bit more special.

  • The Ultimate Vanilla Slushie: A Nostalgic Chill in Every Sip

    The Ultimate Vanilla Slushie: A Nostalgic Chill in Every Sip

    Imagine the scent of vanilla bean filling your kitchen, warm yet inviting, as you prepare to freeze a simple ingredient into a refreshing treat. But this isn’t just any slushie; it’s a vanilla marvel that transforms ordinary summer moments into memories. The secret lies in balancing the rich aroma of vanilla with a perfectly icy texture, giving each sip a delightful chill and a hint of nostalgia.

    What makes this vanilla slushie stand out is its versatility. It’s a dessert you can customize with a splash of your favorite milk, a drizzle of caramel, or even a sprinkle of cinnamon. Whether you’re seeking a quick cool-off or a gentle indulgence after a long day, this recipe promises refreshment with a comforting twist.

    Vanilla Bean Slushie

    This vanilla bean slushie is a frozen beverage made by blending vanilla extract, milk, and ice until smooth and icy. It has a refreshing, creamy texture with a pronounced vanilla aroma, garnished with optional toppings or mix-ins for customization.
    Prep Time 10 minutes
    Total Time 10 minutes
    Servings: 2
    Course: Main Course
    Cuisine: Dessert
    Calories: 150

    Ingredients
      

    • 1 teaspoon vanilla extract preferably pure vanilla bean extract
    • 1 cup milk dairy or plant-based
    • 2 cups ice cubes adjust for desired thickness
    • 2 tbsp sugar optional, for added sweetness

    Equipment

    • Blender
    • Measuring cups and spoons

    Method
     

    1. Add the milk, vanilla extract, sugar (if using), and ice cubes into your blender.
    2. Secure the lid and blend on high speed until the mixture is smooth and icy, about 30-45 seconds. You should see a frosty, velvety texture forming.
    3. Pause briefly to check the consistency. If it’s too thick, add a splash more milk and pulse again. If too thin, add a few more ice cubes and blend briefly.
    4. Once the mixture is well blended with a uniform, slushy appearance, pour it into glasses.
    5. Optionally, garnish with a vanilla bean pod, sprinkles, or a drizzle of caramel for extra flavor and visual appeal.
    6. Serve immediately with a straw or spoon, enjoying the cold, creamy vanilla flavor.

    Notes

    For a richer flavor, replace part of the milk with heavy cream or add a splash of flavored syrup.

    In a world full of flashy desserts, this vanilla slushie proves that simple ingredients and a little patience can create something truly satisfying. It’s a reminder that comfort foods don’t need to be complicated, just well-made. As the summer heat persists, there’s nothing quite like a homemade slushie to brighten your day.

    So next time you crave a cold treat, remember how easy and delightful it is to turn vanilla into a frosty escape. It’s perfect for lazy weekends or spontaneous guests. And with this recipe in your back pocket, you’re always ready to serve up a bit of frosty happiness.

  • Spooky Sips: The Haunted Red Vampire Punch

    Spooky Sips: The Haunted Red Vampire Punch

    This Vampire Punch isn’t just for goblins and ghosts; it’s a chance to explore the chaos of a Halloween night in a single glass. One whiff of the deep red juice, tinged with a hint of citrus, transports me straight into a haunted mansion’s eerie corridors. And the best part? Its chilling hue makes every sip feel like a drop of midnight.

    As a food blogger who loves pushing culinary boundaries, I’ve crafted this punch with a secret twist—an unexpected burst of spicy soda that fizzes like a potion brewing. It’s simple enough for last-minute chaos and spooky enough to turn any gathering into a haunted feast. Plus, it’s all about the spectacle, with floating “eyeballs” and shimmering red magic.

    Halloween Vampire Punch

    This Vampire Punch combines deep red fruit juices with citrus flavors and a spicy soda to create a vibrant, fizzy beverage. The punch features floating
    Prep Time 10 minutes
    Total Time 10 minutes
    Servings: 8
    Course: Main Course
    Cuisine: Halloween
    Calories: 95

    Ingredients
      

    • 2 cups cranberry juice use chilled for best effect
    • 1 cup orange juice preferably freshly squeezed
    • 1/2 cup lemon juice freshly squeezed for bright flavor
    • 1 cup spicy soda (like ginger beer or spicy ginger ale) adds fizz and spicy kick
    • Ice cubes as needed to chill and serve
    • Optional floating eyeball decorations for spooky visual appeal

    Equipment

    • Large pitcher
    • Measuring cups
    • Stirring spoon
    • Sharp knife
    • Floating eyeball decorations

    Method
     

    1. Pour the cranberry juice into a large pitcher, creating a vivid red base for your punch.
    2. Add the orange juice to the pitcher, mixing gently with a stirring spoon to blend the rich flavors.
    3. Squeeze the fresh lemon juice into the mixture, then stir again to incorporate the citrus brightness.
    4. Fill glasses with ice cubes, then pour the fruit juice mixture over the ice, filling each glass about three-quarters full.
    5. Slowly top each glass with spicy soda, letting it fizzle and create a lively, frothy head on the punch.
    6. Gently float the spooky eyeball decorations on the surface of each glass to add a creepy Halloween touch.
    7. Serve immediately, enjoying the bubbling, eye-catching spectacle and refreshing, spicy flavor.

    Notes

    Feel free to prepare the punch ahead of time and add the soda just before serving to maintain its fizz. The floating eyeballs are best added right before serving for maximum impact.

    Gather around with this eye-popping Vampiric Punch and watch your guests’ faces light up—whether with delight or terror. Its layered flavors and haunting hue make it a perfect centerpiece for any costume bash. And honestly, there’s something about serving it with a crooked smile that captures the true spirit of Halloween.

    So, whether you’re embracing the chaos or just craving a vibrant refreshment, this punch guarantees a memorable toast. Pour it into your favorite cauldron or crystal pitcher, and let the night’s mysterious fun begin. Cheers to a frightfully good time!

  • A Tangy Twist: Unveiling a New Realm of Tomato Sauce

    A Tangy Twist: Unveiling a New Realm of Tomato Sauce

    Cooking during the golden hour has a magic of its own. I recently discovered that simmering tomatoes with a splash of balsamic vinegar unlocks a deep, caramelized sweetness that dances on the tongue. It’s a playful rebellion against the usual garlic and basil crowd, transforming a humble sauce into a conversation starter.

    This recipe isn’t just about flavor; it’s about those little moments of culinary curiosity. The aroma of slow-cooked tomatoes with a hint of onion fills my kitchen with nostalgic warmth, making it impossible to resist the urge to dive in early. It’s the perfect project for a quiet weekend, when patience is your best ingredient.

    Caramelized Tomato Balsamic Sauce

    This sauce is made by simmering ripe tomatoes with a splash of balsamic vinegar, resulting in a deep, sweet, and slightly tangy flavor. The slow cooking process develops a thick, glossy texture with caramelized notes and a vibrant appearance. It is perfect for drizzling over pasta, grilled vegetables, or meats.
    Prep Time 10 minutes
    Cook Time 40 minutes
    Total Time 50 minutes
    Servings: 4
    Course: Main Course
    Cuisine: Mediterranean
    Calories: 120

    Ingredients
      

    • 2 pounds ripe tomatoes chopped
    • 1 medium yellow onion finely diced
    • 2 tablespoons balsamic vinegar adds sweetness and depth
    • 2 cloves garlic minced
    • 1 tablespoon olive oil for sautéing
    • to taste salt and pepper for seasoning

    Equipment

    • Saucepan
    • Wooden spoon

    Method
     

    1. Heat the olive oil in a saucepan over medium heat until shimmering and fragrant.
    2. Add the finely diced onion and sauté until translucent, about 5 minutes, until it fills the kitchen with a sweet aroma and becomes soft.
    3. Stir in the minced garlic and cook for another minute until fragrant, making the mixture slightly bubbly.
    4. Add the chopped tomatoes to the saucepan, stirring to combine them with the onion and garlic base.
    5. Pour in the balsamic vinegar, stirring well to coat the tomatoes, and bring the mixture to a gentle simmer.
    6. Reduce the heat to low and let the sauce simmer gently, stirring occasionally, for about 30-40 minutes until the mixture thickens and develops a glossy, caramelized appearance with rich aroma.
    7. Season the sauce with salt and pepper to taste, stirring to ensure even flavor distribution.
    8. Remove the sauce from heat once it has achieved a deep color and a thick, jam-like consistency.
    9. Transfer the sauce to a bowl or serve directly, allowing it to cool slightly before using as a condiment or meal accompaniment.
    This tomato sauce is a reminder that simplicity combined with a little creativity can yield remarkable results. It pairs beautifully with everything from fluffy pasta to roasted vegetables, adding a splash of sunshine to any meal.

    Whenever I make this sauce, I feel connected to a tradition of slow, loving cooking. It reminds me that sometimes, the best dishes are made with a little chaos, a lot of patience, and a dash of daring. It’s more than a recipe; it’s a gentle invitation to enjoy the process and savor the flavors.

  • The Secret Ingredient That Turns Pumpkin Muffins From Ordinary to Irresistible

    The Secret Ingredient That Turns Pumpkin Muffins From Ordinary to Irresistible

    Pumpkin muffins are everywhere this season, but I've discovered a little twist that makes them truly stand out. Instead of the usual cinnamon and nutmeg overload, I add a dash of ground ginger and a whisper of allspice for depth. The aroma alone transforms a simple morning treat into something cozy and nostalgic, perfect for chilly fall days.

    Every time I bake these, I recall childhood mornings when my mother would bake pumpkin bread—this recipe echoes that warmth but in a quicker, handheld form. It's fascinating how a handful of ingredients combined in just the right way can evoke such rich memories. These muffins aren't just breakfast—they're a small seasonal ceremony.

    Spiced Pumpkin Muffins

    Pumpkin muffins are baked quick bread treats that feature a moist, tender crumb with a slightly domed top. They are made by mixing pumpkin puree with dry and wet ingredients, then baking until golden and fluffy. The muffins have a warm aroma with a soft, springy texture and a moist interior.
    Prep Time 15 minutes
    Cook Time 20 minutes
    Total Time 35 minutes
    Servings: 12
    Course: Main Course
    Cuisine: American
    Calories: 180

    Ingredients
      

    • 1 1/2 cups all-purpose flour
    • 1 cup pumpkin puree
    • 1/2 cup granulated sugar
    • 1/3 cup vegetable oil
    • 2 large eggs
    • 1 1/2 teaspoons baking soda
    • 1 teaspoon ground ginger
    • 1/2 teaspoon allspice
    • 1/2 teaspoon salt

    Equipment

    • Mixing bowls
    • Muffin tin
    • Whisk
    • Measuring cups and spoons
    • Rubber spatula

    Method
     

    1. Preheat the oven to 350°F (175°C) and line a muffin tin with paper liners or grease it lightly.
    2. In a large mixing bowl, whisk together the flour, baking soda, ground ginger, allspice, and salt until combined. This creates an evenly distributed spice mix.
    3. In a separate bowl, combine the pumpkin puree, sugar, vegetable oil, and eggs. Whisk until the mixture is smooth and slightly frothy, about 1-2 minutes.
    4. Pour the wet mixture into the dry ingredients and gently fold with a spatula until just combined. Be careful not to overmix, as this can make the muffins dense.
    5. Divide the batter evenly among the muffin cups, filling each about two-thirds full. The batter should be lumpy but well distributed.
    6. Bake in the preheated oven for 20-22 minutes, or until the muffins are golden and a toothpick inserted into the center comes out clean.
    7. Remove the muffins from the oven and let them cool in the tin for 5 minutes before transferring to a wire rack to cool completely.
    8. Once cooled, enjoy these moist, aromatic pumpkin muffins either warm or at room temperature, with or without a pat of butter.
    Baking pumpkin muffins is both comforting and surprisingly versatile. They’re perfect for mornings when you seek a moment of calm or a sweet snack to break up a busy afternoon.

    Enjoy the subtle spice and sweet pumpkin flavor, knowing that these muffins bring a touch of autumn magic into any moment. Whether shared with loved ones or savored alone, they make each day a little brighter.

  • Spooky Sweetness: Halloween Candy Corn Parfaits

    Spooky Sweetness: Halloween Candy Corn Parfaits

    Halloween is here, and that means its time for playful, colorful treats that bring a dash of chaos to dessert tables. But this year, I wanted to go beyond the usual candies and create something that combines visual jaw-droppers with a nostalgic crunch. Enter the Candy Corn Parfait: a layered spectacle resembling a mini Halloween sunset in a glass.

    This recipe is all about embracing the quirks of candy corn and turning them into a delicious, Instagram-worthy delight. Plus, its surprisingly easy to build, making it perfect for last-minute party setups or spontaneous spooky snack attacks. The best part? Every spoonful reveals a swirl of creamy, crunchy fun that keeps your guests coming back for more.

    Candy Corn Parfait

    The Candy Corn Parfait features layers of creamy vanilla pudding, crunchy cookie crumbs, and colorful candy corn arranged to resemble a sunset. The parfait is assembled in a clear glass to showcase the vibrant colors and contrasting textures, resulting in a visually appealing and crunchy dessert.
    Prep Time 15 minutes
    Cook Time 10 minutes
    Total Time 25 minutes
    Servings: 4
    Course: Main Course
    Cuisine: Festive, Halloween
    Calories: 250

    Ingredients
      

    • 2 cups vanilla pudding prepared and chilled
    • 1 cup cookie crumbs graham cracker or digestive cookies, crushed
    • 1 cup candy corn assorted colors for decoration
    • Optional additional sprinkles or edible glitter for extra decorative flair

    Equipment

    • Mixing bowls
    • Whisk
    • Measuring cups and spoons
    • Glass or serving jars
    • Spoon or spatula

    Method
     

    1. Set up your glass or jar to start assembling the parfait.
    2. Spoon a generous layer of vanilla pudding into the bottom of each glass, filling about a third of the way up.
    3. Sprinkle a layer of cookie crumbs over the pudding to add crunch and texture.
    4. Add another layer of vanilla pudding on top of the cookie crumbs, smoothing the surface gently with the back of a spoon.
    5. Decorate the top with colorful candy corn, arranging them to resemble a mini sunset with vibrant peaks and valleys.
    6. If desired, sprinkle additional edible decorations like sprinkles or glitter over the top for extra Halloween flair.
    7. Repeat the layering process with remaining glasses if making multiple servings, finishing with a topping of candy corn and optional decorations.
    8. Place the assembled parfaits in the refrigerator for about 10 minutes to slightly set and chill before serving.
    9. Remove from the fridge, and serve immediately with a festive straw or spoon to enjoy the creamy, crunchy layers.

    Notes

    For an extra festive touch, use colorful sprinkles or edible glitter to enhance the visual appeal of the layers.

    This Candy Corn Parfait offers a playful twist on traditional Halloween desserts, merging nostalgia with modern flair. Its layered beauty invites curious eyes and eager forks, making it a great conversation starter at any gathering. Plus, it celebrates the season with a burst of color and sweet, creamy textures.

    As the days grow shorter and the spooky decorations go up, this treat reminds us that desserts can be both fun and stunning. It’s a simple way to add a splash of joy and chaos to your celebration, with plenty of room for customization. Now, every spoonful becomes a little moment of festive delight in the chaos of October.

  • Wickedly Delightful Halloween Witch Finger Cookies

    Wickedly Delightful Halloween Witch Finger Cookies

    Halloween is the perfect time to embrace culinary chaos, and these Witch Finger Cookies bring that spirit to life. Their eerily realistic fingers are surprisingly delicious, with a buttery crunch that contrasts their spooky appearance. As I knead the dough, I can already smell a warm fusion of almond and vanilla wafting through the kitchen, promising a treat that’s as creepy as it is tasty.

    What makes this recipe truly special is how easily it transforms a simple sugar cookie into a haunted masterpiece. These eerie fingers don’t just look the part — they snap, crumble, and burst with flavor with each bite. It’s my favorite project to get into the Halloween mood, blending a little culinary mischief with nostalgic delight.

    Witch Finger Cookies

    These Witch Finger Cookies are buttery sugar cookies sculpted into creepy finger shapes, then baked until lightly golden. Their realistic appearance is complemented by almond and vanilla flavors, with a crisp texture that snaps with each bite. Perfect for Halloween, they combine spooky aesthetics with delicious crunch and flavor.
    Prep Time 20 minutes
    Cook Time 15 minutes
    Total Time 35 minutes
    Servings: 12
    Course: Main Course
    Cuisine: Halloween
    Calories: 150

    Ingredients
      

    • 1 cup unsalted butter softened
    • 1 cup granulated sugar
    • 1 teaspoon vanilla extract
    • 1 teaspoon almond extract
    • 1 1/4 cups all-purpose flour
    • 1/2 teaspoon baking powder
    • 1/4 teaspoon salt
    • 2 large egg yolks for shaping and decoration
    • 2 tablespoons milk
    • optional almond slices or slivered almonds for fingernail details

    Equipment

    • Mixing bowls
    • Baking sheet
    • Parchment paper
    • Knife
    • Bowl for melting chocolate or almond slices

    Method
     

    1. Cream together the softened butter and sugar in a mixing bowl until the mixture turns pale and fluffy, about 2-3 minutes.
    2. Mix in vanilla and almond extracts, blending well to incorporate their fragrant flavors.
    3. In a separate bowl, whisk together the flour, baking powder, and salt to evenly distribute the dry ingredients.
    4. Gradually add the dry mixture to the butter mixture, mixing until a crumbly dough forms.
    5. Add the egg yolks and milk, then knead gently until the dough comes together and is smooth enough to handle.
    6. Preheat your oven to 350°F (175°C). Line a baking sheet with parchment paper and set aside.
    7. Divide the dough into small portions, then shape each into a thin, elongated finger shape, tapering at one end to resemble a nail bed.
    8. Use a toothpick or small knife to create little knuckle lines for a more realistic finger appearance.
    9. Place the shaped cookies on the prepared baking sheet, spacing them out properly.
    10. Bake the cookies in the preheated oven for 12 to 15 minutes, or until they turn lightly golden around the edges.
    11. Once baked, let the cookies cool slightly before adding small almond slivers or chopped almonds for fingernail details, pressing them gently onto the tips.
    12. Enjoy these spooky, crunchy witch fingers as a fun Halloween treat!

    Notes

    For extra creepiness, you can lightly dust the fingers with red or green food coloring or add drizzles of dark chocolate for a more macabre effect.

    Sharing these Witch Finger Cookies always sparks a giggle or a startled gasp. Their creepy charm makes them a highlight on any spooky spread, and the recipe is straightforward enough for a last-minute whimsy. It’s a small tradition I look forward to every October, reminding me that sometimes, chaos in the kitchen creates the most memorable moments.

    As the season deepens into spooky nights and pumpkin spice, these cookies add a playful, eerie touch. Their crispy texture and quirky details make every bite a surprise. Watching friends try to guess the secret ingredients is half the fun — and the best part of October’s sweet chaos.

  • Autumn Awakening: Rustic Pumpkin Spice Pancakes for Cozy Mornings

    Autumn Awakening: Rustic Pumpkin Spice Pancakes for Cozy Mornings

    For those mornings when a standard pancake just won’t do, I turn to a seasonal twist that fills my kitchen with the warm aroma of fall. These pumpkin spice pancakes are more than just breakfast; they’re an experience that awakens nostalgic memories of crisp leaves and chilly breezes.

    The secret lies in the cozy blend of cinnamon, nutmeg, and allspice mingling with sweet pumpkin puree, creating a flavor that’s both familiar and new. As I pour the batter onto the hot griddle, I can’t help but smile at the anticipation of fluffy stacks topped with a pat of melting butter and a drizzle of maple syrup.

    Every bite offers a soft crumb infused with spices and a hint of pumpkin, perfectly balancing sweetness and spice. These pancakes are not just a seasonal treat but a celebration of autumn’s comforting flavors. They remind me that breakfast can be an indulgence, even on busy mornings, if you give it the right twist.

    Pumpkin Spice Pancakes

    Pumpkin spice pancakes are fluffy breakfast treats made by mixing a batter that includes pumpkin puree and warm spices. They are cooked on a hot griddle until golden brown, resulting in tender, moist pancakes with a spiced, pumpkin-infused flavor and a light, airy texture. Finished with melted butter and maple syrup, they offer a comforting autumn-inspired flavor profile.
    Prep Time 10 minutes
    Cook Time 15 minutes
    Total Time 25 minutes
    Servings: 4
    Course: Main Course
    Cuisine: American
    Calories: 350

    Ingredients
      

    • 1 1/2 cups all-purpose flour
    • 2 tablespoons brown sugar
    • 1 teaspoon baking powder
    • 1/2 teaspoon baking soda
    • 1/2 teaspoon ground cinnamon preferably ground
    • 1/4 teaspoon ground nutmeg
    • 1/4 teaspoon ground allspice
    • 1 cup pumpkin purée unsweetened
    • 1 cup milk
    • 2 large eggs beaten
    • 2 tablespoons unsalted butter melted
    • 1 teaspoon vanilla extract

    Equipment

    • Large mixing bowl
    • Whisk
    • Griddle or non-stick skillet
    • Spatula

    Method
     

    1. In a large mixing bowl, whisk together the flour, brown sugar, baking powder, baking soda, cinnamon, nutmeg, and allspice until well combined and free of lumps.
    2. In a separate bowl, combine the pumpkin purée, milk, beaten eggs, melted butter, and vanilla extract, whisking until smooth and evenly blended.
    3. Pour the wet mixture into the dry ingredients and gently fold together with a spatula until just combined. Do not overmix; some lumps are okay as they help keep the pancakes fluffy.
    4. Preheat your griddle or non-stick skillet over medium heat until a few drops of water sizzle and evaporate promptly.
    5. Lightly grease the skillet with butter or cooking spray, then pour about 1/4 cup of batter for each pancake, leaving space for them to spread.
    6. Cook until bubbles form on the surface and the edges look set, about 2-3 minutes. The pancakes will start to turn golden brown.
    7. Carefully flip each pancake and cook for another 2-3 minutes until both sides are golden and the pancakes are cooked through.
    8. Transfer the cooked pancakes to a plate and keep warm. Repeat with remaining batter, greasing the skillet as needed.
    9. Serve the pumpkin spice pancakes hot, topped with a pat of butter and drizzled with maple syrup for a finished presentation.

    Notes

    Ensure not to overmix the batter to keep pancakes fluffy. For extra flavor, add a pinch of ginger or a dash of cloves. These pancakes are best enjoyed fresh but can be stored in a refrigerator and gently reheated.

    These pumpkin spice pancakes bring the perfect cozy touch to any crisp autumn morning. Their simple ingredients and forgiving nature make them an ideal choice for busy weekends. Plus, they smell so good, they can make a lazy breakfast feel special.

    As the season shifts and mornings grow cooler, I find comfort in this warm, flavorful treat. It’s a small ritual that signals change and celebrates the flavors of fall, one fluffy bite at a time.

    }