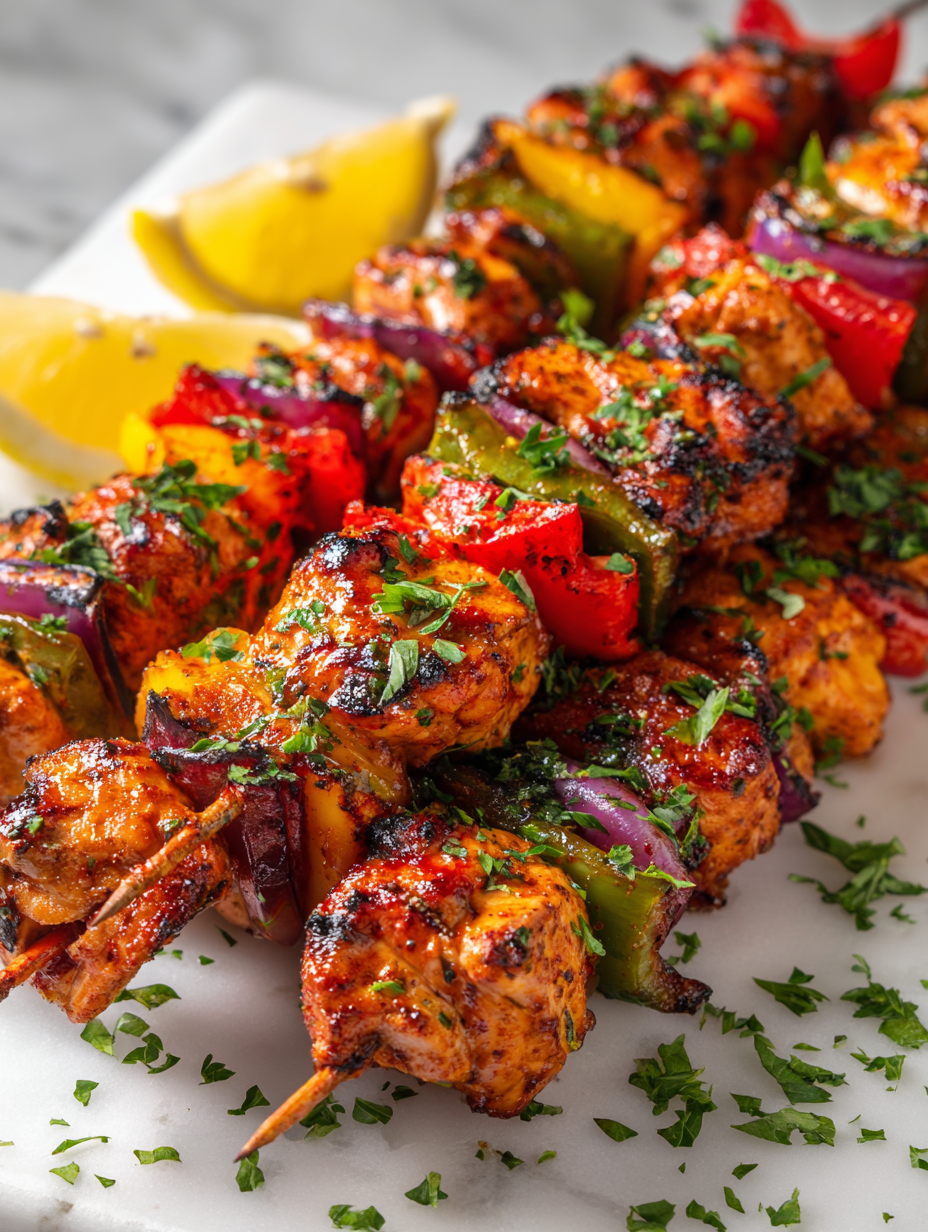
Author: Resao

  • The Secret Ingredient That Turns Your Chili Into a Comfort Symphony

    The Secret Ingredient That Turns Your Chili Into a Comfort Symphony

    Every time I make chili, I think about the chaos of my early cooking days—burnt spices, overcooked beans, and the frantic smell of everything boiling over. But I’ve recently uncovered a little trick that completely changed my approach: adding a splash of smoky bourbon at just the right moment.

    This recipe isn’t just about chili; it’s about transforming a humble dish into a story of nostalgia and adventure. As the ingredients simmer, the kitchen fills with a warm, intoxicating aroma—like a cozy campfire on a crisp fall evening. It’s a reminder that good food doesn’t just nourish the body, but also sparks your imagination.

    Smoky Bourbon Chili

    This chili is made by simmering ground meat, beans, and vegetables with spices, and finished with a splash of smoky bourbon to deepen the flavor. The dish develops a thick, hearty texture with a rich, smoky aroma and vibrant, tender ingredients. It’s a comforting stew with a glossy, inviting appearance and complex taste profile.
    Prep Time 15 minutes
    Cook Time 45 minutes
    Total Time 1 hour
    Servings: 4
    Course: Main Course
    Cuisine: American
    Calories: 450

    Ingredients
      

    • 1 lb ground beef or turkey or any ground meat of choice
    • 1 can kidney beans drained and rinsed
    • 1 can diced tomatoes 14.5 oz can
    • 1 medium onion finely chopped
    • 2 cloves garlic minced
    • 2 tbsp chili powder
    • 1 tsp cumin
    • 0.5 tsp smoked paprika
    • 0.25 tsp cayenne pepper optional, for heat
    • 1 cup beef or vegetable broth
    • 0.25 cup smoky bourbon
    • 2 tsp salt or to taste
    • 1 tbsp oil for sautéing

    Equipment

    • Large Pot or Dutch Oven
    • Wooden Spoon or Spatula

    Method
     

    1. Heat the oil in a large pot over medium heat. Add the chopped onion and cook until it becomes translucent and fragrant, about 3-4 minutes.
    2. Add the minced garlic and cook for another 30 seconds until it releases a fragrant aroma.
    3. Stir in the ground meat and cook, breaking it apart with your spoon, until browned and cooked through, about 5-7 minutes.
    4. Mix in the chili powder, cumin, smoked paprika, cayenne (if using), and salt. Cook for 1-2 minutes, allowing spices to toast and become fragrant.
    5. Add the diced tomatoes and drained beans to the pot, stirring well to combine everything evenly.
    6. Pour in the broth and bring the mixture to a gentle boil, then reduce heat to low and cover loosely.
    7. Allow the chili to simmer uncovered for 30-40 minutes, stirring occasionally, until it thickens and flavors meld together.
    8. Once the chili is nearly ready, pour in the smoky bourbon and stir gently into the mixture.
    9. Simmer the chili for an additional 5 minutes to let the bourbon infuse and deepen the smoky flavor.
    10. Taste the chili and adjust seasoning if needed. Serve hot, garnished with your favorite toppings, and enjoy the rich, smoky aroma and hearty texture.
    This chili is perfect for chilly nights when pressing pause feels like the best thing you can do. The richness and depth of flavors make it a meal to savor, not rush through. I love how it brings the family together, laughter and good smells filling the air.

    There’s an unspoken comfort in a pot like this—a dish that invites you back to simpler times while still feeling fresh and new. Whether enjoyed on its own or with a side of crusty bread, it’s a reminder that sometimes, the best meals are the ones made with love and a little bit of chaos.

  • Vivid Blue Raspberry Slushie: A Nostalgic Chill in Every Sip

    Vivid Blue Raspberry Slushie: A Nostalgic Chill in Every Sip

    Imagine stumbling upon a rainbow-hued ice delight in the heart of summer. This blue raspberry slushie isnt just a treat; its a portal to childhood memories of chasing down that icy stall after a long day. Bright, tangy, and refreshingly sweet, it captures the chaos of summer fun in a single sip.

    What makes this recipe stand out? Its all about the visual impact paired with a perfect balance of flavor. The electric blue color isnt just for show; it amplifies the nostalgic rush of biting into something unexpectedly vibrant. This isnt your average frozen drink—it’s an experience longing for a revival on the hottest days.

    Blue Raspberry Slushie

    This blue raspberry slushie is a frozen beverage made by blending sweetened blue raspberry flavor with crushed ice until smooth and icy. The result is a vibrant, tangy drink with a slushy, refreshing texture and a striking electric blue color that evokes summer nostalgia.
    Prep Time 10 minutes
    Total Time 10 minutes
    Servings: 2
    Course: Main Course
    Cuisine: American
    Calories: 150

    Ingredients
      

    • 1 cup blue raspberry syrup or blue raspberry flavored drink
    • 2 cups crushed ice freshly crushed for optimal texture
    • 1 tablespoon lemon juice adds a hint of brightness

    Equipment

    • Blender
    • Measuring cups and spoons

    Method
     

    1. Measure out the blue raspberry syrup and pour it into the blender.
    2. Add the crushed ice to the blender, filling it nearly to the top.
    3. Squeeze in the lemon juice for a subtle tartness that balances the sweetness.
    4. Secure the lid on the blender and pulse a few times to start breaking up the ice.
    5. Blend on high until the mixture is smooth, icy, and has a slushy consistency, about 30-45 seconds.
    6. Pour the vibrant blue slushie into glasses, stopping when the liquid reaches the rim.
    7. Garnish with a slice of lemon or fresh berries if desired for a colorful finishing touch.
    8. Serve immediately with a straw and enjoy its icy, tangy refreshment.

    Spring and summer are the perfect seasons to toss tradition aside and crank up the creativity in the kitchen. This blue raspberry slushie is a fun way to surprise guests or to enjoy solo as a cool escape from the intense heat.

    Its eye-catching color and lively flavor make it an instant hit for gatherings or quiet evenings. Plus, the simple ingredients and quick preparation mean you can whip one up whenever the craving strikes. Keep your freezer stocked, and youll always have a splash of nostalgia ready to serve.

  • Unconventional Berry-Infused Rum Slushie for Summer Breezes

    Unconventional Berry-Infused Rum Slushie for Summer Breezes

    Imagine a hot summer day where traditional frozen drinks just don’t cut it anymore. I recently decided to shake things up with a rum slushie infused with unexpected berry flavors, turning a simple cocktail into a vibrant dance of tastes and aromas. This isn’t your average frozen drink; it’s a chaotic, colorful splash of summer in a glass.

    The secret lies in the messy joy of blending sweetness with a little stubborn chaos — berries, rum, a splash of lime, and a touch of honesty about how much fun summer can be. Whether you’re throwing a spontaneous backyard party or craving a dazzling midnight treat, this recipe is your ticket to a burst of cool comfort that feels a tad rebellious.

    Berry Rum Slushie

    This berry rum slushie is a frozen cocktail made by blending fresh berries, rum, lime juice, and ice until smooth and icy. The final texture is a vibrant, slushy drink with a colorful, chunky appearance and a refreshing, fruity flavor with a boozy kick.
    Prep Time 10 minutes
    Total Time 10 minutes
    Servings: 2
    Course: Main Course
    Cuisine: Global
    Calories: 150

    Ingredients
      

    • 1 cup frozen mixed berries fresh or thawed
    • 1/4 cup white rum adjust to taste
    • 2 tablespoons lime juice freshly squeezed
    • 1-2 cups ice cubes plus extra if needed
    • 1 tablespoon sweetener (optional) honey or simple syrup to taste

    Equipment

    • Blender
    • Measuring cups and spoons
    • Ice cube tray

    Method
     

    1. Add the frozen berries, rum, lime juice, and sweetener (if using) into the blender.
    2. Pour in about 1 cup of ice cubes to help achieve a thick, slushy consistency.
    3. Blend everything on high speed until the mixture is smooth, thick, and slushy, with tiny ice crystals visible.
    4. Check the consistency and add more ice if you prefer it thicker and more frozen. Blend again briefly to incorporate.
    5. Taste the mixture and adjust sweetness or acidity if needed, blending briefly after any additions.
    6. Pour the vibrant berry rum slushie into glasses and serve immediately with a colorful straw or garnish if desired.
    As the sun dips lower and the evening air cools down, these berry-infused rum slushies become more than just drinks — they are memories in the making. A swirl of berry juice and the slight kick of rum remind us that summer is fleeting, but the flavors linger.

    Stir one up whenever you need a break from the ordinary. The chaotic blend of fresh berries and spirited rum delivers a refreshing escape, perfect for those warm, carefree days. Cheers to embracing the messy, delicious moments of summer with every sip.

  • Pumpkin-Powered Slow Cooker Fall Chili: An Unexpected Twist

    Pumpkin-Powered Slow Cooker Fall Chili: An Unexpected Twist

    As the leaves turn shades of amber and crimson, I find myself craving something different—something that captures the essence of fall with a cozy, comforting twist. Enter my slow cooker fall chili infused with pumpkin, a recipe that transforms ordinary chili into an autumnal masterpiece. The smell alone, with warm spices and roasted pumpkin notes, makes the house feel like a seasonal hug.

    This dish isn’t just about hearty beans and savory meats; it’s about celebrating the fleeting beauty of fall harvest. The slow cooker does most of the work, filling your kitchen with a rich, spicy aroma that teases you long before dinner. It’s perfect for lazy weekends or busy weekdays when you want flavor that’s as effortless as it is unforgettable.

    Slow Cooker Fall Pumpkin Chili

    This chili combines hearty beans, tender ground meat, and roasted pumpkin, all infused with warm spices. It is cooked slowly to develop a thick, flavorful sauce with a slightly chunky texture and vibrant fall colors. The result is a comforting, festive stew perfect for autumn meals.
    Prep Time 15 minutes
    Cook Time 6 minutes
    Total Time 6 minutes
    Servings: 6
    Course: Main Course
    Cuisine: American
    Calories: 350

    Ingredients
      

    • 2 cups cooked pumpkin, roughly chopped roasted or cooked until soft
    • 1 lb ground beef or turkey browned before adding
    • 1 can (15 oz) black beans drained and rinsed
    • 1 can (15 oz) diced tomatoes with juices
    • 1 medium onion diced
    • 2 cloves garlic minced
    • 2 teaspoons chili powder
    • 1 teaspoon cumin
    • 0.5 teaspoon cinnamon adds warmth
    • to taste salt and pepper

    Equipment

    • Slow cooker
    • Chef’s knife
    • Cutting board
    • Ladle

    Method
     

    1. Dice the onion and mince the garlic, setting them aside for the cooking process.
    2. In a skillet over medium heat, cook the ground meat until it’s browned and crumbles, about 5-7 minutes. Drain excess fat and set aside.
    3. Add the diced onion to the same skillet and cook until translucent, about 3-4 minutes, releasing a sweet aroma.
    4. Stir in the minced garlic and cook for another minute until fragrant.
    5. Transfer the cooked meat mixture to the slow cooker, then add the roasted pumpkin, drained black beans, diced tomatoes with their juices, chili powder, cumin, cinnamon, salt, and pepper.
    6. Stir everything together until well combined, ensuring the spices are evenly distributed.
    7. Cover the slow cooker with the lid and cook on low for 6 hours, allowing the flavors to meld and the chili to thicken.
    8. Once cooking is complete, give the chili a gentle stir and taste for seasoning adjustments.
    9. Serve the chili hot, garnished with your favorite toppings like chopped herbs or a dollop of sour cream if desired.

    Notes

    For extra flavor, consider roasting the pumpkin with spices beforehand. Adjust spice levels to taste for a milder or spicier chili.

    This pumpkin chili reminds me of tailgate parties with the crisp air and football cheers echoing in the background. It’s an ode to autumn’s abundance, perfect for cozy nights with loved ones. As the season winds down, this dish keeps the spirit of fall alive, one steaming bowl at a time.

    Once you’ve tasted the blend of pumpkin and spice melded in your slow cooker, it will become your go-to comfort food. Keep a batch simmering and watch how it transforms ordinary evenings into memorable, flavorful moments. That’s the magic of a simple, seasonal chili that’s as easy to love as it is to make.

  • Unlock Refreshing Joy with this Cherry Slushie Twist!

    Unlock Refreshing Joy with this Cherry Slushie Twist!

    Imagine biting into a spoonful of wintery cherries, their tartness bursting against a backdrop of icy coolness. This recipe is my secret to turning such a fleeting moment of summer into a lasting breeze of flavor. It’s more than just a drink; it’s a little rebellion against the dull days.

    Cherry slushies often get poured in a rush, but I take my time to balance sweetness with tart, creating a symphony of flavors in each sip. Whether it’s a hot afternoon or a quick pick-me-up, this recipe transforms ordinary fruit into a miniature frozen fiesta.

    Frozen Cherry Slushie

    This cherry slushie is a vibrant, icy beverage made by blending fresh or frozen cherries with sweetener and ice until smooth and frosty. The final texture is a granular, spoonable frozen mixture with a bright red hue and tart-sweet flavor profile, perfect for hot days or refreshing treats.
    Prep Time 10 minutes
    Total Time 10 minutes
    Servings: 2
    Course: Main Course
    Cuisine: fusion
    Calories: 80

    Ingredients
      

    • 1 cup frozen or fresh cherries pitted if fresh
    • 1 tablespoon honey or simple syrup adjust sweetness to taste
    • 1 cup ice cubes
    • 1/4 cup water or fruit juice to help blending

    Equipment

    • Blender
    • Measuring cups and spoons

    Method
     

    1. Add cherries, honey, ice cubes, and water to the blender.
    2. Pulse the blender a few times to start breaking down the cherries and ice.
    3. Blend on high until the mixture is smooth, icy, and spoonable, about 30-60 seconds.
    4. Stop the blender and check the texture; it should be thick and icy.
    5. Pour the slushie into chilled glasses or bowls.
    6. Serve immediately with a straw or spoon for the perfect cold, tart treat.
    As the weather dips into the cooler months, this cherry slushie brings a flash of summer’s promise. It’s perfect for spontaneous picnics or just a peaceful moment of coolness in a busy day. I keep a stash in the freezer, so I always have a refreshing treat ready.

    Enjoy this simple pleasure whenever you need a quick escape or a splash of nostalgia. The bright, tangy aroma of cherries makes every sip a tiny celebration. Sometimes, the simplest recipes remind us just how sweet life can be, especially with a splash of icy cherry goodness.

  • Spooktacular Halloween Mummy Meatballs: A Nostalgic Twist for Your Party

    Spooktacular Halloween Mummy Meatballs: A Nostalgic Twist for Your Party

    Halloween is the perfect time to embrace playful, creepy foods that bring a nostalgic smile. These mummy meatballs are not only adorable but also packed with comforting flavors that remind me of childhood dinners. The way the stringy mozzarella peeks through the crispy bacon wrappings makes every bite a fun surprise.

    Making these meatballs is like a mini craft project, but the end results are totally worth the chaotic kitchen clean-up. The savory aroma of seasoned meat mingling with the smoky scent of bacon filling the house is a small celebration itself. Perfect for kids and adults alike, they turn ordinary ingredients into a festive, memorable feast.

    Let’s dive into the magic of turning simple ingredients into spooky, cute little mummies that are as delicious as they are charming.

    Halloween Mummy Meatballs

    These mummy meatballs are bite-sized portions of seasoned ground meat wrapped in crispy bacon strips, topped with melted mozzarella to resemble mummies. The dish involves baking and assembling techniques that create a playful, creepy appearance with a tender, flavorful interior and crispy exterior. The final result is a fun, spooky appetizer or main that combines savory textures and visual appeal.
    Prep Time 20 minutes
    Cook Time 30 minutes
    Total Time 50 minutes
    Servings: 4
    Course: Main Course
    Cuisine: American
    Calories: 250

    Ingredients
      

    • 1.5 pounds ground beef preferably 80/20 fat ratio
    • 1 small onion finely minced
    • 2 cloves garlic minced
    • 1/2 cup bread crumbs for binding
    • 1 teaspoon salt
    • 1/2 teaspoon black pepper
    • 8 slices bacon cut in half lengthwise
    • 8 slices mozzarella cheese cut into small rectangles
    • additional olive oil for brushing

    Equipment

    • Baking sheet
    • Cooling rack
    • Meatball scoop or spoon
    • Knife
    • Baking parchment

    Method
     

    1. Preheat your oven to 400°F (200°C). Line a baking sheet with parchment paper and place a cooling rack on top.
    2. Combine the ground beef, minced onion, garlic, bread crumbs, salt, and pepper in a large bowl. Mix gently until evenly incorporated.
    3. Use a meatball scoop or your hands to shape the mixture into small, uniform meatballs about 1 to 1.5 inches in diameter. Place them on the prepared rack.
    4. Wrap each meatball with a half slice of bacon, overlapping slightly to secure. Place the wrapped meatballs on the rack, seam side down.
    5. Brush the bacon-wrapped meatballs lightly with olive oil for extra crispiness. Bake in the preheated oven until the bacon is crispy and the meat is cooked through, about 25-30 minutes.
    6. Remove the meatballs from the oven and let them rest for a few minutes so the juices settle. Carefully transfer them to a serving platter.
    7. Insert a small rectangle of mozzarella into the top of each meatball, pressing gently to let it melt slightly and resemble a mummy’s bandages.
    8. Optional: Use thin strips of cooked bacon or cheese to add ‘mummy wrap’ effects, or arrange mozzarella so it looks like bandages.
    9. Serve the mummy meatballs warm, enjoying the crispy bacon exterior and cheesy interior that reveal the fun, mummy-like appearance with each bite.

    Notes

    Feel free to add small edible googly eyes with bits of olive or black sesame seeds for extra spookiness.
    These mummy meatballs are more than just a Halloween snack; they’re a celebration of fun, flavor, and nostalgia. Sharing them with loved ones turns a simple get-together into a memorable party. Plus, they make a striking centerpiece for your spooky spread.

    Enjoy the process of assembling these little creatures, and revel in the delighted reactions they inspire. As the season shifts and falls into full swing, these bites of joy are just what the occasion calls for. Keep the spirits high and the flavors bold—happy haunting.

  • Chill Out with a Tropical Twist: The Unexpected Charm of Pineapple Coconut Slushie

    Chill Out with a Tropical Twist: The Unexpected Charm of Pineapple Coconut Slushie

    Imagine a summer afternoon where the sun blazes overhead, and you need something cool and refreshing to beat the heat. The pineapple coconut slushie isn’t just a drink; it’s a mini vacation in your glass, transporting you straight to a beachside cabana with each sip. What’s unusual about this recipe is how it blends the sweet, tangy flavor of ripe pineapple with the creamy richness of coconut, all turned icy cold for that perfect refresher.

    This recipe is my little obsession because it isn’t just a summer treat – it’s a mood. With just a handful of ingredients, you can whip up something that feels indulgent, yet effortless. It’s the kind of drink that sparks spontaneous smiles and makes you forget about the world for a moment. Plus, the vibrant yellow and white swirl gives it a picture-worthy appeal that’s hard to resist.

    Pineapple Coconut Slushie

    The pineapple coconut slushie combines ripe pineapple and coconut milk blended with ice to create a smooth, icy beverage with a vibrant yellow and white appearance. It is made using blending techniques that result in a thick, chilled drink with a refreshing, creamy texture. The final presentation shows a frosty, swirl-patterned glass ideal for hot summer days.
    Prep Time 5 minutes
    Total Time 5 minutes
    Servings: 2
    Course: Main Course
    Cuisine: Tropical
    Calories: 150

    Ingredients
      

    • 1 cup ripe pineapple chunks fresh or frozen
    • 1/2 cup coconut milk full-fat for creaminess
    • 1 cup ice cubes adjust for desired thickness

    Equipment

    • Blender
    • Measuring cups and spoons

    Method
     

    1. Add the ripe pineapple chunks, coconut milk, and ice cubes to your blender.
    2. Blend the mixture on high speed until the ice is crushed and the drink is smooth, about 30-45 seconds.
    3. Check the consistency; if it’s too thick, add a splash more coconut milk and blend again for a few seconds.
    4. Pour the slushie into chilled glasses, allowing the icy mixture to swirl into a vibrant yellow and white pattern.
    5. Garnish with a small pineapple wedge or a sprinkle of shredded coconut if desired.
    6. Serve immediately with a straw and enjoy the refreshing, creamy texture.

    In the end, this pineapple coconut slushie is more than just a recipe; it’s a small escape from everyday chaos. Whether you’re lounging on your porch or hosting a casual gathering, it adds a touch of sunshine to any moment. No matter the season, this icy delight keeps the good vibes flowing and the senses satisfied.

    Keep it simple, keep it cool, and let the flavors whisk you away. Sometimes, all you need is a frozen glass filled with tropical joy to make everything a little brighter. So, next time you crave something sweet, turn to this quick, irresistible slushie. It’s a tiny taste of paradise, anytime you desire.

  • Pumpkin Power: The Surprising Health Boost in Every Bite

    Pumpkin Power: The Surprising Health Boost in Every Bite

    For those of us obsessed with seasonal eats, pumpkin isn’t just for flavor—it’s a nutrient powerhouse. This recipe takes the humble pancake and elevates it with the rich, earthy goodness of pumpkin, but with a twist: keeping it light and healthy. Imagine waking up on a crisp fall morning to the aroma of spiced pumpkin and warm batter that feels indulgent yet guilt-free.

    What makes this recipe stand out is how it transforms a classic comfort food into a nourishing start to the day. I’ve included a secret ingredient that boosts fiber and adds a gentle sweetness, making each bite a delightful experience. Plus, it’s versatile enough for both hectic mornings and lazy weekends spent savoring every last crumb.

    Pumpkin Whole Wheat Pancakes

    These pumpkin pancakes are made by mixing whole wheat flour with pumpkin puree, spices, and a few other ingredients, then cooking until golden brown. The batter produces fluffy pancakes with a slightly dense, moist texture and a warm, spiced flavor. They are a wholesome breakfast option that showcases seasonal pumpkin in a comforting form.
    Prep Time 10 minutes
    Cook Time 15 minutes
    Total Time 25 minutes
    Servings: 4
    Course: Main Course
    Cuisine: American
    Calories: 250

    Ingredients
      

    • 1 1/2 cups whole wheat flour
    • 1 cup pumpkin puree
    • 2 tablespoons brown sugar
    • 1 teaspoon ground cinnamon
    • 1/2 teaspoon ground ginger
    • 1/4 teaspoon ground nutmeg
    • 1 cup milk
    • 2 large eggs
    • 2 tablespoons vegetable oil
    • 1 teaspoon vanilla extract

    Equipment

    • Mixing bowls
    • Whisk
    • Non-stick skillet or griddle
    • Spatula

    Method
     

    1. In a large mixing bowl, whisk together the whole wheat flour, brown sugar, cinnamon, ginger, and nutmeg to combine the dry ingredients evenly.
    2. Add the pumpkin puree, milk, eggs, vegetable oil, and vanilla extract to the dry mixture.
    3. Whisk everything together until the batter is smooth and just combined, with no large lumps remaining. It should be slightly thick but pourable.
    4. Preheat a non-stick skillet or griddle over medium heat until hot, and lightly grease if needed.
    5. Pour about 1/4 cup of batter onto the skillet for each pancake, allowing space between them.
    6. Cook the pancakes until bubbles form on the surface and the edges look set, about 2-3 minutes; then flip carefully with a spatula.
    7. Cook for another 2-3 minutes on the second side, until golden brown and cooked through.
    8. Transfer the cooked pancakes to a plate and keep warm while you repeat with remaining batter.
    9. Serve the pumpkin pancakes warm, topped with your favorite extras like fresh fruit, maple syrup, or a dusting of powdered sugar.

    Notes

    For extra flavor, add a dash of vanilla or a sprinkle of chopped nuts on top before serving.

    These pumpkin pancakes came about as a way to merge my love for cozy mornings with my desire to eat more nutritiously. They’ve become a staple in my autumn repertoire, especially when the air turns crisp and the leaves crunch beneath my feet. Sharing this recipe is my way of embracing the season’s bounty and spreading some healthful cheer.

    Whether you’re a pumpkin lover or just seeking a comforting, wholesome breakfast, these pancakes won’t disappoint. They remind us that in the chaos of everyday life, simple ingredients can bring undeniable joy and nourishment to our mornings.

  • Spooky Mummy Hot Dogs: A Halloween Snack with a Twist

    Spooky Mummy Hot Dogs: A Halloween Snack with a Twist

    Halloween is the perfect time to embrace the creepy and fun side of cooking. These mummy hot dogs transform an everyday snack into a spooky centerpiece that kids will love. The aroma of grilled buns and sizzling sausages instantly sparks Halloween cheer in my kitchen.

    But what makes this recipe stand out is the playful chaos it invites. Wrapping each hot dog like a mummy, with bits of stringy cheese and olives for eyes, adds a silly, spooky flair. It’s a perfect project for a family-friendly Halloween gathering or a spooky Netflix snack session.

    WHY I LOVE THIS RECIPE?

    • I get to blend nostalgia with creative chaos in the kitchen.
    • The surprise element of seeing faces emerge from the wrapping cheers everyone up.
    • The smell of roasted hot dogs and baked dough is simply irresistible.
    • It’s a fun, messy activity that turns into a tasty masterpiece.
    • Quick to prepare, it’s ideal for last-minute Halloween plans.

    AVOID MY DISASTER (You’re Welcome)

    • FORGOT to preheat the oven? The dough was cold and didn’t puff. Warm the dough first!
    • DUMPED ketchup or mustard on the eyes? Use tiny olives instead, less mess.
    • OVER‑TORCHED the cheese? Keep a close eye at 375°F. Shorter bake time helps.
    • MISSED the sticking of wrapping? Wet the edges slightly to seal better.

    QUICK FIXES THAT SAVE YOUR DAY

    • When dough sticks, splash a little water to loosen it.
    • Patch torn dough with extra strips of bread leftover from cutting shapes.
    • Shield from over-browning by tenting with foil early on—crisp is best.
    • Use a spray of oil for a shiny, golden crust—smells divine.
    • When in doubt, swap out cheese for shredded mozzarella for meltiness.

    Halloween Mummy Hot Dogs

    This dish features hot dogs wrapped in strips of dough to resemble mummies, baked until golden and crispy. Small pieces of cheese and olives serve as eyes, giving a spooky, fun appearance. The final result is a savory, slightly crunchy snack with a playful, mummy-themed presentation.
    Prep Time 15 minutes
    Cook Time 15 minutes
    Total Time 30 minutes
    Servings: 4
    Course: Main Course
    Cuisine: American
    Calories: 250

    Ingredients
      

    • 4 pieces hot dogs beef or chicken
    • 1 pack crescent roll dough or rolled pizza dough
    • small pieces cheddar cheese cut into tiny triangles for eyes
    • small pieces black olives pitted, sliced for eyes

    Equipment

    • Baking sheet
    • Parchment paper
    • Sharp knife
    • Small spoon or tweezers for eyes

    Method
     

    1. Preheat your oven to 375°F (190°C) and line a baking sheet with parchment paper.
    2. Unroll the crescent dough and gently press together the perforations to form a solid sheet.
    3. Slice the dough into strips about 1/2 inch wide; these will be the mummy wrappings.
    4. Place each hot dog on the baking sheet. Take a strip of dough and wrap it loosely around a hot dog, overlapping slightly as you go. Cover about three-quarters of the hot dog lengthwise, leaving one end free.
    5. Repeat the wrapping with remaining hot dogs, ensuring they’re all evenly covered with strips of dough.
    6. Place small slices of cheddar cheese on the wrapped hot dogs to serve as eyes, and top each with a small black olive slice for pupil.
    7. Bake in the preheated oven for about 12-15 minutes, or until the dough is golden brown and crispy, and the hot dogs are heated through.
    8. Remove from oven and let cool slightly before transferring to a serving platter. Enjoy warm, with any additional condiments if desired.

    Notes

    For a quick fix, you can use shredded cheese and whole black olives instead of slices. Keep an eye on the baking time to prevent over-browning.

    These mummy hot dogs give Halloween snacks a whimsical twist with plausible edibility. Their appeal isn’t just in their look but in the way they invite chaos and creativity. Savoring each bite fills the room with a nostalgic, spooky magic that’s hard to replicate.

    As the season shifts and pumpkins glow, these snacks remind us that simple ingredients can turn into memorable moments. They’re perfect for sharing thrill and laughter with loved ones—part of what makes October so special.

  • Unconventional Fall Casseroles You Haven’t Tried Yet

    Unconventional Fall Casseroles You Haven’t Tried Yet

    Every fall, I find myself craving more than just pumpkin spice. There’s a quiet thrill in reinventing traditional casseroles with unexpected ingredients—think sweet potatoes mixed with apple chunks or stuffing layered with roasted squash. It’s a playful way to celebrate the season’s bounty while surprising your palate.

    Yesterday, I experimented with a bizarre but beautiful combo: sage-infused chicken and cranberry quinoa casserole. The smells alone—warm sage, roasted garlic—made my kitchen smell like a cozy autumn forest. These dishes aren’t just warming; they turn routine dinner into a seasonal adventure.

    Sage-Infused Chicken and Cranberry Quinoa Casserole

    This casserole combines tender chunks of chicken simmered with aromatic sage and roasted garlic, layered with sweet tart cranberries and fluffy cooked quinoa. The dish is baked until bubbling and golden, creating a savory yet seasonal centerpiece with a hearty, textured consistency.
    Prep Time 15 minutes
    Cook Time 35 minutes
    Total Time 50 minutes
    Servings: 4
    Course: Main Course
    Cuisine: Seasonal
    Calories: 430

    Ingredients
      

    • 1 pound chicken breast, cut into chunks
    • 1 cup quinoa, rinsed
    • 2 cups chicken broth
    • 3 cloves garlic, minced
    • 2 tablespoons olive oil
    • 1 teaspoon dried sage
    • 1 cup cranberries, fresh or dried
    • 1 cup shredded cheese (cheddar or Gruyère)
    • to taste Salt and pepper

    Equipment

    • Large pot
    • Baking dish
    • Saute pan
    • Mixing spoon

    Method
     

    1. In a large pot, bring the chicken broth to a boil. Add the rinsed quinoa, reduce heat to low, and cover. Simmer until the quinoa is tender and fluffy, about 15 minutes.
    2. While the quinoa cooks, heat olive oil in a saute pan over medium heat. Add the minced garlic and dried sage, stirring until fragrant—about 30 seconds—and then add the chicken chunks. Cook until the chicken is browned on all sides and cooked through, about 8-10 minutes.
    3. Preheat your oven to 375°F (190°C). In a mixing bowl, combine the cooked quinoa, chicken, cranberries, and shredded cheese. Season with salt and pepper to taste, then mix gently to distribute everything evenly.
    4. Transfer the mixture into a greased baking dish, spreading it out into an even layer. Sprinkle a little extra cheese on top for a golden finish.
    5. Bake uncovered in the preheated oven until bubbling around the edges and the cheese on top is golden brown, about 20-25 minutes.
    6. Remove from the oven and let the casserole rest for a few minutes. Serve warm, enjoying the savory chicken melded with the sweet cranberries and aromatic sage.

    Fall casseroles are more than leftovers on a plate—they’re a celebration of autumn’s richness. They remind us that even familiar flavors can be transformed into something extraordinary with a little bit of creativity.

    As the leaves turn, so do my ideas for the table. Each new casserole is a chance to explore seasonal ingredients and share a bit of seasonal magic with loved ones. Here’s to cozy nights and hearty, unexpected bites that warm both belly and soul.