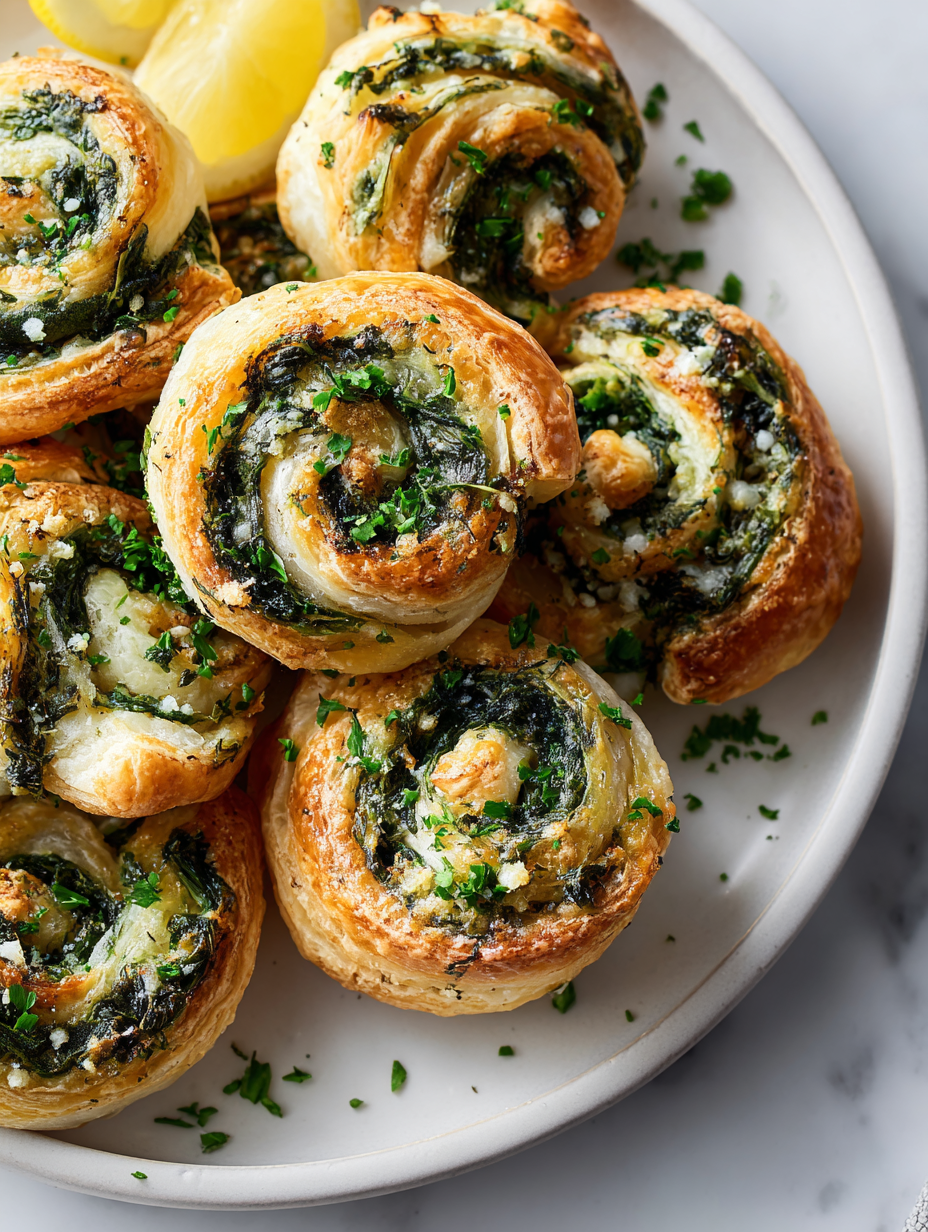
Author: Resao

  • Spooky Sips: The Haunted Red Vampire Punch

    Spooky Sips: The Haunted Red Vampire Punch

    This Vampire Punch isn’t just for goblins and ghosts; it’s a chance to explore the chaos of a Halloween night in a single glass. One whiff of the deep red juice, tinged with a hint of citrus, transports me straight into a haunted mansion’s eerie corridors. And the best part? Its chilling hue makes every sip feel like a drop of midnight.

    As a food blogger who loves pushing culinary boundaries, I’ve crafted this punch with a secret twist—an unexpected burst of spicy soda that fizzes like a potion brewing. It’s simple enough for last-minute chaos and spooky enough to turn any gathering into a haunted feast. Plus, it’s all about the spectacle, with floating “eyeballs” and shimmering red magic.

    Halloween Vampire Punch

    This Vampire Punch combines deep red fruit juices with citrus flavors and a spicy soda to create a vibrant, fizzy beverage. The punch features floating
    Prep Time 10 minutes
    Total Time 10 minutes
    Servings: 8
    Course: Main Course
    Cuisine: Halloween
    Calories: 95

    Ingredients
      

    • 2 cups cranberry juice use chilled for best effect
    • 1 cup orange juice preferably freshly squeezed
    • 1/2 cup lemon juice freshly squeezed for bright flavor
    • 1 cup spicy soda (like ginger beer or spicy ginger ale) adds fizz and spicy kick
    • Ice cubes as needed to chill and serve
    • Optional floating eyeball decorations for spooky visual appeal

    Equipment

    • Large pitcher
    • Measuring cups
    • Stirring spoon
    • Sharp knife
    • Floating eyeball decorations

    Method
     

    1. Pour the cranberry juice into a large pitcher, creating a vivid red base for your punch.
    2. Add the orange juice to the pitcher, mixing gently with a stirring spoon to blend the rich flavors.
    3. Squeeze the fresh lemon juice into the mixture, then stir again to incorporate the citrus brightness.
    4. Fill glasses with ice cubes, then pour the fruit juice mixture over the ice, filling each glass about three-quarters full.
    5. Slowly top each glass with spicy soda, letting it fizzle and create a lively, frothy head on the punch.
    6. Gently float the spooky eyeball decorations on the surface of each glass to add a creepy Halloween touch.
    7. Serve immediately, enjoying the bubbling, eye-catching spectacle and refreshing, spicy flavor.

    Notes

    Feel free to prepare the punch ahead of time and add the soda just before serving to maintain its fizz. The floating eyeballs are best added right before serving for maximum impact.

    Gather around with this eye-popping Vampiric Punch and watch your guests’ faces light up—whether with delight or terror. Its layered flavors and haunting hue make it a perfect centerpiece for any costume bash. And honestly, there’s something about serving it with a crooked smile that captures the true spirit of Halloween.

    So, whether you’re embracing the chaos or just craving a vibrant refreshment, this punch guarantees a memorable toast. Pour it into your favorite cauldron or crystal pitcher, and let the night’s mysterious fun begin. Cheers to a frightfully good time!

  • Earthy Warmth: Ginger-Infused Butternut Squash Soup

    Earthy Warmth: Ginger-Infused Butternut Squash Soup

    Imagine a bowl that captures the crisp essence of autumn, yet with a surprising twist. This butternut squash soup with ginger isn’t your average fall comfort food; it’s a celebration of seasonal flavors with a zing. The roasted squash’s milky sweetness is perfectly balanced by the sharp, fragrant ginger, making each spoonful an adventure.

    Cooking this soup is like inviting a cozy, spicy hug into your kitchen. It’s simple to prepare, but the flavors unfold beautifully over time. Perfect for chilly nights when you crave something nourishing and a little unexpected.

    Butternut Squash and Ginger Soup

    This butternut squash soup features roasted squash blended with fresh ginger, resulting in a smooth, velvety texture with a vibrant, spicy aroma. The process involves roasting the squash to enhance sweetness, then simmering and pureeing the mixture for a creamy finish. Its appearance is a bright, orange-hued soup with a silky consistency.
    Prep Time 15 minutes
    Cook Time 40 minutes
    Total Time 55 minutes
    Servings: 4
    Course: Main Course
    Cuisine: Contemporary
    Calories: 150

    Ingredients
      

    • 1 large butternut squash peeled and cubed
    • 2 inch fresh ginger root peeled and minced
    • 1 tablespoon olive oil for roasting
    • 1 medium onion diced
    • 2 cups vegetable broth or chicken broth
    • to taste salt and pepper for seasoning

    Equipment

    • Baking sheet
    • Chef’s knife
    • Cutting board
    • Large pot
    • Immersion Blender or Regular Blender
    • Measuring cups
    • Spoon

    Method
     

    1. Preheat the oven to 400°F (200°C). Place the peeled and cubed butternut squash on a baking sheet, drizzle with olive oil, and toss to coat.
    2. Roast the squash in the oven for about 25-30 minutes, until it becomes tender and begins to caramelize around the edges, filling your kitchen with sweet, nutty aromas.
    3. While the squash roasts, heat a large pot over medium heat and add a splash of oil. Sauté the diced onion until translucent and fragrant, about 5 minutes.
    4. Add the minced ginger to the onions and cook for another minute until it releases a spicy, aromatic scent.
    5. Once the squash is roasted and has cooled slightly, add it to the pot with the sautéed onion and ginger.
    6. Pour in the vegetable broth and bring the mixture to a gentle simmer, allowing the flavors to meld for about 10 minutes.
    7. Use an immersion blender to carefully blend the soup directly in the pot until smooth and creamy, or transfer to a blender in batches and puree.
    8. Taste the soup and season with salt and pepper as needed, blending again briefly if necessary to incorporate.
    9. Reheat gently if needed and serve hot, garnished with a drizzle of olive oil or a dollop of sour cream if desired.
    This recipe is a beautifully imperfect reflection of the season’s bounty. It encourages improvisation, letting the ginger and squash take center stage. Every spoonful feels like a little celebration of fall’s fleeting magic.

    With its bright, earthy flavors and comforting warmth, this soup is more than just a meal—it’s a little moment of peace. Whether you serve it as a starter or a main, it’s guaranteed to stir feelings of home and harmony. A bowl of this soup is sure to make any day feel a bit more special.

  • A Tangy Twist: Unveiling a New Realm of Tomato Sauce

    A Tangy Twist: Unveiling a New Realm of Tomato Sauce

    Cooking during the golden hour has a magic of its own. I recently discovered that simmering tomatoes with a splash of balsamic vinegar unlocks a deep, caramelized sweetness that dances on the tongue. It’s a playful rebellion against the usual garlic and basil crowd, transforming a humble sauce into a conversation starter.

    This recipe isn’t just about flavor; it’s about those little moments of culinary curiosity. The aroma of slow-cooked tomatoes with a hint of onion fills my kitchen with nostalgic warmth, making it impossible to resist the urge to dive in early. It’s the perfect project for a quiet weekend, when patience is your best ingredient.

    Caramelized Tomato Balsamic Sauce

    This sauce is made by simmering ripe tomatoes with a splash of balsamic vinegar, resulting in a deep, sweet, and slightly tangy flavor. The slow cooking process develops a thick, glossy texture with caramelized notes and a vibrant appearance. It is perfect for drizzling over pasta, grilled vegetables, or meats.
    Prep Time 10 minutes
    Cook Time 40 minutes
    Total Time 50 minutes
    Servings: 4
    Course: Main Course
    Cuisine: Mediterranean
    Calories: 120

    Ingredients
      

    • 2 pounds ripe tomatoes chopped
    • 1 medium yellow onion finely diced
    • 2 tablespoons balsamic vinegar adds sweetness and depth
    • 2 cloves garlic minced
    • 1 tablespoon olive oil for sautéing
    • to taste salt and pepper for seasoning

    Equipment

    • Saucepan
    • Wooden spoon

    Method
     

    1. Heat the olive oil in a saucepan over medium heat until shimmering and fragrant.
    2. Add the finely diced onion and sauté until translucent, about 5 minutes, until it fills the kitchen with a sweet aroma and becomes soft.
    3. Stir in the minced garlic and cook for another minute until fragrant, making the mixture slightly bubbly.
    4. Add the chopped tomatoes to the saucepan, stirring to combine them with the onion and garlic base.
    5. Pour in the balsamic vinegar, stirring well to coat the tomatoes, and bring the mixture to a gentle simmer.
    6. Reduce the heat to low and let the sauce simmer gently, stirring occasionally, for about 30-40 minutes until the mixture thickens and develops a glossy, caramelized appearance with rich aroma.
    7. Season the sauce with salt and pepper to taste, stirring to ensure even flavor distribution.
    8. Remove the sauce from heat once it has achieved a deep color and a thick, jam-like consistency.
    9. Transfer the sauce to a bowl or serve directly, allowing it to cool slightly before using as a condiment or meal accompaniment.
    This tomato sauce is a reminder that simplicity combined with a little creativity can yield remarkable results. It pairs beautifully with everything from fluffy pasta to roasted vegetables, adding a splash of sunshine to any meal.

    Whenever I make this sauce, I feel connected to a tradition of slow, loving cooking. It reminds me that sometimes, the best dishes are made with a little chaos, a lot of patience, and a dash of daring. It’s more than a recipe; it’s a gentle invitation to enjoy the process and savor the flavors.

  • Spooky Sweetness: Halloween Candy Corn Parfaits

    Spooky Sweetness: Halloween Candy Corn Parfaits

    Halloween is here, and that means its time for playful, colorful treats that bring a dash of chaos to dessert tables. But this year, I wanted to go beyond the usual candies and create something that combines visual jaw-droppers with a nostalgic crunch. Enter the Candy Corn Parfait: a layered spectacle resembling a mini Halloween sunset in a glass.

    This recipe is all about embracing the quirks of candy corn and turning them into a delicious, Instagram-worthy delight. Plus, its surprisingly easy to build, making it perfect for last-minute party setups or spontaneous spooky snack attacks. The best part? Every spoonful reveals a swirl of creamy, crunchy fun that keeps your guests coming back for more.

    Candy Corn Parfait

    The Candy Corn Parfait features layers of creamy vanilla pudding, crunchy cookie crumbs, and colorful candy corn arranged to resemble a sunset. The parfait is assembled in a clear glass to showcase the vibrant colors and contrasting textures, resulting in a visually appealing and crunchy dessert.
    Prep Time 15 minutes
    Cook Time 10 minutes
    Total Time 25 minutes
    Servings: 4
    Course: Main Course
    Cuisine: Festive, Halloween
    Calories: 250

    Ingredients
      

    • 2 cups vanilla pudding prepared and chilled
    • 1 cup cookie crumbs graham cracker or digestive cookies, crushed
    • 1 cup candy corn assorted colors for decoration
    • Optional additional sprinkles or edible glitter for extra decorative flair

    Equipment

    • Mixing bowls
    • Whisk
    • Measuring cups and spoons
    • Glass or serving jars
    • Spoon or spatula

    Method
     

    1. Set up your glass or jar to start assembling the parfait.
    2. Spoon a generous layer of vanilla pudding into the bottom of each glass, filling about a third of the way up.
    3. Sprinkle a layer of cookie crumbs over the pudding to add crunch and texture.
    4. Add another layer of vanilla pudding on top of the cookie crumbs, smoothing the surface gently with the back of a spoon.
    5. Decorate the top with colorful candy corn, arranging them to resemble a mini sunset with vibrant peaks and valleys.
    6. If desired, sprinkle additional edible decorations like sprinkles or glitter over the top for extra Halloween flair.
    7. Repeat the layering process with remaining glasses if making multiple servings, finishing with a topping of candy corn and optional decorations.
    8. Place the assembled parfaits in the refrigerator for about 10 minutes to slightly set and chill before serving.
    9. Remove from the fridge, and serve immediately with a festive straw or spoon to enjoy the creamy, crunchy layers.

    Notes

    For an extra festive touch, use colorful sprinkles or edible glitter to enhance the visual appeal of the layers.

    This Candy Corn Parfait offers a playful twist on traditional Halloween desserts, merging nostalgia with modern flair. Its layered beauty invites curious eyes and eager forks, making it a great conversation starter at any gathering. Plus, it celebrates the season with a burst of color and sweet, creamy textures.

    As the days grow shorter and the spooky decorations go up, this treat reminds us that desserts can be both fun and stunning. It’s a simple way to add a splash of joy and chaos to your celebration, with plenty of room for customization. Now, every spoonful becomes a little moment of festive delight in the chaos of October.

  • Autumn Awakening: Rustic Pumpkin Spice Pancakes for Cozy Mornings

    Autumn Awakening: Rustic Pumpkin Spice Pancakes for Cozy Mornings

    For those mornings when a standard pancake just won’t do, I turn to a seasonal twist that fills my kitchen with the warm aroma of fall. These pumpkin spice pancakes are more than just breakfast; they’re an experience that awakens nostalgic memories of crisp leaves and chilly breezes.

    The secret lies in the cozy blend of cinnamon, nutmeg, and allspice mingling with sweet pumpkin puree, creating a flavor that’s both familiar and new. As I pour the batter onto the hot griddle, I can’t help but smile at the anticipation of fluffy stacks topped with a pat of melting butter and a drizzle of maple syrup.

    Every bite offers a soft crumb infused with spices and a hint of pumpkin, perfectly balancing sweetness and spice. These pancakes are not just a seasonal treat but a celebration of autumn’s comforting flavors. They remind me that breakfast can be an indulgence, even on busy mornings, if you give it the right twist.

    Pumpkin Spice Pancakes

    Pumpkin spice pancakes are fluffy breakfast treats made by mixing a batter that includes pumpkin puree and warm spices. They are cooked on a hot griddle until golden brown, resulting in tender, moist pancakes with a spiced, pumpkin-infused flavor and a light, airy texture. Finished with melted butter and maple syrup, they offer a comforting autumn-inspired flavor profile.
    Prep Time 10 minutes
    Cook Time 15 minutes
    Total Time 25 minutes
    Servings: 4
    Course: Main Course
    Cuisine: American
    Calories: 350

    Ingredients
      

    • 1 1/2 cups all-purpose flour
    • 2 tablespoons brown sugar
    • 1 teaspoon baking powder
    • 1/2 teaspoon baking soda
    • 1/2 teaspoon ground cinnamon preferably ground
    • 1/4 teaspoon ground nutmeg
    • 1/4 teaspoon ground allspice
    • 1 cup pumpkin purée unsweetened
    • 1 cup milk
    • 2 large eggs beaten
    • 2 tablespoons unsalted butter melted
    • 1 teaspoon vanilla extract

    Equipment

    • Large mixing bowl
    • Whisk
    • Griddle or non-stick skillet
    • Spatula

    Method
     

    1. In a large mixing bowl, whisk together the flour, brown sugar, baking powder, baking soda, cinnamon, nutmeg, and allspice until well combined and free of lumps.
    2. In a separate bowl, combine the pumpkin purée, milk, beaten eggs, melted butter, and vanilla extract, whisking until smooth and evenly blended.
    3. Pour the wet mixture into the dry ingredients and gently fold together with a spatula until just combined. Do not overmix; some lumps are okay as they help keep the pancakes fluffy.
    4. Preheat your griddle or non-stick skillet over medium heat until a few drops of water sizzle and evaporate promptly.
    5. Lightly grease the skillet with butter or cooking spray, then pour about 1/4 cup of batter for each pancake, leaving space for them to spread.
    6. Cook until bubbles form on the surface and the edges look set, about 2-3 minutes. The pancakes will start to turn golden brown.
    7. Carefully flip each pancake and cook for another 2-3 minutes until both sides are golden and the pancakes are cooked through.
    8. Transfer the cooked pancakes to a plate and keep warm. Repeat with remaining batter, greasing the skillet as needed.
    9. Serve the pumpkin spice pancakes hot, topped with a pat of butter and drizzled with maple syrup for a finished presentation.

    Notes

    Ensure not to overmix the batter to keep pancakes fluffy. For extra flavor, add a pinch of ginger or a dash of cloves. These pancakes are best enjoyed fresh but can be stored in a refrigerator and gently reheated.

    These pumpkin spice pancakes bring the perfect cozy touch to any crisp autumn morning. Their simple ingredients and forgiving nature make them an ideal choice for busy weekends. Plus, they smell so good, they can make a lazy breakfast feel special.

    As the season shifts and mornings grow cooler, I find comfort in this warm, flavorful treat. It’s a small ritual that signals change and celebrates the flavors of fall, one fluffy bite at a time.

    }

  • Chill Out with the Coffee Slushie: A Unexpected Summer Secret

    Chill Out with the Coffee Slushie: A Unexpected Summer Secret

    As someone who thrives on the aroma of freshly ground coffee beans, I found myself craving a cold twist when the summer heat hit. Instead of the usual brew, I decided to experiment with a frozen version that could keep me energized and cool at the same time. That’s how the coffee slushie was born, a blend of rich coffee flavor and icy refreshment.

    This recipe isn’t just about beating the heat; it’s about transforming your daily coffee ritual into a frozen escape. The best part? It’s so simple that you’ll want to make it all season long. Imagine biting into a chilly coffee cloud, with a hint of sweetness and a burst of caffeine—perfect for sunny afternoons or pre-dinner sips.

    From the texture that melts smoothly on your tongue to the invigorating aroma, this slushie delivers a sensory jolt. It’s more than a drink—it’s a moment of bliss that turns ordinary coffee into a cool adventure. Once you try it, you won’t want to go back to your regular cup again.

    Coffee Slushie

    A cold frozen beverage blending brewed coffee, milk, and sugar to create a smooth, icy texture with a rich coffee flavor. The mixture is blended until slushy and served chilled, offering a refreshing, caffeine-infused treat with a silky consistency.
    Prep Time 5 minutes
    Cook Time 10 minutes
    Total Time 15 minutes
    Servings: 2
    Course: Main Course
    Cuisine: Global
    Calories: 90

    Ingredients
      

    • 1 cup freshly brewed coffee cooled to room temperature
    • 1/2 cup milk any type you prefer
    • 2 tablespoons sugar adjust to taste
    • 2 cups ice cubes

    Equipment

    • Coffee maker or brewing method
    • Blender

    Method
     

    1. Brew a strong cup of coffee and let it cool to room temperature, ensuring it’s not steaming hot when added to the blender.
    2. Pour the cooled coffee into the blender, then add the milk and sugar. Blend briefly until the sugar dissolves and the mixture is combined smoothly.
    3. Add the ice cubes to the blender, then start blending on high speed. Continue until the ice is finely crushed and the mixture reaches a thick, slushy consistency.
    4. Check the texture; it should be cold, smooth, and scoopable, resembling a soft-serve consistency. If it’s too thick, add a splash more milk and blend briefly again.
    5. Pour the coffee slushie into chilled glasses, and if desired, garnish with a sprinkle of cocoa powder or a coffee bean for presentation.
    6. Serve immediately with a straw or spoon, enjoying the icy, caffeinated refreshment in every sip.

    This coffee slushie comes into its own during the hottest months, where cold beverages are a necessity rather than a luxury. It’s a simple joy that transforms your usual caffeine fix into an icy revolution, perfect for cooling down and escaping into a flavor-filled moment. The way the flavors intensify with each spoonful makes it a true treat that’s hard to forget.

    It’s a reminder that sometimes, the best ideas happen with just a little ice, some coffee, and a dash of curiosity. No matter your day or season, this frozen delight will slide right into your routine, offering a splash of refreshment whenever needed most.

  • Halloween Jack-o’-Lantern Stuffed Bell Peppers: A Spooky Feast

    Halloween Jack-o’-Lantern Stuffed Bell Peppers: A Spooky Feast

    Every October, I look forward to transforming ordinary vegetables into spooky centerpieces that delight kids and adults alike. These Halloween Stuffed Bell Pepper Jack-o’-Lanterns turn bright peppers into grinning grins, filled with savory goodness that warms the soul amid chilly fall nights. It you love a little edible art woven with comfort food, this recipe will surprise you.

    The joy of carving is tempered with flavor here, as each pepper is hollowed out with purpose and filled with a richly seasoned mixture. The smell of melting cheese and roasting peppers fills the house, teasing everyone tummy rumbles. It turns a simple dinner into a mini Halloween party for your taste buds and your decor.

    Halloween Stuffed Bell Pepper Jack-o’-Lanterns

    This dish involves hollowing out colorful bell peppers and carving them into jack-o’-lantern faces. Each pepper is filled with a savory mixture, topped with cheese, and baked until tender and bubbly. The final presentation resembles glowing pumpkin lanterns with a warm, cheesy interior.
    Prep Time 15 minutes
    Cook Time 30 minutes
    Total Time 45 minutes
    Servings: 4
    Course: Main Course
    Cuisine: American
    Calories: 250

    Ingredients
      

    • 4 large bell peppers assorted colors for visual effect
    • 1 cup cooked rice can use leftover rice
    • 1/2 cup shredded cheese cheddar, Monterey Jack, or a mix
    • 1 small onion finely chopped
    • 2 cloves garlic minced
    • 1 teaspoon paprika for flavor and color
    • 1 tablespoon olive oil
    • to taste salt and pepper

    Equipment

    • Kitchen knife
    • Spoon
    • Baking sheet
    • Aluminum Foil

    Method
     

    1. Preheat your oven to 375°F (190°C). Arrange a baking sheet with foil for easy cleanup.
    2. Wash the bell peppers thoroughly and cut off the tops to create lids. Use a spoon to carefully hollow out the seeds and membranes, creating a smooth cavity inside. Set aside the tops for later use or decorative purposes.
    3. Chop the onion and mince the garlic, then heat olive oil in a skillet over medium heat. Sauté the onion and garlic until translucent and fragrant, about 2-3 minutes.
    4. Add the cooked rice, paprika, salt, and pepper to the skillet. Stir well and cook for another 2 minutes, allowing the flavors to meld and the mixture to heat through.
    5. Remove the skillet from heat and mix in half of the shredded cheese until evenly combined. This forms your stuffing filling.
    6. Use a spoon to fill each hollowed bell pepper with the prepared rice mixture, pressing gently to pack the filling in.
    7. Place the stuffed peppers upright on the prepared baking sheet. Top each with the remaining shredded cheese for a melty, cheesy lid.
    8. Bake in the preheated oven for about 30 minutes, until the peppers are tender and slightly charred at the edges, and the cheese is bubbling and golden.
    9. Optional: Use a small paring knife to carve faces into the peppers to resemble jack-o’-lanterns for a festive Halloween look before serving.
    10. Once finished, carefully transfer the peppers to a serving platter or individual plates. Serve hot and enjoy the cheesy, flavorful filling paired with the roasted pepper exterior.

    Notes

    Feel free to customize the filling with cooked ground meat or vegetables. Carving faces is optional but adds a fun Halloween touch!

    This Halloween dish turns a simple dinner into a festive masterpiece that sparks conversations and smiles. The mix of savory stuffing and playful carving makes it an instant hit and a satisfying meal on a chilly night. Watching the peppers glow with melted cheese is a small, joyful ritual that plays well with seasonal nostalgia.

    As the season shifts and new decorations creep into every corner, this recipe reminds us that fun can be simple and tastes memorable. The process of creating these edible Jack-o’-Lanterns connects tradition with creativity, making every bite a celebration of the season. Happy carving and feasting to all who try this cheerful, flavorful trick-or-treat.

  • The Secret Ingredient That Turns Pumpkin Muffins From Ordinary to Irresistible

    The Secret Ingredient That Turns Pumpkin Muffins From Ordinary to Irresistible

    Pumpkin muffins are everywhere this season, but I've discovered a little twist that makes them truly stand out. Instead of the usual cinnamon and nutmeg overload, I add a dash of ground ginger and a whisper of allspice for depth. The aroma alone transforms a simple morning treat into something cozy and nostalgic, perfect for chilly fall days.

    Every time I bake these, I recall childhood mornings when my mother would bake pumpkin bread—this recipe echoes that warmth but in a quicker, handheld form. It's fascinating how a handful of ingredients combined in just the right way can evoke such rich memories. These muffins aren't just breakfast—they're a small seasonal ceremony.

    Spiced Pumpkin Muffins

    Pumpkin muffins are baked quick bread treats that feature a moist, tender crumb with a slightly domed top. They are made by mixing pumpkin puree with dry and wet ingredients, then baking until golden and fluffy. The muffins have a warm aroma with a soft, springy texture and a moist interior.
    Prep Time 15 minutes
    Cook Time 20 minutes
    Total Time 35 minutes
    Servings: 12
    Course: Main Course
    Cuisine: American
    Calories: 180

    Ingredients
      

    • 1 1/2 cups all-purpose flour
    • 1 cup pumpkin puree
    • 1/2 cup granulated sugar
    • 1/3 cup vegetable oil
    • 2 large eggs
    • 1 1/2 teaspoons baking soda
    • 1 teaspoon ground ginger
    • 1/2 teaspoon allspice
    • 1/2 teaspoon salt

    Equipment

    • Mixing bowls
    • Muffin tin
    • Whisk
    • Measuring cups and spoons
    • Rubber spatula

    Method
     

    1. Preheat the oven to 350°F (175°C) and line a muffin tin with paper liners or grease it lightly.
    2. In a large mixing bowl, whisk together the flour, baking soda, ground ginger, allspice, and salt until combined. This creates an evenly distributed spice mix.
    3. In a separate bowl, combine the pumpkin puree, sugar, vegetable oil, and eggs. Whisk until the mixture is smooth and slightly frothy, about 1-2 minutes.
    4. Pour the wet mixture into the dry ingredients and gently fold with a spatula until just combined. Be careful not to overmix, as this can make the muffins dense.
    5. Divide the batter evenly among the muffin cups, filling each about two-thirds full. The batter should be lumpy but well distributed.
    6. Bake in the preheated oven for 20-22 minutes, or until the muffins are golden and a toothpick inserted into the center comes out clean.
    7. Remove the muffins from the oven and let them cool in the tin for 5 minutes before transferring to a wire rack to cool completely.
    8. Once cooled, enjoy these moist, aromatic pumpkin muffins either warm or at room temperature, with or without a pat of butter.
    Baking pumpkin muffins is both comforting and surprisingly versatile. They’re perfect for mornings when you seek a moment of calm or a sweet snack to break up a busy afternoon.

    Enjoy the subtle spice and sweet pumpkin flavor, knowing that these muffins bring a touch of autumn magic into any moment. Whether shared with loved ones or savored alone, they make each day a little brighter.

  • The Secret Science Behind the Perfect Blueberry Slushie

    The Secret Science Behind the Perfect Blueberry Slushie

    Ever wondered how to make a blueberry slushie that’s just the right amount of icy and bursting with flavor? I dove into the freezer aisle and experimented with frozen blueberries to find that magical balance. It’s not just about blending berries with ice; it’s about capturing a cooling burst of summer’s sweet chaos.

    This recipe lets you harness the natural sweetness of blueberries while creating a texture that’s refreshingly slushy, not icy or watered down. Perfect for hot days or when nostalgia calls for a cool bite, this drink refreshes and surprises in every sip.

    Blueberry Slushie

    A blueberry slushie is a chilled beverage made by blending frozen blueberries with ice to create a refreshing, icy-textured drink. The main ingredients are frozen blueberries, ice, and a touch of sweetener, resulting in a vibrant, purplish slush with a smooth, icy consistency. The final appearance is a vividly colored, semi-thick smoothie served cold and ready to sip.
    Prep Time 5 minutes
    Total Time 5 minutes
    Servings: 2
    Course: Main Course
    Cuisine: Generic
    Calories: 80

    Ingredients
      

    • 2 cups frozen blueberries prefrozen for best icy texture
    • 1 cup ice cubes preferably small pieces
    • 1-2 tablespoons honey or sugar to taste, optional
    • 1 cup water or fruit juice adjust for desired consistency

    Equipment

    • Blender
    • Measuring cups and spoons

    Method
     

    1. Place the frozen blueberries, ice cubes, sweetener, and water or juice into the blender.
    2. Secure the lid on the blender and start blending on a low speed, gradually increasing to high until the mixture is smooth and icy in texture, about 30-45 seconds.
    3. Check the consistency — it should be thick, slushy, and slightly frosty. If too thick, add a splash more water or juice and blend briefly again.
    4. Turn off the blender and inspect the color—vivid purple with a slightly frosty appearance on top.
    5. Pour the blueberry slushie into glasses, using a spoon to help distribute any remaining icy bits evenly.
    6. Serve immediately with a straw or spoon, enjoying the cool, extra-refreshing texture.

    Notes

    For a creamier texture, add a splash of yogurt or milk before blending.
    Making this blueberry slushie became a quick escape during my chaotic mornings. The vibrant color and the burst of fruity aroma instantly lift my spirits and remind me of childhood summers.

    It’s a simple, joyful recipe that’s easy to whip up in minutes, yet it feels like a tiny celebration each time. Whether you’re relaxing on a lazy afternoon or entertaining friends, this slushie is your go-to crowd-pleaser. Cheers to icy, berry goodness in every glass.

  • Glow in the Dark Halloween Brain Jello Mold That Spooks and Delights

    Glow in the Dark Halloween Brain Jello Mold That Spooks and Delights

    Every October, I find myself captivated by the eerie allure of themed treats that turn the ordinary into the extraordinary. This year, I decided to craft something truly unsettling: a Halloween Brain Jello Mold that glows eerily in the dark, perfect for a spooky party. The process feels a bit like a mad scientist experiment, with bubbling colors and flickering lights that thrill both kids and adults.

    The best part? The gory-looking jello has a surprisingly smooth texture, almost silky, as it oozes from the mold. It’s not just about looks—this recipe brings back memories of childhood Halloween nights, filled with mischief and marvels. Plus, creating a glow-in-the-dark jello involves a quick trip to the pantry, making it as fun to prepare as it is to share.

    Halloween Brain Jello Mold

    This dish is a spooky gelatin dessert designed to resemble a human brain, achieved by layering and molding colored gelatin. The result is a smooth, silky-textured mold with a gory appearance, which glows eerily in the dark, making it perfect for Halloween parties.
    Prep Time 20 minutes
    Cook Time 10 minutes
    Total Time 30 minutes
    Servings: 8
    Course: Main Course
    Cuisine: Halloween
    Calories: 50

    Ingredients
      

    • 3 cups fruit juice or flavored liquid for the base gelatin layer
    • 3 tablespoons gelatin powder unflavored or flavored, depending on desired color
    • 0.5 cup cold water to bloom the gelatin
    • 1 cup white grape juice or flavored liquid for the gory-looking layer
    • 2 tablespoons gelatin powder for the darker, bloody layer
    • 2 tsp fluorescent or tonic water (optional, for glow effect) add to glow in the dark under blacklight

    Equipment

    • Mixing bowls
    • Saucepan
    • Silicone mold or gelatin mold
    • Whisk
    • Measuring cups and spoons
    • Small saucepan or microwave-safe bowl

    Method
     

    1. Pour 0.5 cup of cold water into a mixing bowl and sprinkle the gelatin powder over it. Let it sit for 5 minutes to bloom, until it looks gelled and slightly cloudy.
    2. Heat the fruit juice or flavored liquid in a saucepan over low heat until just simmering. Remove from heat and stir in the bloomed gelatin until completely dissolved.
    3. Pour the mixture into a silicone mold or gelatin mold, filling it about one-third full to create the core of the brain. Place in the refrigerator for 20 minutes until slightly firm.
    4. Meanwhile, prepare the darker, bloody layer by blooming the second gelatin powder with a little cold water. Heat the white grape juice until warm and stir in this gelatin until fully dissolved.
    5. Once the first layer is semi-set, gently pour the darker gelatin over the partially firm layer, carefully covering it without disturbing the shape. Return to the fridge for another 20 minutes to set completely.
    6. Prepare the glow-in-the-dark solution by mixing the gelatine with a small amount of warm water and adding the tonic or fluorescent water. Stir well and add to the remaining gelatin mixture if glow is desired.
    7. Once the previous layer is firm, pour the glowing gelatin mixture gently over the mold, filling it to the top. Place it in the refrigerator for at least 2 hours or until fully set and jiggle-ready.
    8. Carefully unmold the gelatin by gently pressing or warming the outside of the mold to loosen it. The finished sculpture should resemble a textured, brain-like form with layered colors and a smooth surface.
    9. Slice and serve chilled, ideally under blacklight to enhance the glowing effect and spooky appearance.

    Notes

    For an extra spooky effect, add edible blood syrup around the mold before serving.

    This brain jello isn’t just a feast for the eyes; it’s a small act of chaos that sparks joy during the spooky season. Its milky, slimy appearance combined with a tart, fruity flavor makes each bite feel like a moment of playful horror. When the lights go out and the glow begins, you’ll see everyone’s eyes light up with excitement and a little shiver.

    In the end, it’s about celebrating the thrill of Halloween with something delightfully creepy and surprisingly simple. Whether for a party centerpiece or a mischievous family treat, this mold promises memories of laughter, screams, and glowing grins. As you dip your spoon into that cold, shimmering surface, you’ll feel that festive magic in every wobble.