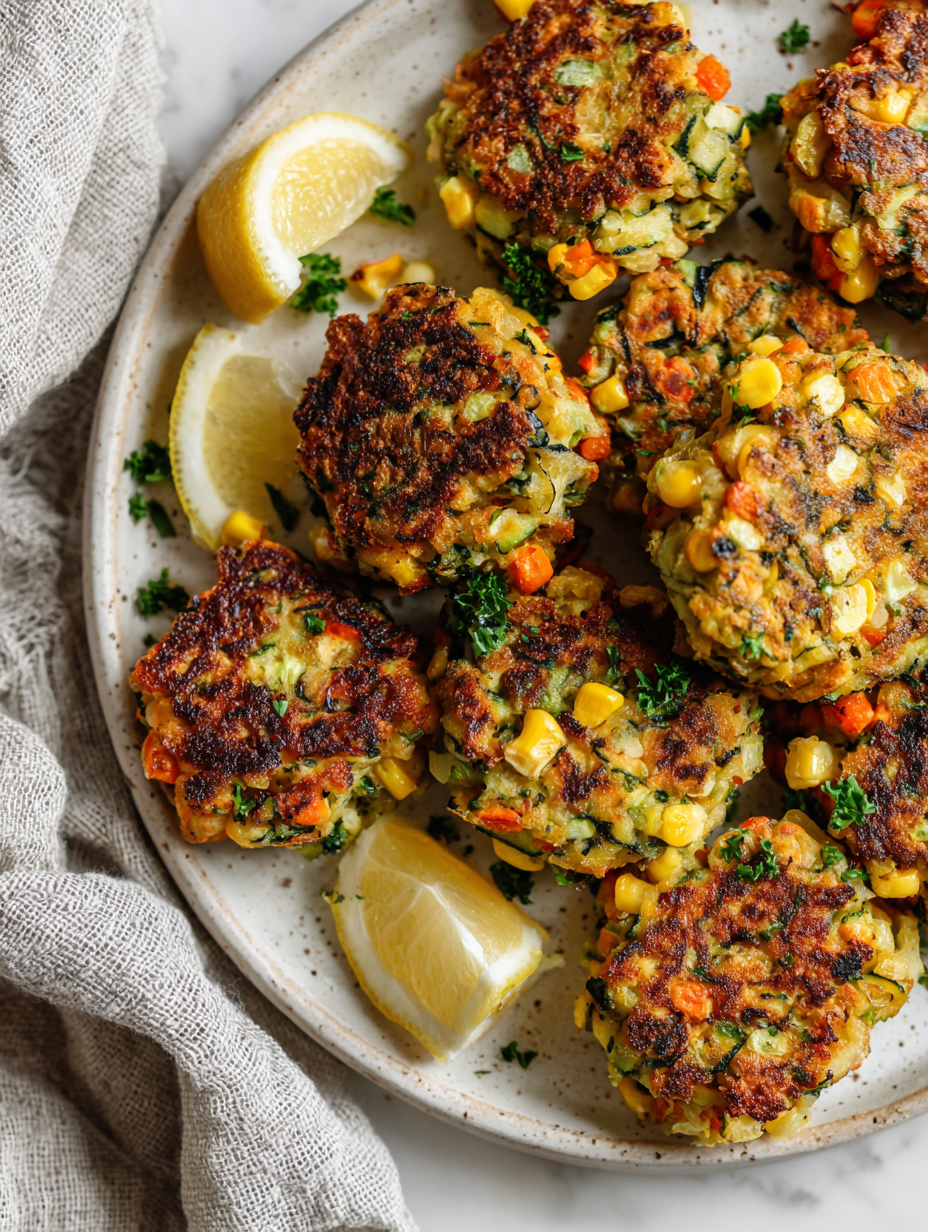
Author: Resao

  • Glow in the Dark Halloween Brain Jello Mold That Spooks and Delights

    Glow in the Dark Halloween Brain Jello Mold That Spooks and Delights

    Every October, I find myself captivated by the eerie allure of themed treats that turn the ordinary into the extraordinary. This year, I decided to craft something truly unsettling: a Halloween Brain Jello Mold that glows eerily in the dark, perfect for a spooky party. The process feels a bit like a mad scientist experiment, with bubbling colors and flickering lights that thrill both kids and adults.

    The best part? The gory-looking jello has a surprisingly smooth texture, almost silky, as it oozes from the mold. It’s not just about looks—this recipe brings back memories of childhood Halloween nights, filled with mischief and marvels. Plus, creating a glow-in-the-dark jello involves a quick trip to the pantry, making it as fun to prepare as it is to share.

    Halloween Brain Jello Mold

    This dish is a spooky gelatin dessert designed to resemble a human brain, achieved by layering and molding colored gelatin. The result is a smooth, silky-textured mold with a gory appearance, which glows eerily in the dark, making it perfect for Halloween parties.
    Prep Time 20 minutes
    Cook Time 10 minutes
    Total Time 30 minutes
    Servings: 8
    Course: Main Course
    Cuisine: Halloween
    Calories: 50

    Ingredients
      

    • 3 cups fruit juice or flavored liquid for the base gelatin layer
    • 3 tablespoons gelatin powder unflavored or flavored, depending on desired color
    • 0.5 cup cold water to bloom the gelatin
    • 1 cup white grape juice or flavored liquid for the gory-looking layer
    • 2 tablespoons gelatin powder for the darker, bloody layer
    • 2 tsp fluorescent or tonic water (optional, for glow effect) add to glow in the dark under blacklight

    Equipment

    • Mixing bowls
    • Saucepan
    • Silicone mold or gelatin mold
    • Whisk
    • Measuring cups and spoons
    • Small saucepan or microwave-safe bowl

    Method
     

    1. Pour 0.5 cup of cold water into a mixing bowl and sprinkle the gelatin powder over it. Let it sit for 5 minutes to bloom, until it looks gelled and slightly cloudy.
    2. Heat the fruit juice or flavored liquid in a saucepan over low heat until just simmering. Remove from heat and stir in the bloomed gelatin until completely dissolved.
    3. Pour the mixture into a silicone mold or gelatin mold, filling it about one-third full to create the core of the brain. Place in the refrigerator for 20 minutes until slightly firm.
    4. Meanwhile, prepare the darker, bloody layer by blooming the second gelatin powder with a little cold water. Heat the white grape juice until warm and stir in this gelatin until fully dissolved.
    5. Once the first layer is semi-set, gently pour the darker gelatin over the partially firm layer, carefully covering it without disturbing the shape. Return to the fridge for another 20 minutes to set completely.
    6. Prepare the glow-in-the-dark solution by mixing the gelatine with a small amount of warm water and adding the tonic or fluorescent water. Stir well and add to the remaining gelatin mixture if glow is desired.
    7. Once the previous layer is firm, pour the glowing gelatin mixture gently over the mold, filling it to the top. Place it in the refrigerator for at least 2 hours or until fully set and jiggle-ready.
    8. Carefully unmold the gelatin by gently pressing or warming the outside of the mold to loosen it. The finished sculpture should resemble a textured, brain-like form with layered colors and a smooth surface.
    9. Slice and serve chilled, ideally under blacklight to enhance the glowing effect and spooky appearance.

    Notes

    For an extra spooky effect, add edible blood syrup around the mold before serving.

    This brain jello isn’t just a feast for the eyes; it’s a small act of chaos that sparks joy during the spooky season. Its milky, slimy appearance combined with a tart, fruity flavor makes each bite feel like a moment of playful horror. When the lights go out and the glow begins, you’ll see everyone’s eyes light up with excitement and a little shiver.

    In the end, it’s about celebrating the thrill of Halloween with something delightfully creepy and surprisingly simple. Whether for a party centerpiece or a mischievous family treat, this mold promises memories of laughter, screams, and glowing grins. As you dip your spoon into that cold, shimmering surface, you’ll feel that festive magic in every wobble.

  • The Surprising Nostalgic Charm of Rosé Wine Slushies

    The Surprising Nostalgic Charm of Rosé Wine Slushies

    Imagine a summer evening where the air feels sticky with anticipation, and your freezer is calling out for a little rebellious sweetness. That’s when I stumbled on the idea of turning rosé into a frosty, drinkable memory—something that surprises even seasoned wine lovers. It’s not just a frozen cocktail; it’s a nostalgic shout-out to lazy days and spontaneous outdoor gatherings.

    This recipe is different from the usual because it combines the elegance of rosé with the playful chaos of a slushie. You’ll be amazed how the cold temperature brings out fruity undertones that often hide behind a sipper’s glass. Perfect for those moments when you crave a treat that’s both cool and unexpectedly sophisticated.

    Frozen Rosé Slushie

    This frozen rosé slushie combines the elegance of chilled wine with a playful, icy texture. It is made by blending rosé with sweeteners and fruit, creating a refreshingly smooth and frosty beverage with a vibrant, semi-opaque appearance. The final dish is a slushy, ice-crystal-laden drink perfect for warm summer evenings.
    Prep Time 10 minutes
    Total Time 10 minutes
    Servings: 4
    Course: Main Course
    Cuisine: Western
    Calories: 135

    Ingredients
      

    • 750 ml rosé wine chilled
    • 2 tablespoons honey or simple syrup adjust to taste
    • 1 cup fresh berries strawberries, raspberries or blueberries
    • 1 tablespoon lemon juice optional, adds brightness

    Equipment

    • Freezer
    • Blender
    • Measuring cups and spoons

    Method
     

    1. Pour the chilled rosé into a shallow container and stir in honey or simple syrup until fully dissolved.
    2. Add the fresh berries and lemon juice to the mixture, then gently stir to combine, allowing the fruit to infuse some flavor.
    3. Place the container in the freezer and let it firm up for about 2-3 hours, stirring every 30 minutes to break up ice crystals and promote a smooth texture.
    4. Once the mixture is mostly frozen but still scoopable, transfer it to a blender.
    5. Blend the mixture until it reaches a smooth, slushy consistency, about 30 seconds to 1 minute.
    6. Pour the blended slushie into glasses, allowing any remaining ice crystals to settle slightly before serving.
    7. Garnish with additional berries or a lemon wedge if desired, then serve immediately for a refreshing, frosty treat.

    Notes

    Adjust sweetness and fruit choices to personal preference. For a thicker texture, freeze longer and blend again for a smoother finish.
    As the sun dips below the horizon, this rosé wine slushie becomes your best partner for unwinding. It’s an easy recipe that makes a statement without fuss, ideal for impromptu celebrations or quiet evenings. Sometimes, a simple glass of frozen wine is all you need to bring a little magic to your day.

    So, next time you spot a bottle of rosé, think twice before pouring a standard glass. Turn it into a slushie, turn your routine upside down, and enjoy a toast to the little surprises in life.

  • Spooky Sweetness: Halloween Pumpkin Cheesecake Bars

    Spooky Sweetness: Halloween Pumpkin Cheesecake Bars

    Every October, I hunt for a dessert that turns the spooky season into a celebration of comfort and chaos. These Halloween Pumpkin Cheesecake Bars are my latest obsession—an unusual twist that transforms classic pumpkin flavor with a mysterious, velvety finish. The moment I crack my first spoonful, I’m transported back to childhood Halloweens, where the air smelled of caramel and caramelized sugar crackles under my nails.

    What draws me to this recipe isn’t just the festive look but the way it balances richness with a hint of spice. The smooth cheesecake paired with a crumbly base is like a witch’s brew—mysterious yet familiar. Plus, the dark swirl of pumpkin and chocolate creates an eye-catching design that feels as fun to make as it is to eat.

    Halloween Pumpkin Cheesecake Bars

    These layered cheesecake bars feature a creamy pumpkin filling topped with a smooth chocolate swirl on a crunchy cookie crust. The dessert is baked until set, resulting in a velvety texture with an eye-catching marbled appearance. Perfect for festive occasions, they combine rich flavors with a slightly spiced bite.
    Prep Time 20 minutes
    Cook Time 40 minutes
    Total Time 1 hour
    Servings: 12
    Course: Main Course
    Cuisine: American
    Calories: 350

    Ingredients
      

    • 1 ½ cups graham cracker crumbs or digestive cookie crumbs
    • ½ cup unsalted butter melted
    • 16 oz cream cheese softened
    • 1 cup granulated sugar
    • 1 cup canned pumpkin not pie filling
    • 3 large eggs room temperature
    • 1 ½ teaspoons ground cinnamon or pumpkin pie spice
    • 1/2 teaspoon ground ginger
    • ½ cup semi-sweet chocolate chips melted

    Equipment

    • 8-inch baking pan
    • Mixing bowls

    Method
     

    1. Preheat your oven to 350°F (175°C). Mix the graham cracker crumbs with melted butter until evenly coated and press this mixture firmly into the bottom of your prepared baking pan to form the crust.
    2. In a large bowl, beat the softened cream cheese with granulated sugar until smooth and creamy, about 2-3 minutes. Add the canned pumpkin, eggs, cinnamon, ginger, and a pinch of salt, then mix until fully combined and the mixture is smooth.
    3. Pour the pumpkin cheesecake filling over the prepared crust, smoothing the top with a spatula. Gently dollop melted chocolate over the surface in a random pattern for a marbled effect.
    4. Use a toothpick or skewer to gently swirl the chocolate into the pumpkin filling, creating a marbled pattern. Place the pan in the oven and bake for 40-45 minutes, or until the edges are set and the center slightly jiggles.
    5. Remove the cheesecake from the oven and let it cool in the pan for about an hour. Then, transfer to the refrigerator and chill for at least 4 hours or overnight to fully set.
    6. Slice the chilled cheesecake into bars, revealing a beautiful marbled swirl on top. Serve cold, and enjoy the rich, velvety texture with a hint of spice and chocolate.

    Notes

    For an extra festive look, decorate with whipped cream or orange zest before serving.

    As fall’s chill settles in, these bars add a touch of sweet mischief to any gathering. Their striking appearance and flavors evoke a nostalgic yet festive spirit—perfect for October’s magic. I love how a simple slice of this dessert can transform a casual event into something memorable.

    Sharing this recipe feels like passing down a little piece of holiday cheer. Whether it’s for a spooky dinner or a harvest celebration, these bars are a delicious way to celebrate the season’s flavors. And honestly, I look forward to making them every year.

  • Monster Burgers: Halloween’s Cheesiest Chaos

    Monster Burgers: Halloween’s Cheesiest Chaos

    As the air gets crisp and the nights grow longer, Halloween calls for more than just candy—it’s the perfect moment to unleash your inner kid with something delightfully grotesque. These Halloween Monster Burgers transform ordinary patties into writhing, silly, monster faces that make the dinner table a mini haunted house. Each one is a little chaotic, a little spooky, and utterly fun to make with kids or your brave inner child.

    What I love most about this recipe is the creative chaos it invites. It’s all about using what’s in the fridge—cheddar for teeth, olives for eyes, and lettuce for wild hair. This isn’t about perfection; it’s about unleashing your playful side and sharing a few laughs over a messy, gooey burger. Plus, everyone will remember these monsters long after the candy stash is gone.

    WHY I LOVE THIS RECIPE?

    • It sparks my creativity and adds a dash of mess and magic to Halloween dinner prep.
    • Children’s laughter echoes as they mash their own monster faces.
    • It’s a fun way to sneak extra veggies with lettuce and toppings.
    • The kitchen fills with a cheesy, savory aroma that only the best comfort foods bring.
    • It keeps the chaos fun and the mood light, perfect for spooky, giggly nights.

    AVOID MY DISASTER (You’re Welcome)

    • FORGOT to pre-cook the patties; they turned soggy, lost their shape—patties need a quick sear first.
    • DUMPED too much cheese, it spilled over and clumped—measure for neatness and easier cleanup.
    • OVER‑TORCHED the buns, they now taste burnt—keep an eye on the oven, set a timer.
    • SKIPPED washing hands after handling olives—ended up smudging the monster faces—gloves or wash up next time.

    QUICK FIXES THAT SAVE YOUR DAY

    • When patties stick, splash cold water on your hands for easy shaping.
    • Patch torn buns with a dab of butter milk mixture before toasting.
    • Shield cheese from burning by adding it at the very end of oven baking.
    • When olives slip, use a toothpick or skewer to position eyes securely.
    • For a quick rescue, melt some extra cheese in the microwave and swirl it over the monsters for gooey effect. Smells rich and cheesy.

    Halloween Monster Burgers

    Halloween Monster Burgers are playful, creatively decorated burgers made by transforming cooked beef patties into silly monster faces. You use various toppings like cheese, olives, and lettuce to create eyes, teeth, and wild hair, resulting in a fun, chaotic presentation. The final dish has juicy, savory patties with colorful and textured toppings that resemble grotesque monsters.
    Prep Time 15 minutes
    Cook Time 10 minutes
    Total Time 25 minutes
    Servings: 4
    Course: Main Course
    Cuisine: American
    Calories: 650

    Ingredients
      

    • 1 pound ground beef for patties
    • 4 burger buns slider or regular size
    • 4 slices cheddar cheese for teeth and decorations
    • 1/2 cup black olives sliced for eyes
    • 1 head lettuce shredded for hair
    • 2 tablespoons mustard for monster mouths
    • 2 tablespoons ketchup for monster tongues and details
    • Salt and pepper to taste seasoning for beef

    Equipment

    • Grill or stovetop skillet
    • Baking sheet
    • Chef’s knife
    • Toothpicks or skewers
    • Spatula

    Method
     

    1. Preheat your grill or skillet over medium-high heat until hot, ready to sear the patties.
    2. Divide the ground beef into four equal portions and gently shape each into a thick, round patty. Season each patty generously with salt and pepper.
    3. Place the patties on the hot grill or skillet and cook for about 4-5 minutes per side until browned and cooked through. Sear until they develop a nice crust, then set aside.
    4. While the patties cook, prepare your toppings: shred the lettuce for wild hair, slice the olives for eyes, and cut cheddar slices into triangular teeth or other fun shapes.
    5. Toast the burger buns lightly until golden if desired, then set aside.
    6. Once the patties are cooked and rested briefly, place each on a bun bottom. Spoon a little ketchup and mustard on the top of the patty to create monster mouths and tongues.
    7. Decorate each burger face with cheese for teeth, olives for eyes, and shredded lettuce for wild hair. Use a toothpick or skewer to help position small toppings if needed.
    8. Cover each decorated patty with the top bun carefully, creating a playful, monstrous look on the side with the toppings showing.
    9. Serve immediately while the patties are warm and the toppings are fresh, ready for a fun Halloween meal.

    Notes

    Feel free to get creative with other toppings like cherry tomatoes, bell peppers, or extra cheese for more monster features.

    These Halloween Monster Burgers bring an imperfect, joyful chaos to the dinner table, just in time for fall festivities. Their messy, inventive faces make eating part of the entertainment, perfect for nights when the goal is fun, not finesse. Every bite is a reminder that a little chaos can add flavor to a favorite season.

    As the season dips into its spirited, spooky embrace, creating these monsters feels like a tribute to childhood’s wild imagination. They’re simple enough for a quick kitchen adventure but memorable enough to spark smiles long after the costumes come off. Sometimes, the best moments are those filled with mess, laughter, and a little bit of delicious madness.

  • Cheesy Jack-o’-Lantern Stuffed Peppers: A Spooky Bite with a Surprise

    Cheesy Jack-o’-Lantern Stuffed Peppers: A Spooky Bite with a Surprise

    Halloween transforms ingredients into playful decorations, but I love turning that whimsy into dinner. These Jack-o’-Lantern stuffed peppers act as edible art, with carved faces that double as a cheesy surprise inside. It’s a cheerful way to bring fun and flavor to the table amidst the spooky chaos.

    As I carve the pepper tops and prepare the filling, the promise of melted cheese and seasoned rice fills my kitchen with warm scents. This recipe bridges the holiday’s playful spirit and comforting bites, making it irresistible for kids and adults alike. Plus, it’s surprisingly straightforward, letting you focus on the fun of the carve and the joy of the feast.

    **WHY I LOVE THIS RECIPE?**

    • Making my own pumpkin faces always sparks nostalgic childhood creativity.
    • The cheesy gooeyness feels like a cozy hug on a chilly October evening.
    • It combines artistry with a hearty, flavorful bite in one simple dish.
    • I love how this recipe makes Halloween dinner engaging and visually stunning.

    **AVOID MY DISASTER (You’re Welcome)**

    • FORGOT to pre-cook peppers — they stayed crunchy; I fixed it by steaming first.
    • DUMPED too much cheese — it overflowed and burned; reduced amount mainly in the stuffing.
    • OVER-TORCHED the faces — they turned black; I kept a close eye and used foil.
    • MISSED carving the faces thoroughly — some tunnels collapsed; clear outlines helped afterward.

    **QUICK FIXES THAT SAVE YOUR DAY**

    • When peppers are undercooked, splash with vegetable broth and bake covered.
    • Patch over burnt edges with a sprinkle of fresh cheese and a quick broil.
    • Shoo away excess moisture by patting peppers dry before stuffing.
    • When cheese is stringy, jingle the pan and speed up melting—crackling sounds are satisfying.
    • If filling is too thick, stir in a splash of broth for a moist mix.

    Jack-o’-Lantern Stuffed Peppers

    This dish features bell peppers carved with spooky faces, baked until tender, and filled with a cheesy seasoned rice mixture. The carved peppers are visually playful with melted cheese oozing out, creating an appealing Halloween presentation with a comforting, hearty texture.
    Prep Time 20 minutes
    Cook Time 30 minutes
    Total Time 50 minutes
    Servings: 4
    Course: Main Course
    Cuisine: American
    Calories: 290

    Ingredients
      

    • 4 large bell peppers preferably orange or yellow for a spooky look
    • 1 cup cooked rice preferably fluffy white rice
    • 1 cup cheddar cheese grated
    • 1/2 cup cooked chicken or turkey optional, chopped small
    • 1 teaspoon garlic powder
    • 1/2 teaspoon paprika
    • to taste salt and pepper
    • 1 tablespoon olive oil

    Equipment

    • Chef’s knife
    • Baking sheet
    • Mixing bowl
    • Spoon
    • Small Paring Knife
    • Aluminum Foil

    Method
     

    1. Preheat your oven to 375°F (190°C).
    2. Carefully cut off the tops of each bell pepper with a sharp paring knife to create a lid, then scoop out the seeds and membranes. Set aside the tops for carving later.
    3. Use the paring knife to carve spooky face designs—triangular eyes, a jagged mouth—on the front of each pepper. Take your time to make the designs expressive and clear.
    4. Place the carved peppers on a baking sheet lined with aluminum foil, with their cut sides facing up.
    5. In a mixing bowl, combine cooked rice, grated cheese, chopped chicken (if using), garlic powder, paprika, salt, pepper, and a drizzle of olive oil. Mix until evenly combined and creamy.
    6. Spoon the filling into each carved pepper, pressing down gently so it fills all the carved faces and leaves a slight mound on top.
    7. Place the pepper tops back on each filled pepper to create lids, or set them aside for serving if desired.
    8. Bake in the preheated oven for about 25-30 minutes, until the peppers are tender and the cheese is bubbling and golden around the edges.
    9. Remove from the oven and let cool slightly. Carefully transfer to a plate, and if you wish, serve with the carved faces still visible for a spooky effect.
    10. Enjoy your playful and hearty Halloween dish that blends festive art with comforting flavor!

    Notes

    For easier carving, slightly pre-cook the peppers by steaming for 5 minutes before carving. You can also add a pinch of cayenne to the filling for a spicy kick. Use colorful peppers for a more vibrant Halloween display.

    This dish embodies the fun spirit of Halloween with a touch of culinary creativity. Its bright flavors and cheerful presentation turn ordinary ingredients into a festive centerpiece. Plus, the crisp, roasted peppers add a smoky note that rounds out the cheesy, savory filling.

    As the season calls for comfort and celebration, these Jack-o’-Lantern stuffed peppers remind us that food can be playful and meaningful. Each carved face is a little piece of holiday cheer, turning a simple dinner into a memorable event. Sometimes the best ideas are the most delightfully unexpected.

  • Spooky Chic: Halloween Graveyard Pudding Cups That Wow

    Spooky Chic: Halloween Graveyard Pudding Cups That Wow

    Every October, I find myself craving something playful yet slightly eerie for the season. These Halloween Graveyard Pudding Cups turn that craving into a fun, edible spectacle that delights kids and adults alike. They transform your ordinary pudding into a spooky landscape, complete with graham cracker dirt and candy tombstones.

    What makes this recipe special isn’t just the festive look, but how easily it lets you unleash your inner chocolatier and decorator. The mix of creamy pudding and crunchy toppings sparks a sensory adventure that keeps everyone guessing. Plus, it’s guaranteed to stir up childhood memories of ghost stories and costume parties.

    Halloween Graveyard Pudding Cups

    This dessert features creamy pudding layered with crushed graham crackers resembling dirt, topped with candy tombstones to resemble a spooky graveyard. The dish involves assembling and decorating layers to create a visual Halloween scene with crunchy and smooth textures.
    Prep Time 15 minutes
    Total Time 15 minutes
    Servings: 4
    Course: Main Course
    Cuisine: American
    Calories: 250

    Ingredients
      

    • 2 cups milk for pudding
    • 1 package vanilla instant pudding mix
    • 1 cup heavy cream chilled for whipping
    • 1/2 cup granulated sugar for whipping cream
    • 1 cup graham crackers crushed to resemble dirt
    • several pieces candy tombstones for decoration

    Equipment

    • Mixing bowls
    • Whisk
    • Measuring cups
    • Spatula
    • Serving cups or small glasses
    • Graham cracker crusher or resealable bag and rolling pin
    • Candy tombstone cutters or molds
    • Decorating tools (optional)

    Method
     

    1. Pour the milk into a mixing bowl and whisk in the vanilla pudding mix until smooth and slightly thickened. Let it sit for 5 minutes until it firms up to a pudding consistency.
    2. In a separate bowl, whip the chilled heavy cream with granulated sugar using a whisk or electric mixer until stiff peaks form, which takes about 3-4 minutes. Set aside.
    3. Gently fold the whipped cream into the prepared pudding until fully combined, creating a light, airy texture.
    4. Transfer the pudding mixture into individual serving cups or small glasses, filling each about three-quarters full.
    5. Sprinkle crushed graham crackers over the pudding layers to resemble dirt and create a textured, earthy surface.
    6. Trim the candy tombstones if necessary, and insert them into the pudding, standing upright to resemble grave markers.
    7. Optional: use decorating tools or extra candies to add more spooky details around the tombstones for extra effect.
    8. Refrigerate the pudding cups for at least 30 minutes to chill and allow flavors to meld.
    9. Once chilled, serve the Halloween graveyard pudding cups in individual glasses, and enjoy the fun, spooky presentation.

    Notes

    You can customize the tombstones with different candies or add edible grass for more creepy effect.

    These spooky pudding cups aren’t just a dessert; they’re a mini haunted scene you create with loved ones. The rich chocolate and crunchy details are a reminder that Halloween isn’t solely about tricks, but treats as well. It’s the perfect way to add a bit of playful chaos to your festive table.

    As the season’s chill sets in and lanterns glow, these graveyard cups bring a bit of the fun and fright right into your home. Handmade, silly, a little spooky—these are the kind of treats that make holiday memories memorable. Enjoy crafting your own tiny haunted landscape this Halloween season.

  • Unexpected Delight: Spiced Pumpkin Cookies with a Crunch

    Unexpected Delight: Spiced Pumpkin Cookies with a Crunch

    As the leaves turn and the air becomes crisp, I find myself craving more than just pumpkin spice lattes. Today’s recipe transforms humble pumpkin into a cookie that’s both surprising and joyful. The secret lies in adding a subtle crunch that makes each bite memorable.

    Pumpkin Crunch Cookies

    These pumpkin cookies are made by mixing pumpkin puree with spices and sugar, then folding in nuts for texture. The dough is scooped onto a baking sheet and baked until golden, resulting in cookies with a tender interior and a subtle crunch on the edges. The final product has a moist center with a crispy outer layer, complemented by the warmth of seasonal spices.
    Prep Time 15 minutes
    Cook Time 12 minutes
    Total Time 27 minutes
    Servings: 24
    Course: Main Course
    Cuisine: American
    Calories: 120

    Ingredients
      

    • 1 cup pumpkin puree unsweetened
    • 1 cup granulated sugar
    • 1/2 cup vegetable oil
    • 2 cups all-purpose flour
    • 1 teaspoon baking powder
    • 1/2 teaspoon baking soda
    • 1 teaspoon ground cinnamon
    • 1/2 teaspoon ground nutmeg
    • 1/4 teaspoon ground ginger
    • 1/2 teaspoon salt
    • 1 cup chopped nuts (pecans or walnuts)

    Equipment

    • Mixing bowls
    • Baking sheet

    Method
     

    1. Preheat the oven to 350°F (175°C) and line a baking sheet with parchment paper.
    2. In a large mixing bowl, whisk together the pumpkin puree, granulated sugar, and vegetable oil until smooth and well combined. The mixture should look creamy and uniform.
    3. In a separate bowl, sift together the flour, baking powder, baking soda, cinnamon, nutmeg, ginger, and salt. This helps distribute the leavening agents and spices evenly.
    4. Add the dry ingredients into the pumpkin mixture gradually, folding gently with a spatula until just combined. The dough will be slightly sticky but manageable.
    5. Fold in the chopped nuts until evenly distributed throughout the dough. This adds a pleasing crunch and flavor to each bite.
    6. Use a cookie scoop or spoon to drop rounded tablespoons of dough onto the prepared baking sheet, spacing them about 2 inches apart.
    7. Bake in the preheated oven for about 12 minutes, or until the edges turn golden brown and the tops look set.
    8. Remove the cookies from the oven and let them cool on the baking sheet for 5 minutes, allowing them to firm up slightly.
    9. Transfer the cookies to a wire rack to cool completely, which helps them develop a slight crispness on the outside while remaining tender inside.
    10. Enjoy your pumpkin crunch cookies once cooled—these cookies are delicious with a glass of milk or a warm cup of tea.
    This pumpkin cookie recipe isn’t just about flavor; it’s a nostalgic journey wrapped in warm spices and a surprising texture. Perfect to share on cozy afternoons or festive gatherings, it turns a simple ingredient into something extraordinary. Sometimes, all it takes is a little pumpkin magic to brighten the day.

  • Spooky Splash: Halloween Monster Mash Punch That Vanishes in Seconds

    Spooky Splash: Halloween Monster Mash Punch That Vanishes in Seconds

    As Halloween approaches, I find myself craving more than just candy and costumes. I love creating themed drinks that stir up the chaos and nostalgia of haunted nights. This Monster Mash Punch is a chaos of colors and flavors, guaranteed to be the centerpiece that disappears quicker than you can say “trick or treat.”

    What makes this punch truly special is its playful messiness—think bright green, gory red, and bubbling purple all in one glass. It’s perfect for those who want a drink that’s as visually shocking as it is delicious. Plus, it’s super easy to whip up with just a few pantry staples and a splash of imagination.

    Monster Mash Punch

    Monster Mash Punch is a colorful, themed beverage featuring layered and bubbling fruit juices that create a visually shocking effect. It combines bright green, red, and purple liquids, often with added carbonation or effervescent elements, resulting in a fizzy, playful drink with a chaotic appearance. The final presentation is vibrant, bubbly, and eye-catching, perfect for Halloween festivities.
    Prep Time 10 minutes
    Cook Time 5 minutes
    Total Time 15 minutes
    Servings: 8
    Course: Main Course
    Cuisine: Halloween
    Calories: 120

    Ingredients
      

    • 4 cups white grape juice chilled
    • 2 cups lime flavored soda or lemon-lime soda chilled
    • 1 cup wild berry fruit punch chilled, optional for color
    • 1 cup blue curaçao syrup for color and flavor
    • 1 cup crushed ice optional, for chilling
    • splash carbonated water or club soda to add fizz

    Equipment

    • Large pitcher or punch bowl
    • Measuring cups and spoons
    • Mixing spoon
    • Glass stirring sticks or straws

    Method
     

    1. Pour the white grape juice into a large punch bowl, creating a bright, transparent base.
    2. Add the lemon-lime soda slowly to the grape juice, watching for gentle bubbling and mixing until combined. This adds a bubbly, frothy texture and a refreshing aroma.
    3. Stir in the wild berry fruit punch to introduce a vibrant red hue and enhance the fruity flavor profile. Mix gently to avoid losing too much carbonation.
    4. Drizzle the blue curaçao syrup into the mixture, creating swirling patches of electric blue and green that resemble gory or glowing effects. Use a spoon or pour slowly for visual effect.
    5. Fill the punch bowl with crushed ice to keep the drink chilled and add a frosty, bubbling effect as the ice begins to melt slightly into the mixture.
    6. Just before serving, add a splash of carbonated water or club soda to achieve extra fizz and lively bubbles bursting throughout the punch.
    7. Stir the punch gently with a long spoon or stirring stick, causing the different colors and bubbles to swirl and bubble wildly, creating a chaotically gory look.
    8. Serve the punch in clear glasses or cups with straws or stirring sticks, allowing the colorful layers and bubbling effects to be visible and fun.
    9. Enjoy immediately to experience the full bubbly, chaotic spectacle of this vibrant Halloween-themed drink.
    This Halloween punch isn’t just a drink; it’s a celebration in a glass. It brings out the kid in all of us, with its wiggly, shimmering effect and crazy colors. Plus, it’s a hilarious way to keep the party lively and a little chaotic.

    As the night winds down, this punch will leave a trail of delighted screams and sticky fingers. It’s loud, bright, and a little gross—just like Halloween should be. Cheers to creating spooky memories, one gulp at a time.

  • Enchanted Poison Apple Martini: A Spooky Sip for Halloween

    Enchanted Poison Apple Martini: A Spooky Sip for Halloween

    Halloween is the perfect time to indulge in cocktails that look as mysterious as they taste. The Poison Apple Martini transforms a classic apple flavor into something darker, more alluring. Its vibrant green hue and eerie glow make it a conversation starter at any haunted gathering.

    What makes this recipe stand out is the touch of chaos it adds to your bar cart. A splash of sourness, a hint of sweetness, and a hint of green shimmer combine for a drink that’s as fun to make as it is to sip. It’s a mixture of nostalgia and playful artistry, ideal for spooky season.

    WHY I LOVE THIS RECIPE?

    • FIND joy in turning simple ingredients into a potion that sparks conversation.
    • REVEL in the chaos of adding unexpected touches like glow-in-the-dark liqueur.
    • REMEMBER those childhood apple treats with a grown-up twist.
    • PRIDE in creating a stunning, spooky cocktail in just minutes.
    • RELIEF knowing everyone will be impressed and delighted with this creepy concoction.

    Poison Apple Martini

    The Poison Apple Martini is a vibrant green cocktail with an eerie glow, featuring bright apple flavor combined with a splash of sourness and shimmer. It is prepared by mixing and shaking ingredients until well-chilled, resulting in a smooth, visually striking drink with a glossy, alluring appearance.
    Prep Time 5 minutes
    Total Time 5 minutes
    Servings: 2
    Course: Main Course
    Cuisine: bAr
    Calories: 180

    Ingredients
      

    • 3 oz vodka chilled
    • 1 oz green apple liqueur for vibrant color and flavor
    • 0.5 oz lemon juice freshly squeezed
    • 0.5 oz simple syrup adjust for sweetness
    • 0.2 oz glow-in-the-dark tonic optional for eerie glow
    • a pinch edible shimmer or glitter for shimmer effect

    Equipment

    • Cocktail shaker
    • Strainer
    • Martini glasses

    Method
     

    1. Add the vodka, green apple liqueur, lemon juice, simple syrup, and glow-in-the-dark tonic (if using) into a cocktail shaker.
    2. Fill the shaker with ice until it’s about three-quarters full and seal tightly.
    3. Shake vigorously for about 15 seconds until the mixture is well chilled and the shaker feels icy and slightly frosted.
    4. Strain the mixture into chilled martini glasses, ensuring a smooth, clear pour that highlights the vivid green hue.
    5. Sprinkle a pinch of edible shimmer or glitter on top of each drink for a magical, glowing effect.
    6. Serve immediately to enjoy the chilling, shimmering allure of this spooky cocktail.

    Notes

    Use glow-in-the-dark tonic and edible shimmer for a striking visual effect perfect for Halloween parties. Adjust sweetness with more or less simple syrup as desired.

    Creating the Poison Apple Martini is a fun challenge that elevates your Halloween party. Its striking appearance and bold flavors make it a memorable centerpiece. Plus, the easy steps mean you can whip up a batch without breaking a sweat.

    As the night deepens and the candles flicker, this cocktail adds a layer of enchantment to your festivities. Sipping on its shimmering, tangy essence makes the evening feel truly magical — a perfect way to celebrate the spooky season with friends.

  • Transform Your Dinner: A Cozy Twist on Turkey Chili

    Transform Your Dinner: A Cozy Twist on Turkey Chili

    Imagine a chilly evening, the scent of cumin and smoky paprika wafting through your kitchen. This turkey chili isn’t just a meal; it’s an experience — a comforting bowl that somehow feels like a warm hug after a long day.

    I’ve always been fascinated by how a simple stew can evoke nostalgia and bring surprises. This recipe turns traditional chili on its head, using lean turkey and a secret ingredient that adds a subtle sweetness and depth. It’s perfect for those who crave flavor but want to keep things light.

    What makes this dish stand out? It’s not only easy to make but also incredibly adaptable. Whether you’re cooking for a family or just yourself, this chili promises a rich, satisfying bite every time.

    Turkey Chili with a Secret Sweet Ingredient

    This turkey chili involves browning lean ground turkey and simmering it with spices, vegetables, and a secret sweet ingredient to create a hearty, flavorful stew. The dish develops a thick, chunky texture with a rich aroma, topped with a slightly smoky and spicy finish. It is served hot, with a vibrant, inviting appearance and a satisfying, comforting consistency.
    Prep Time 15 minutes
    Cook Time 30 minutes
    Total Time 45 minutes
    Servings: 4
    Course: Main Course
    Cuisine: American
    Calories: 350

    Ingredients
      

    • 1 lb lean ground turkey or turkey breast, crumbled
    • 1 medium onion finely chopped
    • 3 cloves garlic minced
    • 1 tablespoon cumin ground
    • 1.5 tablespoons smoked paprika sweet or hot based on preference
    • 1 can (14 oz) diced tomatoes stewed or fire-roasted for extra flavor
    • 1 can (15 oz) kidney beans drained and rinsed
    • 1 cup vegetable broth or chicken broth
    • 1 little secret sweet ingredient such as a small spoonful of honey or a diced apple
    • 2 teaspoons chili powder
    • Salt and pepper to taste

    Equipment

    • Large skillet or Dutch oven
    • Wooden Spoon or Spatula

    Method
     

    1. Heat the large skillet over medium heat and add a drizzle of oil. Once shimmering, add the chopped onion and cook, stirring frequently, until it becomes translucent and fragrant—about 3-4 minutes.
    2. Add the minced garlic to the skillet and cook for another 30 seconds until fragrant, stirring continuously to prevent burning.
    3. Increase the heat slightly and add the ground turkey, breaking it apart with your spoon or spatula. Cook, stirring occasionally, until the turkey turns golden brown and is cooked through, about 8-10 minutes.
    4. Sprinkle in the cumin, smoked paprika, chili powder, salt, and pepper to season the meat evenly, cooking for another minute to toast the spices and enhance their flavor.
    5. Pour in the diced tomatoes and vegetable broth, stirring well to scrape up any browned bits from the bottom of the pan. Bring the mixture to a gentle simmer.
    6. Stir in the drained kidney beans and the secret sweet ingredient, distributing evenly throughout the chili. Continue simmering uncovered for about 15-20 minutes, allowing the flavors to meld and the chili to thicken.
    7. Check the seasoning and adjust with more salt, pepper, or chili powder as desired. The chili should be thick, with a rich aroma and vibrant color.
    8. Spoon the hot turkey chili into bowls and serve immediately, garnished with your favorite toppings if desired. Enjoy the hearty, flavorful dish that’s perfect for a cozy evening.

    This turkey chili is a reminder that the simplest ingredients can create the most memorable meals. It’s perfect for cozy nights and unexpected guests alike. Each spoonful delivers warmth, flavor, and a moment of comfort.

    As the season changes, so does my appetite for hearty, wholesome dishes like this. With a bowl of this chili, I find a little piece of joy in the everyday chaos, knowing I can whip up something nourishing in no time.