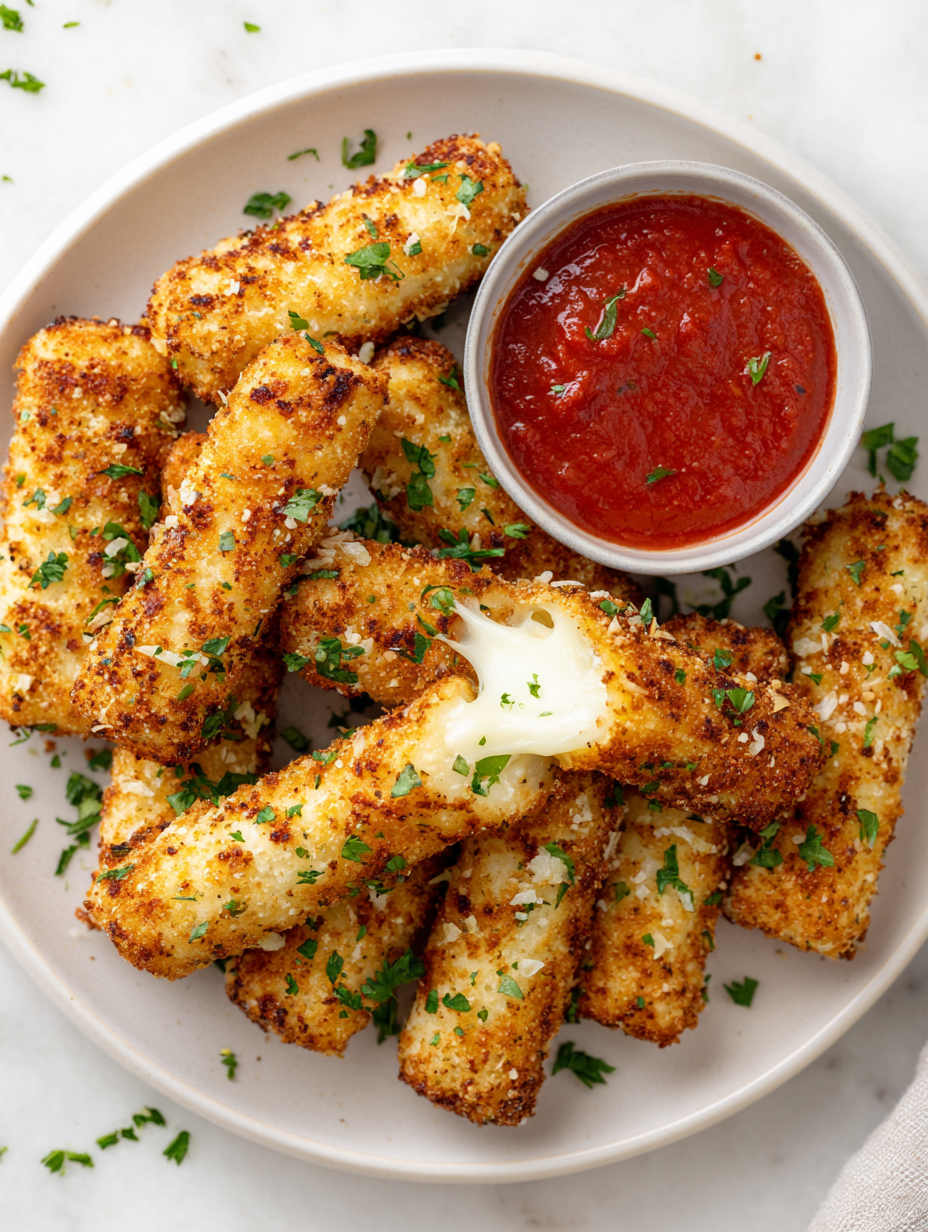
Author: Resao

  • Autumn’s Cozy Twist: Fall Turkey Chili with Sweet Potatoes

    Autumn’s Cozy Twist: Fall Turkey Chili with Sweet Potatoes

    Whether you are embracing the season’s harvest or just in need of a satisfying meal, this chili ticks all the boxes. It’s easy to make ahead, and the flavors deepen beautifully overnight. Plus, it smells like fall itself — a comforting, nostalgic aroma that fills the kitchen.

    Hearty Fall Chili

    This chili is a comforting stew made with ground beef, beans, tomatoes, and seasonal spices simmered until thick and flavorful. It develops a rich, aromatic sauce with a satisfying, slightly chunky texture and vibrant color. The dish is typically served garnished with toppings like cheese or chopped herbs for added flavor.
    Prep Time 15 minutes
    Cook Time 45 minutes
    Total Time 1 hour
    Servings: 6
    Course: Main Course
    Cuisine: American
    Calories: 350

    Ingredients
      

    • 1 lb ground beef or turkey/chicken as desired
    • 1 medium yellow onion diced
    • 3 cloves garlic minced
    • 1 can (14 oz) diced tomatoes with juice
    • 1 can (15 oz) black beans rinsed and drained
    • 1 cup vegetable or beef broth
    • 2 tablespoons chili powder adjust to taste
    • 1 teaspoon cumin
    • 1/2 teaspoon paprika
    • to taste salt and pepper

    Equipment

    • Large Pot or Dutch Oven
    • Wooden Spoon or Spatula

    Method
     

    1. Heat the large pot over medium heat and add the ground beef. Cook until evenly browned, breaking it apart with a spoon until cooked through and no longer pink.
      1 lb ground beef
    2. Add the diced onion to the beef and sauté for about 5 minutes, stirring occasionally, until the onion is translucent and fragrant. The mixture should begin to release a savory aroma.
      1 medium yellow onion
    3. Stir in the minced garlic and cook for another minute until fragrant, filling the kitchen with a warm, inviting aroma.
      3 cloves garlic
    4. Pour in the diced tomatoes along with their juice, stirring to combine all ingredients evenly. Let it simmer gently for 5 minutes, allowing flavors to meld.
      1 can (14 oz) diced tomatoes
    5. Stir in the rinsed black beans and pour in the broth, then add chili powder, cumin, paprika, salt, and pepper. Mix thoroughly to distribute all the spices evenly.
      1 can (15 oz) black beans, 1 cup vegetable or beef broth, 2 tablespoons chili powder, 1 teaspoon cumin, 1/2 teaspoon paprika, to taste salt and pepper
    6. Bring the chili to a gentle boil, then reduce heat to low. Cover the pot and let it simmer for about 30-40 minutes, stirring occasionally until the mixture thickens and flavors deepen.
    7. Uncover and taste, adjusting seasoning with more salt, pepper, or chili powder if desired. The chili should be thick, hearty, and aromatic with a rich, inviting color.
    8. Serve the chili hot, garnished with your favorite toppings such as shredded cheese, chopped cilantro, or a dollop of sour cream for added flavor and texture.
    In a world of constant change, some comfort foods remain timeless. This chili is that for me — a dish that reminds me to slow down and appreciate the beauty of fall’s flavors. There’s nothing quite like a bowl of this to highlight the magic of harvest time.

  • Falling For This Unusual Autumn Chicken Casserole

    Falling For This Unusual Autumn Chicken Casserole

    As the leaves turn and a chill settles in the air, I started craving something different from the usual pot roast. This recipe came about when I combined my favorite fall spices with a surprising ingredient: roasted butternut squash. The aroma of cinnamon and thyme wafting through the kitchen transforms the ordinary into cozy magic.

    What makes this casserole special isn’t just the flavors but the story behind it. I once had a similar dish at a friend’s farm dinner, where local ingredients told stories of the season. Now, I make it my own, adding a crunchy topping and a hint of maple syrup for that perfect fall touch.

    Fall Butternut Squash Casserole

    This casserole features roasted butternut squash combined with fall spices like cinnamon and thyme, baked until tender and fragrant. A crunchy topping with maple syrup adds a sweet contrast, resulting in a cozy, textured dish with a golden-brown crust and a soft, flavorful interior.
    Prep Time 20 minutes
    Cook Time 40 minutes
    Total Time 1 hour
    Servings: 4
    Course: Main Course
    Cuisine: American
    Calories: 250

    Ingredients
      

    • 1 pound butternut squash peeled, seeded, and cubed
    • 2 teaspoons cinnamon
    • 1 teaspoon thyme fresh or dried
    • 2 tablespoons olive oil for roasting
    • 1/2 cup breadcrumbs for topping
    • 2 tablespoons maple syrup for topping
    • 1 tablespoon butter melted, for topping

    Equipment

    • Baking sheet
    • Mixing bowls
    • Cooking spoon
    • Baking dish
    • Whisk

    Method
     

    1. Preheat the oven to 400°F (200°C). Toss the cubed butternut squash with olive oil, cinnamon, thyme, salt, and pepper. Spread evenly on a baking sheet and roast until tender and caramelized, about 25-30 minutes.
    2. Remove the squash from the oven and let it cool slightly. Transfer to a mixing bowl and gently mash with a fork or potato masher until smooth but still a bit chunky.
    3. In a small bowl, combine the breadcrumbs, melted butter, and a drizzle of maple syrup. Stir until the mixture is crumbly and fragrant.
    4. Spread the mashed butternut squash evenly in a greased baking dish, smoothing the top with a spatula. Sprinkle the breadcrumb mixture evenly over the surface.
    5. Bake the casserole in the preheated oven until the topping is golden brown and crispy, about 15-20 minutes.
    6. Remove from the oven and let it rest for a few minutes. Drizzle with a little extra maple syrup if desired before serving to enhance the sweetness and presentation.

    Nothing beats the comforting warmth of this fall chicken casserole on a chilly evening. It’s a dish that invites nostalgia and sparks conversations around the dinner table. Plus, it’s surprisingly versatile — you can swap in different vegetables or add your favorite cheeses.

    As the oven hums low and the flavors meld, I find a quiet joy in these simple, seasonal moments. Scraping the last bits from the plate, I promise this dish will make your fall dinners feel even more special.

  • Spooky Delights: Halloween Eyeball Pasta with Meatball ‘Eyeballs’

    Spooky Delights: Halloween Eyeball Pasta with Meatball ‘Eyeballs’

    Halloween is the perfect time to embrace the playful and creepy side of cooking. This Eyeball Pasta turns your dinner into a fun, spooky masterpiece that even the smallest ghosts and goblins will adore. The combination of savory meatballs and eerie eyeball illusions makes this dish a perfect centerpiece for any haunted feast.

    What makes this recipe truly special is its attention to detail in creating realistic-looking eyeballs with minimal fuss. It’s a chaotic joy to see the reactions around the dinner table when those meatballs stare back at you. Plus, it’s a fantastic way to indulge in comfort food while celebrating the spooky season.

    WHY I LOVE THIS RECIPE?

    • It’s nostalgic—brings back childhood memories of Halloween treats and costumes.
    • The chaos in plating makes the meal more fun and memorable.
    • It randomly sparks laughter and squeals from guests of all ages.
    • The dish balances creepy aesthetics with warm, satisfying flavors.
    • I feel a burst of pride when I watch guests try to figure out how I made those eyeballs.

    AVOID MY DISASTER (You’re Welcome)

    • FORGOT to boil the meatballs enough? They turned hard. Boil longer or simmer gently.
    • DUMPED too much red food coloring? The sauce looked neon. Use sparingly for a realistic effect.
    • OVER-TORCHED the eye details? They cracked. Keep a close eye and finish quickly.
    • FAILED to drain the pasta well? It clumped. Drain thoroughly and toss with oil.

    QUICK FIXES THAT SAVE YOUR DAY

    • When sauce thickens, splash in pasta water for shine and easier mixing.
    • IF the meatballs are too bland, add a pinch of garlic powder.
    • PATCH the eyeball whites with a tiny dab of mozzarella if cracks appear.
    • Shield your eyeballs with a quick layer of clear gelatin for a glossy look.
    • When in doubt, add a pinch of oregano—smells wonderful and ties flavors together.

    Eyeball Spaghetti

    Eyeball Spaghetti features cooked pasta topped with savory meatballs that are decorated to resemble creepy eyeballs. The dish combines tender pasta, juicy meatballs, and a flavorful sauce, with the eyeball decorations adding a spooky, realistic touch. It results in a fun, visually striking plate with a satisfying blend of textures and flavors.
    Prep Time 15 minutes
    Cook Time 30 minutes
    Total Time 45 minutes
    Servings: 4
    Course: Main Course
    Cuisine: Halloween
    Calories: 600

    Ingredients
      

    • 400 g spaghetti uncooked
    • 500 g ground beef for meatballs
    • 1 cup breadcrumbs
    • 1 large egg beaten
    • 2 cloves garlic minced
    • 1 cup tomato sauce
    • 1 tbsp olive oil
    • black pepper to taste for seasoning
    • 1 cup mozzarella cheese small cubes
    • blue food coloring food coloring for eyeball irises
    • red food coloring food coloring for bloodshot effect

    Equipment

    • Large pot
    • Mixing bowl
    • Baking sheet
    • Saucepan
    • Small spoon or piping bag

    Method
     

    1. Bring a large pot of salted water to a boil, then add the spaghetti and cook until al dente, about 8-10 minutes. Drain and set aside.
    2. In a mixing bowl, combine ground beef, breadcrumbs, beaten egg, minced garlic, salt, and pepper. Mix everything until well incorporated.
    3. Form the mixture into small meatballs, about one inch in diameter, and place them on a baking sheet.
    4. Bake the meatballs at 200°C (400°F) for about 15-20 minutes, or until cooked through and browned on the outside.
    5. While the meatballs bake, warm the tomato sauce in a saucepan over medium heat until bubbling, then reduce heat to low.
    6. Once the meatballs are ready, carefully add them to the simmering sauce and let them soak for a few minutes.
    7. Prepare the eyeball decorations by threading a small piece of mozzarella cheese onto each meatball’s top. Use a drop of red food coloring to create bloodshot streaks on the white of the ‘eyeball’. Add a small dot of blue food coloring inside the mozzarella to simulate the iris.
    8. Arrange the cooked spaghetti on serving plates, then spoon the saucy meatballs over the pasta. Carefully place the decorated ‘eyeballs’ on top of each meatball for a spooky look.
    9. Optional: Use additional red food coloring to add ‘bloodshot’ effect around the eyeballs for extra creepiness.
    10. Serve immediately while warm, and enjoy your spooky, eyeball-themed spaghetti!

    Notes

    For a glossy, realistic effect, lightly brush the eyeballs with a thin layer of clear edible gelatin before serving. Use food coloring sparingly to keep the eyes looking creepy but not too neon.

    This dish captures the spirit of Halloween in every bite—playful, spooky, yet satisfying. It feels right to serve something so wild as we gather with friends and family for the holiday.

    Now, you’ve got everything you need to make a memorable meal that sparks conversations and giggles. Sometimes, a little chaos in the kitchen makes the greatest memories. Enjoy crafting your creepy pasta masterpiece.

  • The Unexpected Charm of Homemade Chicken Noodle Soup

    The Unexpected Charm of Homemade Chicken Noodle Soup

    Many see chicken noodle soup as a simple comfort food, but I find its true magic lying in the unexpected ingredients I add. This version focuses on a subtle hint of lemongrass, which lifts the brothy richness into a realm of fresh, vibrant flavor. Cooking in my small kitchen often feels chaotic, but the aroma of simmering herbs makes every mess worthwhile.

    Each spoonful offers a perfect balance of tender chicken, al dente noodles, and a broth that’s both soothing and complex. This recipe is my go-to during chilly mornings or when I need a quick dose of nostalgia. It’s not just soup; it’s a story of flavor and memory simmered into every bowl.

    Lemongrass Chicken Noodle Soup

    This chicken noodle soup features tender chunks of chicken simmered in a fragrant broth accented by fresh lemongrass. Al dente noodles and a clear, aromatic broth create a comforting dish with a vibrant, complex flavor profile and a soothing, inviting appearance.
    Prep Time 15 minutes
    Cook Time 30 minutes
    Total Time 45 minutes
    Servings: 4
    Course: Main Course
    Cuisine: Asian
    Calories: 350

    Ingredients
      

    • 2 cups chicken broth
    • 1 lb boneless chicken breasts cut into bite-sized pieces
    • 2 stalks lemongrass bruised and sliced into 2-inch pieces
    • 2 carrots carrots peeled and sliced thinly
    • 3 cloves garlic minced
    • 3 oz rice noodles dry
    • 1 tbsp soy sauce
    • 1 tsp sesame oil
    • to taste salt and pepper
    • 2 green onions green onions sliced thinly for garnish

    Equipment

    • Large pot
    • Cutting board

    Method
     

    1. Combine chicken broth, sliced lemongrass, and minced garlic in a large pot. Bring to a gentle simmer over medium heat, allowing the fragrant herbs to infuse the broth for about 10 minutes.
    2. Remove the lemongrass pieces and add the boneless chicken pieces to the simmering broth. Cook until the chicken is cooked through and tender, about 8-10 minutes, stirring occasionally.
    3. While the chicken cooks, pour boiling water over the rice noodles in a separate bowl. Let sit for 5 minutes until softened, then drain and set aside.
    4. Add sliced carrots, soy sauce, and sesame oil to the pot with the chicken. Continue simmering for another 5 minutes, until the carrots are tender and flavors meld.
    5. Stir the cooked noodles into the soup, ensuring they are heated through and coated with the flavorful broth. Taste and adjust seasoning with salt and pepper as needed.
    6. Serve hot, garnished with sliced green onions for a fresh, crisp touch. Enjoy the aromatic, comforting bowl of chicken noodle soup.

    Sharing this chicken noodle soup has transformed my kitchen into a lively gathering spot, even on the busiest days. Its warmth and depth create a cozy pause, a moment of peace among chaos. No matter the season, it reminds me that simple ingredients, combined with a little love, can create something truly comforting.

    With each batch, I feel a small sense of pride—proof that nourishing food can be quick, easy, and deeply satisfying. It’s a recipe that welcomes anyone into a moment of calm and flavor, a simple pleasure worth savoring whenever the mood strikes.

  • Spooky Elegance: Crafting the Perfect Halloween Spider Web Cake

    Spooky Elegance: Crafting the Perfect Halloween Spider Web Cake

    As a baker obsessed with holiday traditions, I love elevating Halloween treats beyond simple decorations. The Spider Web Cake combines eerie elegance with a touch of chaos—its web spun with glossy icing that glistens like real silk under dim lights. Making this cake is a delightful messy ritual, perfect for embracing the spooky season.

    This recipe is less about perfection and more about the fun of creating something visually stunning while playing with textures. Every crack of sugar and streak of black icing tells a story of late-night baking adventures and childhood fears turned sweet. It’s a showstopper that turns any table into a haunted masterpiece.

    ## WHY I LOVE THIS RECIPE?
    – The contrast of dark chocolate and shimmering web details sparks nostalgic chills.
    – The chaotic beauty reflects the wild energy of Halloween parties.
    – I relish the slow, mindful task of crafting a web—meditative and satisfying.
    – It’s a baking project that invites messy hands and loud laughter.
    – Seeing everyone’s awe-struck faces is a reward that never gets old.

    Spider Web Chocolate Cake

    This cake features a rich chocolate sponge layered with smooth frosting, topped with a glossy black icing web. The web decoration is created by piping shiny icing in a circular pattern with radiating lines, resulting in a striking, textured appearance. The final cake combines moist crumb with a decorative, web-like finish that mimics a spooky spider web.
    Prep Time 30 minutes
    Cook Time 35 minutes
    Total Time 1 hour 5 minutes
    Servings: 12
    Course: Main Course
    Cuisine: Halloween
    Calories: 420

    Ingredients
      

    • 1 3/4 cups all-purpose flour
    • 2 cups granulated sugar
    • 3/4 cup unsweetened cocoa powder
    • 1 1/2 teaspoons baking soda
    • 1 teaspoon baking powder
    • 1/2 teaspoon salt
    • 2 large eggs
    • 1 cup buttermilk
    • 1/2 cup vegetable oil
    • 2 teaspoons vanilla extract
    • 1 cup hot water
    • 2 cups powdered sugar
    • 1/2 cup unsweetened cocoa powder
    • 1/4 cup milk adjust for consistency
    • 1/4 cup light corn syrup for glossy web icing
    • 1/2 teaspoon vanilla extract

    Equipment

    • Mixing bowls
    • Electric mixer
    • 8-inch round cake pan
    • Cooling rack
    • Piping bag with small round tip
    • Spatula
    • Sifter

    Method
     

    1. Preheat your oven to 350°F (175°C). Grease the cake pan and set aside.
    2. In a large mixing bowl, sift together the flour, sugar, cocoa powder, baking soda, baking powder, and salt until well combined.
    3. Add eggs, buttermilk, vegetable oil, and vanilla extract to the dry ingredients. Mix on medium speed until the batter is smooth and uniform.
    4. Pour in the hot water gradually while mixing, and continue until the batter is thin but laced with rich chocolate aroma.
    5. Pour the batter into the prepared cake pan and smooth the top with a spatula.
    6. Bake in the preheated oven for about 35 minutes, or until a toothpick inserted in the center comes out clean.
    7. Remove the cake from the oven and let it cool in the pan for 10 minutes, then transfer to a wire rack to cool completely.
    8. While the cake cools, prepare the frosting by mixing powdered sugar, cocoa powder, milk, corn syrup, and vanilla extract until smooth and glossy. Adjust the milk to get a flowing yet thick icing consistency.
    9. Spread a thin layer of frosting over the completely cooled cake to seal in moisture, then chill for 15 minutes.
    10. Spread the remaining frosting evenly over the top and sides of the cake. Fill a piping bag fitted with a small round tip with the glossy web icing.
    11. Pipe concentric circles from the center outward on the top of the cake to form the web, then add radiating lines across the circles with quick, confident strokes. Use the web icing for a shiny, web-like effect.
    12. Once the web pattern is complete, set the cake aside for a few minutes to let the icing firm slightly before serving. Enjoy your spooky Spider Web Chocolate Cake!
    This Spider Web Cake isn’t just a dessert; it’s a conversation starter. Its slightly imperfect web design reminds us that beauty lies in the chaos of creativity. Whipping up this cake becomes a joyful ritual that feeds the soul as much as it delights the taste buds.

    As the season chills in, baking something so visually striking feels especially apt. The aroma of rich cocoa blends with a hint of vanilla, promising comfort amid the cool October air. This cake turns your haunted gathering into a celebration of spooky craftsmanship and homemade magic.

  • Vibrant Summer Salsa: A Fresh Take on a Classic

    Vibrant Summer Salsa: A Fresh Take on a Classic

    There’s something irresistibly charming about a salsa that bursts with fresh flavors. As someone who believes that summer produce deserves to shine, I find joy in crafting salsas that highlight the best of ripe tomatoes and zesty herbs. This recipe isn’t just about adding spice; it’s about celebrating the vibrancy of seasonal ingredients.

    Every time I make this salsa, I recall lazy weekend mornings at the farmer’s market, where the air smelled of basil and ripe tomatoes. It’s a reminder that simple ingredients, when combined thoughtfully, can create something truly special. This recipe is perfect for those bright sunny days when you crave a burst of freshness on your plate.

    Fresh Tomato and Herb Salsa

    This salsa combines ripe tomatoes, finely chopped herbs, and fresh lime juice to create a vibrant, chunky condiment. The ingredients are mixed together to develop a bright, zesty flavor and a chunky yet cohesive texture, perfect for serving as a topping or dip.
    Prep Time 15 minutes
    Total Time 15 minutes
    Servings: 4
    Course: Main Course
    Cuisine: fusion
    Calories: 25

    Ingredients
      

    • 4 medium ripe tomatoes diced
    • 1/4 cup fresh chopped basil
    • 2 tablespoons fresh lime juice
    • 1 clove garlic minced
    • 1 small red onion finely chopped
    • to taste salt and freshly ground black pepper

    Equipment

    • Sharp knife
    • Cutting board
    • Mixing bowl
    • Spoon

    Method
     

    1. Begin by dicing the ripe tomatoes into small, uniform pieces, then transfer them to a mixing bowl. The tomatoes should be bright red and hold their shape but yield slightly when pressed.
    2. Add the finely chopped red onion and minced garlic to the bowl with the tomatoes. These will contribute crunch and aromatic punch to the salsa.
    3. Sprinkle in the freshly chopped basil and pour over the fresh lime juice. The bright acidity will start to meld with the herbs for a vibrant flavor.
    4. Gently mix everything together using a spoon, ensuring the ingredients are evenly combined. The mixture should look colorful and slightly chunky, with juices from the tomatoes and lime creating a light coating.
    5. Season with salt and freshly ground black pepper to taste, then give the salsa one last gentle stir. Adjust seasoning as needed based on your preference.
    6. Let the salsa sit for about 10 minutes at room temperature to allow the flavors to meld and deepen, or refrigerate for a cooler, more refreshing taste.
    7. Transfer the finished salsa to a serving bowl or spoon it directly onto dishes like tacos, grilled meats, or tortilla chips. Its bright, chunky appearance makes it both flavorful and visually appealing.

    Notes

    For additional flavor, consider adding a pinch of cayenne pepper or chopped jalapeño for heat.

    Sharing this fresh salsa is like giving a splash of summer to anyone who tastes it. It’s quick to assemble but full of character, making it a staple for spontaneous gatherings or quiet nights in. The combination of flavors is bound to bring a bit of brightness to your table.

    Don’t hesitate to experiment with different herbs or add a splash of citrus—each variation can bring a new dimension. This salsa’s lively profile makes it a versatile companion for chips, grilled meats, or stirred into salads. Keep this recipe close—it’s a summer secret worth keeping.

  • Unexpected Twist on Eggplant Parmesan: A Mediterranean Feast

    Unexpected Twist on Eggplant Parmesan: A Mediterranean Feast

    Whether you’re a longtime fan of this classic or a curious newcomer, this recipe offers a new way to savor a beloved dish. It’s perfect for showcasing seasonal produce, and it’s a feast for both the eyes and the taste buds. Plus, it’s surprisingly easy to prepare, making it a great choice for relaxed weekend cooking.

    Vegetable Frittata

    A vegetable frittata is an egg-based dish baked with a mixture of seasonal vegetables and cheese, resulting in a fluffy, custard-like interior with a slightly browned top. It combines sautéed vegetables folded into beaten eggs, then baked until set and lightly golden. The final dish is tender with vibrant vegetable pieces and a creamy texture throughout.
    Prep Time 10 minutes
    Cook Time 20 minutes
    Total Time 30 minutes
    Servings: 4
    Course: Main Course
    Cuisine: Western
    Calories: 220

    Ingredients
      

    • 4 large eggs beaten lightly
    • 1 cup mixed vegetables chopped bell peppers, spinach, zucchini
    • 0.5 cup shredded cheese cheddar or feta
    • 2 tablespoons olive oil
    • to taste salt and pepper

    Equipment

    • Frying pan
    • Mixing bowl
    • Whisk
    • Oven-safe baking dish

    Method
     

    1. Chop the vegetables into small, even pieces and set aside. Preheat the oven to 375°F (190°C).
    2. Heat olive oil in a frying pan over medium heat; once shimmering, add the vegetables. Sauté until they soften and become fragrant, about 5 minutes, stirring occasionally.
    3. In a mixing bowl, whisk the eggs until smooth and slightly frothy. Season with salt and pepper to taste.
    4. Add the cooked vegetables and shredded cheese to the beaten eggs, gently folding them together to combine evenly.
    5. Pour the mixture into an oven-safe baking dish, spreading it out evenly with a spatula.
    6. Place the dish in the preheated oven and bake until the eggs are set and the top is lightly golden, about 20 minutes.
    7. Remove the frittata from the oven and let it cool slightly before slicing into wedges.
    8. Garnish with additional herbs if desired, then serve warm with your favorite sides.
    So go ahead, embrace the chaos of layering cheese and sauce, and enjoy every cheesy, crispy corner. The beauty of this recipe is that it’s adaptable—adjust herbs, spice levels, or cheese to suit your mood. Sometimes, a little culinary adventure is exactly what we need to brighten up the day.

  • Spooky Dessert Chaos: Halloween Dirt Cake with Gummy Worms

    Spooky Dessert Chaos: Halloween Dirt Cake with Gummy Worms

    As the leaves turn and the air dips into crisp territory, I find myself craving a little playful chaos in the kitchen. Halloween is the perfect excuse to embrace mess, color, and a touch of the grotesque with this dirt cake masterpiece. It’s not just a dessert; it’s a sensory experience with textures and flavors that evoke childhood mischief and autumn nights.

    This recipe isn’t about finesse; it’s about fun. Swirling chocolate crumbles with tangy gummy worms transforms simple ingredients into a whimsical, slightly spooky treat. Watch the faces light up and ears perk with delight when you serve this layered tableau of edible chaos.

    Halloween Dirt Cake

    This layered dessert combines crushed cookies, pudding, and gummy worms to create a messy, playful treat that resembles a dirt mound. The dish features a crumbly, creamy texture with colorful gummy worms scattered throughout, resembling a spooky garden scene. It is assembled in layers to evoke an autumnal, mischievous aesthetic.
    Prep Time 20 minutes
    Cook Time 10 minutes
    Total Time 30 minutes
    Servings: 8
    Course: Main Course
    Cuisine: comfort food
    Calories: 350

    Ingredients
      

    • 1 package chocolate pudding mix instant
    • 4 cups milk for pudding
    • 2 cups cookie crumbles crushed chocolate cookies or Oreos
    • 1 cup whipped topping such as cool whip
    • 1 bag gummy worms

    Equipment

    • Mixing bowls
    • Electric mixer or whisk
    • Serving dish or trifle bowl
    • Spatula
    • Measuring cups
    • Cookie crumbles or crushed Oreos

    Method
     

    1. In a large mixing bowl, whisk together the instant chocolate pudding mix with the cold milk until smooth and thickened, about 2-3 minutes.
    2. Gently fold the whipped topping into the prepared pudding until evenly combined, creating a smooth, creamy mixture.
    3. Spread a layer of crushed cookies at the bottom of your serving dish to mimic dirt.
    4. Pour half of the chocolate pudding mixture over the crushed cookies, smoothing it out with a spatula for an even layer.
    5. Add another layer of crushed cookies on top of the pudding layer to build up the ‘dirt’ effect.
    6. Pour the remaining pudding mixture over the second cookie layer, smoothing the top gently.
    7. Sprinkle the top with additional cookie crumbs for extra texture and ‘dirt’ appearance.
    8. Decorate the top with gummy worms, placing some so they appear to wiggle out of the ‘dirt’ for a spooky effect.
    9. Refrigerate the dirt cake for at least 2 hours to allow flavors to meld and the texture to set.
    10. Once chilled and set, serve the dirt cake in slices or scoops, reveling in its playful, messy look and layered textures.

    In the end, Halloween Dirt Cake isn’t just about the taste, but the memories and chuckles it sparks. It’s a perfect centerpiece for parties and an instant conversation starter among guests of all ages. This recipe reminds me that sometimes, the best treats are the delightfully messy ones, especially when they bring out childhood nostalgia and holiday cheer.

    Keep it simple, embrace the chaos, and let your creativity run wild with gummy worms and chocolate crumbs. As the season turns and spooky vibes fill the air, this dirt cake will be waiting to delight, surprise, and maybe even gross out a little. That’s the magic of a good holiday dessert—messy, memorable, and delicious.

  • The Secret Ingredient in My Watermelon Slushie That Turns Ordinary Into Magic

    The Secret Ingredient in My Watermelon Slushie That Turns Ordinary Into Magic

    Every summer, I chase the first sweet aroma of ripe watermelon at the market. But this year, I decided to do something different—infuse that classic flavor into a frozen treat with a twist. The secret? A pinch of salt that transforms the sweetness into a burst of flavor that awakens your taste buds.

    This isn’t just a regular watermelon slushie. It’s a vibrant, icy escape that sparks nostalgia and joy in every sip. Perfect for spontaneous gatherings or a quiet moment in the sun, it’s surprisingly simple to make but endlessly refreshing.

    Watermelon Salt Ice Treat

    This frozen dessert combines ripe watermelon with a touch of salt, then blends and freezes the mixture to create a vibrant, icy snack. The final texture is smooth and slushy, with a burst of salty-sweet flavor and bright red color, perfect for summertime enjoyment.
    Prep Time 10 minutes
    Total Time 10 minutes
    Servings: 4
    Course: Main Course
    Cuisine: American
    Calories: 70

    Ingredients
      

    • 4 cups watermelon cubes seedless or de-seeded
    • 1/4 teaspoon salt preferably coarse salt

    Equipment

    • Cutting board
    • Chef’s knife
    • Blender
    • Freezer-safe container
    • Measuring spoons

    Method
     

    1. Cut ripe watermelon into chunks and measure out 4 cups, removing seeds if necessary. Place the watermelon cubes into a blender.
    2. Add a pinch of salt to the watermelon in the blender to enhance the flavor and create a balance between sweetness and saltiness.
    3. Blend the watermelon on high speed until completely pureed, about 30-40 seconds. The mixture should be smooth and vibrant red.
    4. Pour the watermelon puree into a freezer-safe container, spreading it out evenly.
    5. If your freezer allows, set the container in the coldest part and let it freeze for about 2 hours, or until the edges start to firm up.
    6. Remove the freezing mixture from the freezer, and use a fork to scrape and break up any ice crystals now forming. Stir to redistribute the slush.
    7. Return the container to the freezer, repeating the scraping and stirring every 30 minutes for another 2-3 hours. Each time, the mixture will become more slushy and ice-like.
    8. Once the mixture is evenly frozen and has a scoopable, icy consistency, give it a final stir and serve immediately.
    As the days grow warmer, this watermelon slushie offers a cool retreat that’s both satisfying and surprisingly sophisticated. The mix of icy crunch and sweet, salty notes makes each sip feel like a mini celebration.

    Cooking with fresh ingredients at their peak captures the true essence of summer. This simple recipe reminds me that the best treats are often the most straightforward—just pure, honest flavors in perfect harmony.

  • The Surprising Charm of Pumpkin Spice Overnight Oats

    The Surprising Charm of Pumpkin Spice Overnight Oats

    Purchasing pumpkin spice every fall can feel like a rite of passage, but what if you could turn that seasonal flavor into something more nourishing and effortless? Enter pumpkin spice overnight oats — the quiet hero of busy mornings and chilly days. This recipe transforms your favorite cozy smell into a creamy, portable breakfast you can prep in minutes.

    What makes this dish stand out isn’t just the flavor. It’s how it seamlessly combines nostalgia with convenience, making your mornings less about rushing and more about savoring. Plus, the scent of cinnamon, nutmeg, and pumpkin wafting through your kitchen turns simple oats into a little moment of celebration.

    Pumpkin Spice Overnight Oats

    This dish features rolled oats soaked overnight in a mixture of milk, pumpkin puree, and warm spices, resulting in a creamy, flavorful breakfast. The texture is soft and thick, with a fragrant aroma of cinnamon, nutmeg, and pumpkin coming through after refrigeration. It offers a wholesome, ready-to-eat meal that combines comfort with convenience.
    Prep Time 5 minutes
    Total Time 5 minutes
    Servings: 2
    Course: Main Course
    Cuisine: American
    Calories: 250

    Ingredients
      

    • 1 cup rolled oats
    • 1/2 cup milk (dairy or plant-based)
    • 1/4 cup pumpkin puree unsweetened preferred
    • 1 teaspoon ground cinnamon
    • 1/2 teaspoon ground nutmeg
    • 2 tablespoons maple syrup or honey optional for sweetness

    Equipment

    • Mixing bowl
    • Spoon

    Method
     

    1. In a mixing bowl, combine the rolled oats, milk, pumpkin puree, ground cinnamon, ground nutmeg, and maple syrup. Stir well until the mixture is smooth and the spices are evenly distributed. This helps the oats absorb all the flavors overnight.
      1 cup rolled oats, 1/2 cup milk (dairy or plant-based), 1/4 cup pumpkin puree, 1 teaspoon ground cinnamon, 1/2 teaspoon ground nutmeg, 2 tablespoons maple syrup or honey
    2. Cover the bowl tightly with plastic wrap or a lid, and place it in the refrigerator. Let it soak for at least 4 hours or overnight. During this time, the oats will soften and absorb the aromatic spices and pumpkin flavor.
    3. Remove the bowl from the fridge and give the oats a gentle stir. The mixture should be thick, creamy, and fluffy to the touch, with visible steam or a lovely pumpkin scent wafting up from it.
    4. Scoop out the desired portion of oats into serving bowls. If the mixture is too thick, stir in a splash of milk to loosen it up just before serving.
    5. Optionally, garnish with toppings such as sliced bananas, toasted nuts, or a drizzle of honey. The finished dish should have a smooth, creamy consistency with a warm, spiced aroma and a beautiful pumpkin hue.

    Notes

    You can prepare this ahead of time and customize with your favorite toppings.

    As autumn deepens, there’s something comforting about starting the day with a bowl that smells like pumpkin pie but feels like self-care in a jar. These oats hold onto the season’s essence without the fuss of baking or fussing over stovetops. It’s a quiet nod to all the cozy moments that fall promises.

    In a busy world, this recipe reminds us that joyful, nourishing mornings don’t have to be complicated. With just a handful of ingredients and a quick preparation, you get a breakfast that’s both satisfying and seasonally charming. It’s a small ritual worth savoring every chilly morning.