
Baked chicken tenders might seem straightforward, but getting that perfect crispy crunch while keeping the meat juicy can be tricky. I’ve found that a simple homemade coating, baked rather than fried, makes all the difference—less mess, less fuss, but still that satisfying texture contrast. It’s the kind of recipe I turn to when I want comfort without turning on the stove for deep frying.
What I love most is how adaptable this recipe is. You can toss in different herbs or spices to match whatever mood you’re in. Plus, it’s a real crowd-pleaser—kids love it, adults appreciate it, and it’s perfect for a quick weeknight dinner or a casual snack. There’s something about that golden, crispy exterior and tender inside that just hits the right spot, every time.
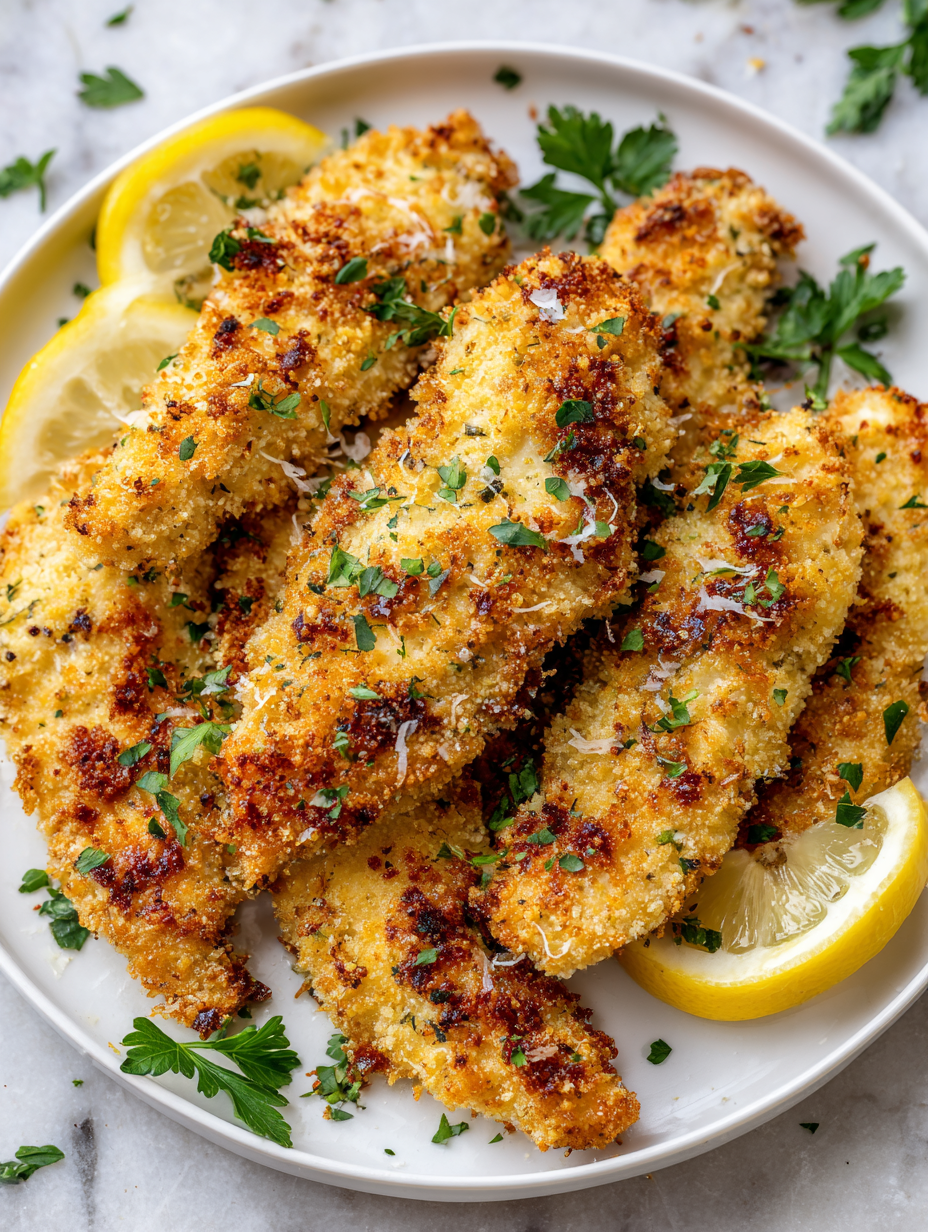
Focusing on the texture contrast—crispy exterior with juicy, tender inside—achieved through a simple homemade coating, making these tenders irresistibly snackable and perfect for any casual gathering.
Origin of My Baked Chicken Tenders
This recipe came together on a hectic Tuesday when I needed something quick, satisfying, and foolproof. I remember the first time I tried baking tenders instead of frying—there was a surprising crunch, and the meat stayed juicy. It made me realize how often we overlook the simplicity of the oven for crispy snacks. Now, it’s my go-to for busy nights and casual get-togethers, because everyone loves that combination of crispy exterior and tender inside, minus the mess.
Key Ingredients and Tips
- Chicken breasts: I prefer skinless, boneless thighs for more flavor and juiciness, but chicken breasts work just fine. Keep an eye out for that fresh, meaty scent.
- Breadcrumbs: I use panko for extra crunch, but seasoned breadcrumbs bring more flavor without extra effort. Look for those light, airy crumbs that shimmer when toasted.
- Parmesan cheese: Adds a salty, umami punch that boosts the coating. It melts into the crust, giving a slightly crispy, cheesy layer. Don’t skip it if you like that rich tang.
- Egg wash: I beat a couple of eggs with a splash of milk—think creamy, slightly frothy. It helps the coating stick like glue. If it’s too thick, add a little more milk.
- Spices & herbs: Paprika, garlic powder, and a pinch of cayenne bring warmth and depth. Smell the spices as you sprinkle—make sure they’re fresh for the brightest aroma.
- Olive oil spray: I use it to lightly coat the tenders before baking—helps crisp the coating and adds a subtle fruity scent. Be generous but even to avoid soggy spots.
- Salt & pepper: Always taste the seasoning mix—salty enough to enhance, but not overpower. Adjust at the end if needed, based on your chicken’s natural flavor.
Spotlight on key ingredients
Chicken breasts:
- I prefer skinless, boneless thighs for more flavor and juiciness, but chicken breasts work just fine. Keep an eye out for that fresh, meaty scent.
- Breadcrumbs: I use panko for extra crunch, but seasoned breadcrumbs bring more flavor without extra effort. Look for those light, airy crumbs that shimmer when toasted.
- Parmesan cheese: Adds a salty, umami punch that boosts the coating. It melts into the crust, giving a slightly crispy, cheesy layer. Don’t skip it if you like that rich tang.
Breadcrumbs & Parmesan:
- Breadcrumbs: I use panko for extra crunch, but seasoned breadcrumbs bring more flavor without extra effort. Look for those light, airy crumbs that shimmer when toasted.
- Parmesan cheese: Adds a salty, umami punch that boosts the coating. It melts into the crust, giving a slightly crispy, cheesy layer. Don’t skip it if you like that rich tang.
Notes for ingredient swaps
- Dairy-Free: Swap the eggs for a flaxseed or chia seed mixture—still helps the coating stick, but watch out for a slightly different texture.
- Gluten-Free: Use crushed, gluten-free rice crackers or almond meal instead of panko. Expect a nuttier flavor and slightly denser crunch.
- Low-Sodium: Choose unsalted breadcrumbs and skip the added salt in the seasoning. You might want to add a splash more spices for flavor.
- Vegan: Replace eggs with aquafaba (bean brine) or a commercial egg replacer. The coating will still adhere, but it might be a tad less crispy.
- Cheese Variations: Parmesan can be swapped for nutritional yeast for a cheesy flavor without dairy. It’ll add a savory, slightly nutty note.
- Oil Spray: Use avocado oil spray or even a light drizzle of melted butter for extra richness and browning. Watch for smoking points.
- Spices & Herbs: Experiment with smoked paprika or cumin for a different aroma profile. Keep in mind, stronger spices may overpower delicate chicken flavor.
Equipment & Tools
- Baking sheet: To hold the tenders while baking evenly.
- Parchment paper or silicone mat: To prevent sticking and ease cleanup.
- Medium bowl: For the egg wash.
- Shallow dish: For coating ingredients.
- Tongs: To handle chicken strips cleanly.
- Kitchen spray or brush: To lightly oil the tenders for crispness.
Step-by-step guide to baked tenders
- Preheat your oven to 200°C (392°F). Use a baking sheet lined with parchment paper or a silicone mat for easy cleanup.
- Prepare your equipment: a medium-sized bowl for the egg wash, a shallow dish for the coating, and tongs for handling the chicken.
- Slice chicken breasts into strips about 1 inch wide and 3 inches long. Pat them dry with paper towels to remove excess moisture.
- In the egg bowl, whisk together 2 eggs with a splash of milk until well combined. This will help the coating stick.
- In the shallow dish, combine 1 cup panko breadcrumbs, 1/4 cup grated Parmesan, 1 teaspoon paprika, 1/2 teaspoon garlic powder, salt, and pepper.
- Dip each chicken strip into the egg wash, letting excess drip off, then dredge thoroughly in the breadcrumb mixture, pressing lightly to adhere.
- Arrange the coated tenders on the prepared baking sheet. Lightly spray or brush with olive oil to promote crispiness.
- Bake in the oven for about 20-25 minutes. Flip halfway through, and spray again to ensure even crisping.
- Watch for a golden-brown color and crispy edges. The internal temperature should reach 75°C (165°F).
- Once done, remove from oven and let rest for 3-5 minutes. Serve hot with your favorite dipping sauce.
Let the tenders rest for 3-5 minutes on a wire rack or plate. Serve with dipping sauces or a simple salad. The resting period helps juices redistribute, keeping them tender inside.
How to Know It’s Done
- Golden-brown, crispy exterior with visible crumbs.
- Internal temperature of at least 75°C (165°F).
- Juicy, tender interior when sliced.
Baked Chicken Tenders
Ingredients
Equipment
Method
- Preheat your oven to 200°C (392°F) and line a baking sheet with parchment paper or a silicone mat.
- Slice the chicken breasts into strips about 1 inch wide and 3 inches long, then pat them dry to remove excess moisture.
- In a medium bowl, whisk together the eggs with a splash of milk until smooth and frothy.
- In a shallow dish, combine the panko breadcrumbs, grated Parmesan, paprika, garlic powder, salt, and pepper, mixing well.
- Dip each chicken strip into the egg wash, allowing any excess to drip off, then dredge thoroughly in the breadcrumb mixture, pressing lightly to ensure the coating sticks.
- Arrange the coated chicken tenders on the prepared baking sheet, spacing them evenly.
- Lightly spray or brush the tenders with olive oil to help them crisp up in the oven.
- Bake in the oven for about 20-25 minutes, flipping halfway through, until the tenders are golden brown and crispy.
- Check for doneness by ensuring the tenders are golden and the internal temperature reaches 75°C (165°F). They should feel crisp and sound slightly hollow when tapped.
- Remove the tenders from the oven and let them rest for 3-5 minutes — this helps keep them juicy inside.
- Serve the crispy baked tenders hot with your favorite dipping sauce or a side salad for a complete meal.
Notes
Pro tips for crispy tenders
- Use panko breadcrumbs for a lighter, crunchier crust that shatters with each bite.
- Spray the chicken generously with oil before baking to achieve an even, golden crisp.
- Chill coated tenders for 10 minutes before baking; it helps the crust stick better and crisp up.
- Bake at a high temperature, around 200°C (392°F), to mimic fried texture without excess oil.
- Flip tenders halfway through baking to ensure even browning on all sides.
- Rest tenders for 3-5 minutes post-baking; this keeps them juicy inside and crispy outside.
- Use a wire rack over your baking sheet for maximum air circulation and crispness.
Common mistakes and how to fix them
- FORGOT to preheat oven → Always preheat for even cooking and crispness.
- DUMPED chicken into coating → Coat chicken thoroughly for maximum crunch.
- OVER-TORCHED coating → Reduce oven temp or bake longer for golden color.
- MISSED resting time → Rest tenders 3-5 minutes for juicier results.
Quick fixes for common issues
- When chicken sticks to the pan → Splash with a bit of water or broth, then gently loosen.
- If coating isn’t crispy enough → Patch with a quick spray of oil and a few extra minutes in the oven.
- When tenders are overcooked and dry → Splash with a little broth or sauce to rehydrate and add flavor.
- If breadcrumbs turn too dark → Shield with foil and lower oven temperature slightly, then continue baking.
- heading
Prep, store, and reheat tips
- Prep the chicken tenders by coating them fully; keep them covered in the fridge for up to 24 hours for convenience.
- Store baked tenders in an airtight container in the fridge for up to 3 days; reheat for a crisp exterior and juicy inside.
- For longer storage, freeze tenders in a single layer on a baking sheet, then transfer to a zip-top bag; maintain quality up to 1 month.
- Reheat in a preheated oven at 180°C (350°F) for 10-12 minutes until heated through and crispy again. Expect some initial moisture loss, but the texture bounces back with gentle reheating.
Top questions about baked chicken tenders
1. How hot should the oven be?
Preheat your oven to 200°C (392°F) for the best crispy exterior. Use a baking sheet lined with parchment for easy cleanup.
2. What chicken cut is best?
Use skinless, boneless chicken breasts or thighs cut into strips. Pat them dry to remove excess moisture for better coating adhesion.
3. How do I ensure the coating sticks well?
Coat the chicken thoroughly in the breadcrumb mixture and press gently to help the coating stick. Chill for 10 minutes if needed.
4. How long do I bake them?
Bake for about 20-25 minutes, flipping halfway. Look for a golden, crispy crust and internal temperature of 75°C (165°F).
5. Can I substitute the breadcrumbs?
Use panko breadcrumbs for extra crunch. You can substitute with crushed gluten-free crackers or seasoned breadcrumbs, depending on your dietary needs.
6. Should I oil the chicken before baking?
Spray the tenders lightly with oil before baking to promote crispness. Avoid overcrowding the baking sheet for even cooking.
7. Why do I need to rest the tenders?
Rest the tenders for 3-5 minutes after baking to allow juices to redistribute, keeping them tender inside.
8. What if they aren’t crispy enough?
If the coating isn’t crispy enough, increase oven temperature slightly or spray with more oil and bake a few extra minutes.
9. How should I store and reheat leftovers?
Store leftovers in an airtight container in the fridge for up to 3 days. Reheat in a 180°C (350°F) oven for 10 minutes for best crunch.
10. How do I know when they’re done?
Avoid overcooking by checking the internal temperature and appearance. The tenders should be golden, crispy, and juicy inside.
These baked chicken tenders aren’t just a quick dinner, they’re a little reminder that simple ingredients can deliver real comfort. The crispy exterior and juicy interior make every bite almost addictive, especially with a good dip or a squeeze of lemon. It’s a recipe I keep coming back to, especially when I need something honest, satisfying, and fuss-free.
In the end, it’s about those small moments—hearing that crackle in the oven, tasting that smoky crunch—that make even a familiar dish feel new. No matter how many times I make them, I still appreciate how straightforward and reliable this recipe is. It’s the kind of dish that sneaks into the weekly rotation, no questions asked.
At Salt Strategist, we believe food is more than just nourishment; it’s a story, a memory, and an experience meant to be shared. Our blog is dedicated to exploring the art of cooking with a focus on everyday meals, kitchen tips, and inspiring recipes that bring people closer together around the table.
Our Story
Salt Strategist was founded by Emily Carter, a passionate home cook and culinary storyteller from Portland, Oregon. Growing up in a family that valued Sunday dinners and homemade meals, Emily discovered early on that food has the power to connect hearts and cultures.
Her vision for Salt Strategist is simple: to make cooking approachable, exciting, and rewarding for everyone. Whether you are a seasoned chef or just starting your cooking journey, this blog is here to inspire confidence in the kitchen with easy-to-follow recipes, clever cooking strategies, and flavour-packed ideas.