
There’s something about the aroma of roasted mushrooms that instantly transports me to my grandmother’s kitchen, where the earthy scent mingled with garlic and herbs. These baked stuffed mushrooms are like a little piece of that memory, wrapped in a warm, cheesy blanket. I love how simple ingredients can create a dish that feels both rustic and indulgent, perfect for lazy weekends or when you need a comforting bite.
Focusing on this dish’s nostalgic roots, I’ve learned that the magic is in the details—getting the stuffing just right, balancing the seasonings, and roasting until the mushrooms are tender and fragrant. It’s not fancy, but it’s honest and satisfying, the kind of recipe that makes everyone gather around the table, noses sniffing the smoky aroma. Every bite is a reminder that good food doesn’t have to be complicated to be memorable.
Focusing on how the earthy aroma of roasted mushrooms and the creamy stuffing evoke memories of family gatherings and rustic kitchens, making this dish a comforting reminder of home wherever you are.
The inspiration behind this dish
- This recipe was born out of a lazy Sunday afternoon, when I was rummaging through the fridge and found a bunch of mushrooms that needed using up. I wanted something warm, cheesy, and a little fancy—something that felt indulgent but didn’t take hours. The idea of stuffing those earthy caps with a savory mixture and baking until bubbly just clicked, reminding me of family dinners where everyone gathers around the table with a plate in hand. It’s simple, honest, and a little bit rustic—the kind of dish that feels like a small celebration.
- Every time I make these, I think of my grandmother’s kitchen, where the smell of roasting mushrooms would drift in from the oven, mingling with garlic and fresh herbs. It’s that cozy, nostalgic feeling that makes this recipe a go-to for gatherings or quiet nights alone. I love how the combination of textures—the tender mushroom, the gooey cheese, the crunchy topping—turns a humble ingredient into something special. It’s a reminder that good food is about comfort and familiarity, served up in a way that’s straightforward but memorable.
- heading
Ingredient breakdown: key components
- Fresh large white mushrooms: I love the earthy aroma of these, and I find removing the stems and chopping them finely adds a nice texture to the stuffing. Swap with cremini if you want a slightly deeper flavor.
- Cream cheese: Its silky richness makes the stuffing creamy and indulgent. If you’re dairy-free, ricotta or mashed avocado can work, but expect a different, milder texture.
- Parmesan cheese: I prefer this for its sharp, nutty punch, but pecorino or asiago can add a similar salty kick if that’s what you have.
- Garlic: Roasted or raw, garlic gives that punchy aroma. If you’re sensitive, use less or substitute with garlic powder—it’s milder but still flavorful.
- Fresh herbs (parsley, thyme): I love the fresh brightness they add, especially when chopped fine. Dried herbs can be used, but reduce the amount by half for a more subtle, dried-herb note.
- Breadcrumbs: I like the crunch they bring, especially when toasted. Gluten-free or crushed nuts can be a good substitute for different textures or dietary needs.
- Olive oil: This helps the stuffing meld together and adds a slight fruity aroma. For a richer flavor, a splash of melted butter works well, but olive oil keeps it lighter.
Spotlight on key ingredients
Mushrooms:
- Fresh large white mushrooms: I love their earthy aroma and tender texture. Removing stems adds a savory crunch to the stuffing. Swap with cremini for a richer, deeper flavor.
- Cream cheese: It’s the silky backbone of this dish, making every bite creamy and indulgent. If dairy-free, try mashed avocado for a mellow, smooth alternative, though it’s milder.
Herbs:
- Parmesan cheese: Its sharp, nutty flavor intensifies when baked, creating a delightful savory crust. Pecorino or asiago can replace it for a different salty punch, but expect a slightly different aroma and melt.
- Fresh herbs (parsley, thyme): Bright, fragrant, and fresh, they awaken the filling with a hint of green. During cooking, they release a herbal aroma that’s both fresh and earthy, especially when chopped fine.
Notes for ingredient swaps
- Dairy-Free: Swap cream cheese for mashed avocado or cashew cheese; expect a milder, slightly less creamy result.
- Vegan: Use plant-based cheese alternatives and nutritional yeast in place of Parmesan for a cheesy, umami flavor.
- Gluten-Free: Replace traditional breadcrumbs with crushed gluten-free crackers or finely chopped nuts for crunch.
- Nut-Free: Omit nuts or breadcrumbs and add extra herbs or a sprinkle of cheese for texture and flavor.
- Herb Variations: Swap parsley and thyme for basil or chives to match your preferred flavor profile.
- Cheese Choices: Use Pecorino or Asiago instead of Parmesan for a sharper, more pungent note.
- Oil Alternatives: Substitute olive oil with melted butter or ghee for a richer aroma and flavor.
Equipment & Tools
- Oven: To bake the stuffed mushrooms evenly.
- Skillet: To cook mushroom stems and develop flavors.
- Mixing bowl: To prepare and combine stuffing ingredients.
- Spoon or piping bag: To stuff mushroom caps neatly.
- Baking dish: To hold the stuffed mushrooms during baking.
- Knife: To chop mushroom stems and herbs.
- Cutting board: To prepare ingredients safely.
Step-by-step guide to baking stuffed mushrooms
- Preheat your oven to 190°C (375°F). Gather a baking dish roughly 20x20cm (8×8 inches).
- Clean the mushrooms gently with a damp cloth. Remove stems and set aside; chop finely for stuffing.
- In a skillet over medium heat (about 160°C/320°F), heat a tablespoon of olive oil. Add chopped mushroom stems and cook until fragrant, about 3-4 minutes. Remove from heat.
- In a mixing bowl, combine softened cream cheese, grated Parmesan, minced garlic, chopped herbs, and the cooked mushroom stems. Mix well. Season with salt and pepper to taste.
- Stuff each mushroom cap generously with the mixture. Place filled caps upright in the baking dish.
- Sprinkle a little extra Parmesan and breadcrumbs on top of each stuffed mushroom for a crispy finish.
- Bake in the preheated oven for 20-25 minutes. The tops should be golden, and the mushrooms tender when pierced with a fork.
- Remove from oven and let rest for 5 minutes. This helps the filling set slightly and makes serving easier.
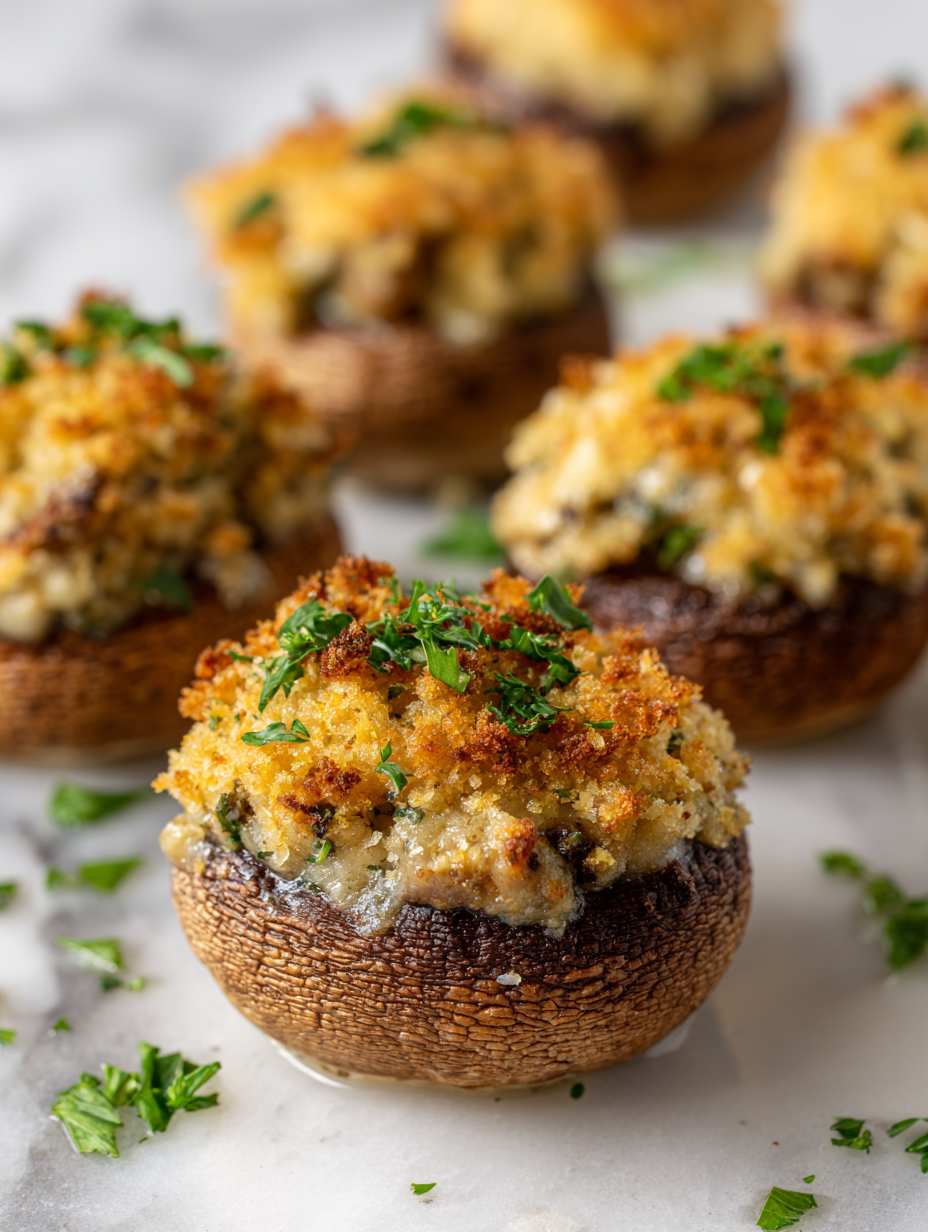
- Serve warm, garnished with a fresh sprig of parsley if desired. Enjoy the fragrant, cheesy aroma with a crispy top and tender mushroom base.
Let the mushrooms rest for 5 minutes out of the oven to settle. Serve directly from the dish, garnished with fresh herbs if desired. The warm, cheesy aroma will invite everyone to dig in.
How to Know It’s Done
- Mushrooms are tender and juices run clear when pierced.
- Top is golden and crispy, not burnt.
- Filling is bubbly and slightly browned around edges.
Baked Stuffed Mushrooms
Ingredients
Equipment
Method
- Preheat your oven to 190°C (375°F) and lightly grease a baking dish.
- Gently clean the mushrooms with a damp cloth, then carefully remove the stems and chop them finely. Set the mushroom caps aside.
- Heat olive oil in a skillet over medium heat. Add the chopped mushroom stems and cook for about 3-4 minutes until fragrant and slightly browned, stirring occasionally. Remove from heat.
- In a mixing bowl, combine softened cream cheese, grated Parmesan, minced garlic, chopped parsley, chopped thyme, and the cooked mushroom stems. Mix until well blended and season with salt and pepper to taste.
- Use a spoon or piping bag to generously stuff each mushroom cap with the filling, pressing gently to fill completely.
- Arrange the stuffed mushrooms upright in the prepared baking dish. Sprinkle breadcrumbs and a little extra Parmesan on top for a crispy finish.
- Bake in the preheated oven for 20-25 minutes, until the tops are golden brown and the mushrooms are tender when pierced with a fork.
- Remove from the oven and let rest for 5 minutes. This helps the filling set and makes serving easier.
- Serve the stuffed mushrooms warm, garnished with fresh parsley if desired. The cheesy aroma and crispy tops make for an inviting presentation.
Notes
Pro tips for perfect stuffed mushrooms
- Bolded mini-head: Use a small teaspoon to evenly fill the mushroom caps, avoiding mess and ensuring consistent stuffing.
- Bolded mini-head: Chill the stuffed mushrooms for 10 minutes before baking to help the filling set and reduce spillage.
- Bolded mini-head: Brush the tops lightly with olive oil before baking for a golden, crispy crust and enhanced flavor.
- Bolded mini-head: Bake on a middle rack to ensure even heat distribution and prevent burning on the top or bottom.
- Bolded mini-head: If the tops brown too quickly, tent with foil for the remaining baking time to avoid over-torching.
- Bolded mini-head: Rest the mushrooms 5 minutes after baking; this helps the filling firm up and makes serving neater.
- Bolded mini-head: For extra crunch, sprinkle some toasted breadcrumbs or chopped nuts on top just before baking.
Common mistakes and how to fix them
- FORGOT to preheat the oven? Always set it early to avoid uneven cooking.
- DUMPED the filling? Ensure mushrooms are dry to prevent sogginess before stuffing.
- OVER-TORCHED the topping? Keep an eye on the last 5 minutes to prevent burning.
- MISSED the resting step? Let mushrooms sit 5 minutes for better flavor and easier serving.
Quick fixes and pantry swaps
- When mushrooms release excessive water, splash with a little lemon juice to brighten the flavor.
- If the filling is too loose, dump in a spoonful of breadcrumbs or grated cheese to firm it up.
- Over-torched topping? Shield with foil and reduce oven temperature slightly for even browning.
- DUMPED the stuffing? Ensure mushroom caps are dry before filling to prevent sogginess.
- When the cheese isn’t melting smoothly, rescue with a quick blast of heat under the broiler for 5 seconds.
Prep, store, and reheat tips
- Prepare the stuffing mixture up to a day in advance; keep refrigerated to preserve freshness and flavor, which intensifies overnight.
- Stuffed mushrooms can be assembled a few hours ahead; keep covered in the fridge, but don’t refrigerate for more than 24 hours to avoid sogginess.
- Refrigerated stuffed mushrooms should be baked within 24 hours for best texture and aroma. The filling may darken slightly, but the flavor remains rich.
- Reheat in a 180°C (350°F) oven for 10-15 minutes until warmed through; look for bubbling cheese and a fragrant smell that signals readiness.
Top questions about stuffed mushrooms
1. How do I pick the best mushrooms?
Look for mushrooms with firm, unblemished caps and tightly closed gills. Avoid those that look slimy or cracked.
2. How should I clean the mushrooms?
Clean mushrooms gently with a damp cloth. Remove stems carefully to keep the caps intact for stuffing.
3. Do I need to cook the stems first?
Pre-cook mushroom stems until fragrant and slightly browned, about 3-4 minutes, to develop flavor in the stuffing.
4. What’s the ideal baking time and temperature?
Bake at 190°C (375°F) for 20-25 minutes until tops are golden and mushrooms are tender when pierced with a fork.
5. How do I prevent the topping from burning?
If the tops brown too quickly, tent with foil to prevent burning while the insides finish cooking.
6. How moist should the stuffing be?
Stuffing should be moist but not runny; if it’s too loose, add a little more breadcrumbs or cheese.
7. Should I let them rest after baking?
Allow the mushrooms to rest for about 5 minutes after baking to help the filling set and make serving easier.
8. How do I store and reheat leftovers?
Store leftovers in an airtight container in the fridge for up to 24 hours. Reheat at 180°C (350°F) until bubbly.
9. Can I make this vegan?
For a vegan version, substitute cream cheese with mashed avocado or cashew cheese, but expect a milder, less creamy result.
10. What if the mushrooms release too much water?
If mushrooms release too much water during baking, sprinkle with lemon juice to brighten the flavor and help evaporate excess moisture.
These baked stuffed mushrooms are more than just a snack; they carry a sense of home and simple joy. The earthy aroma, the gooey cheese, and the crunchy top make every bite a small celebration of comfort food. They’re perfect for when you crave something familiar yet satisfying, especially as the seasons turn cooler.
In the end, it’s about those little moments—sharing a plate, savoring the aroma, feeling a bit nostalgic. This recipe is a reminder that good, honest ingredients can come together effortlessly to create something memorable. Sometimes, all it takes is a humble mushroom to bring a little warmth to your table.
At Salt Strategist, we believe food is more than just nourishment; it’s a story, a memory, and an experience meant to be shared. Our blog is dedicated to exploring the art of cooking with a focus on everyday meals, kitchen tips, and inspiring recipes that bring people closer together around the table.
Our Story
Salt Strategist was founded by Emily Carter, a passionate home cook and culinary storyteller from Portland, Oregon. Growing up in a family that valued Sunday dinners and homemade meals, Emily discovered early on that food has the power to connect hearts and cultures.
Her vision for Salt Strategist is simple: to make cooking approachable, exciting, and rewarding for everyone. Whether you are a seasoned chef or just starting your cooking journey, this blog is here to inspire confidence in the kitchen with easy-to-follow recipes, clever cooking strategies, and flavour-packed ideas.