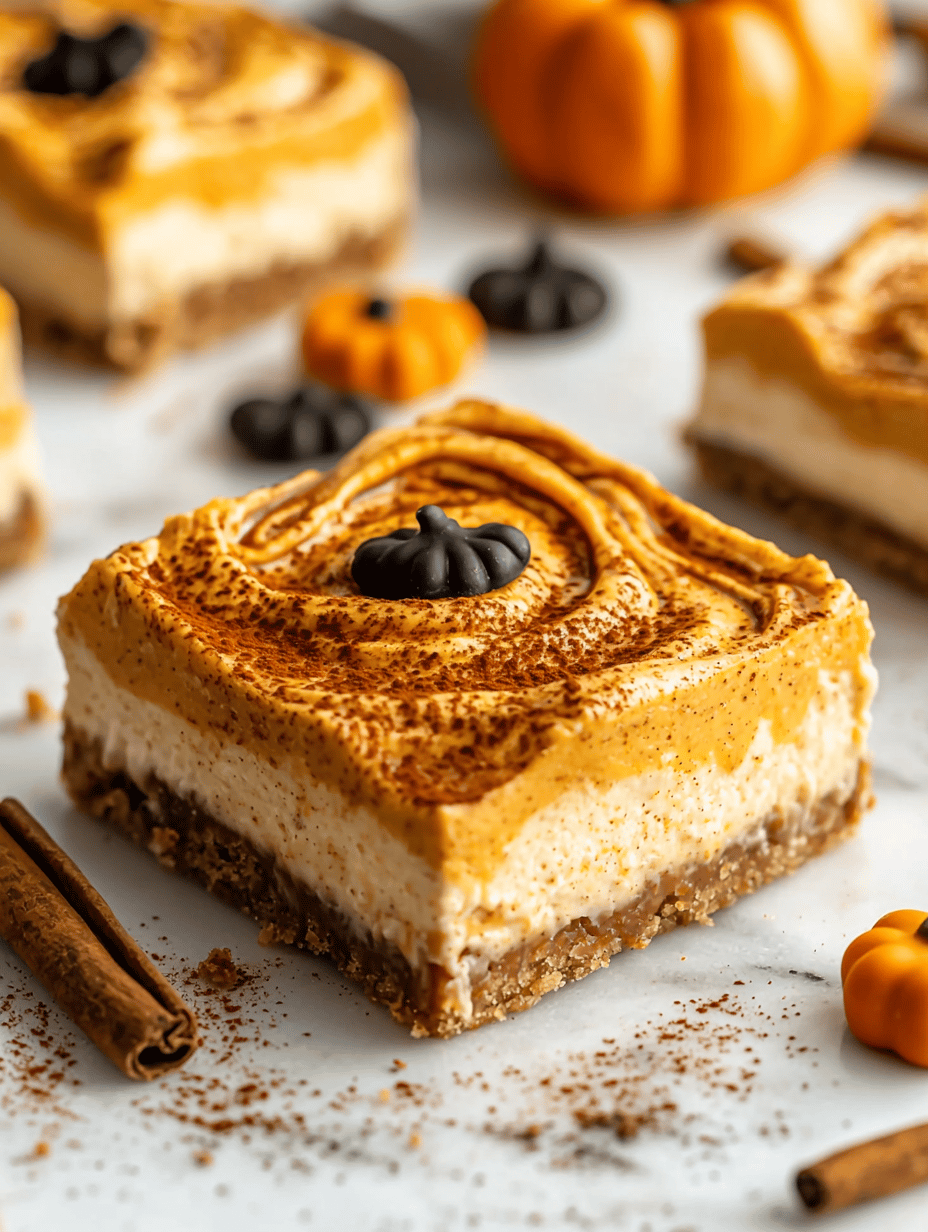
Category: Desserts

  • Unexpected Delight: Spiced Pumpkin Cookies with a Crunch

    Unexpected Delight: Spiced Pumpkin Cookies with a Crunch

    As the leaves turn and the air becomes crisp, I find myself craving more than just pumpkin spice lattes. Today’s recipe transforms humble pumpkin into a cookie that’s both surprising and joyful. The secret lies in adding a subtle crunch that makes each bite memorable.

    Pumpkin Crunch Cookies

    These pumpkin cookies are made by mixing pumpkin puree with spices and sugar, then folding in nuts for texture. The dough is scooped onto a baking sheet and baked until golden, resulting in cookies with a tender interior and a subtle crunch on the edges. The final product has a moist center with a crispy outer layer, complemented by the warmth of seasonal spices.
    Prep Time 15 minutes
    Cook Time 12 minutes
    Total Time 27 minutes
    Servings: 24
    Course: Main Course
    Cuisine: American
    Calories: 120

    Ingredients
      

    • 1 cup pumpkin puree unsweetened
    • 1 cup granulated sugar
    • 1/2 cup vegetable oil
    • 2 cups all-purpose flour
    • 1 teaspoon baking powder
    • 1/2 teaspoon baking soda
    • 1 teaspoon ground cinnamon
    • 1/2 teaspoon ground nutmeg
    • 1/4 teaspoon ground ginger
    • 1/2 teaspoon salt
    • 1 cup chopped nuts (pecans or walnuts)

    Equipment

    • Mixing bowls
    • Baking sheet

    Method
     

    1. Preheat the oven to 350°F (175°C) and line a baking sheet with parchment paper.
    2. In a large mixing bowl, whisk together the pumpkin puree, granulated sugar, and vegetable oil until smooth and well combined. The mixture should look creamy and uniform.
    3. In a separate bowl, sift together the flour, baking powder, baking soda, cinnamon, nutmeg, ginger, and salt. This helps distribute the leavening agents and spices evenly.
    4. Add the dry ingredients into the pumpkin mixture gradually, folding gently with a spatula until just combined. The dough will be slightly sticky but manageable.
    5. Fold in the chopped nuts until evenly distributed throughout the dough. This adds a pleasing crunch and flavor to each bite.
    6. Use a cookie scoop or spoon to drop rounded tablespoons of dough onto the prepared baking sheet, spacing them about 2 inches apart.
    7. Bake in the preheated oven for about 12 minutes, or until the edges turn golden brown and the tops look set.
    8. Remove the cookies from the oven and let them cool on the baking sheet for 5 minutes, allowing them to firm up slightly.
    9. Transfer the cookies to a wire rack to cool completely, which helps them develop a slight crispness on the outside while remaining tender inside.
    10. Enjoy your pumpkin crunch cookies once cooled—these cookies are delicious with a glass of milk or a warm cup of tea.
    This pumpkin cookie recipe isn’t just about flavor; it’s a nostalgic journey wrapped in warm spices and a surprising texture. Perfect to share on cozy afternoons or festive gatherings, it turns a simple ingredient into something extraordinary. Sometimes, all it takes is a little pumpkin magic to brighten the day.

  • Peach Crumble: The Perfect Farewell to Summer’s Sweetness

    Peach Crumble: The Perfect Farewell to Summer’s Sweetness

    As summer wanes and the air turns crisper, there’s a quiet joy in preserving its fleeting bounty. This peach crumble isn’t just a dessert; it’s a nostalgic nod to sunny afternoons and ripe fruit picked straight from the orchard. The warm aroma of baked peaches mingling with cinnamon creates a comforting scent that fills my kitchen with memories.

    Discovering how simple ingredients come together to craft a dish that’s both indulgent and refreshingly straightforward is what makes this recipe special. It’s a celebration of peaches’ natural sweetness, enhanced by a crisp topping that adds just the right crunch. A perfect end to any summer dinner, or a sweet escape on a chilly evening.

    Peach Crumble

    This peach crumble features ripe peaches baked under a buttery, cinnamon-spiced topping. The dish combines soft, juicy fruit with a crunchy, golden-brown streusel, presenting a dessert with contrasting tender and crisp textures. It is often served warm, sometimes with a scoop of vanilla ice cream or a dollop of whipped cream.
    Prep Time 20 minutes
    Cook Time 35 minutes
    Total Time 55 minutes
    Servings: 6
    Course: Main Course
    Cuisine: American
    Calories: 250

    Ingredients
      

    • 4 cups fresh peaches, sliced peeled and pitted
    • 1/2 cup granulated sugar
    • 1 tablespoon lemon juice
    • 1 teaspoon ground cinnamon
    • 1 cup all-purpose flour for topping
    • 1/2 cup rolled oats optional for added crunch
    • 1/2 cup brown sugar
    • 1/2 cup unsalted butter, cold cut into small pieces
    • 1/2 teaspoon salt

    Equipment

    • Oven
    • Mixing bowls
    • Baking dish

    Method
     

    1. Preheat the oven to 350°F (175°C). Grease a baking dish with butter or non-stick spray.
    2. In a large mixing bowl, combine sliced peaches, granulated sugar, lemon juice, and cinnamon. Toss gently until the fruit is evenly coated, then pour the mixture into the prepared baking dish.
    3. In a separate bowl, mix together flour, oats (if using), brown sugar, and salt. This forms the crumbly topping.
    4. Add the cold, cubed butter to the dry ingredients. Using your fingertips or a pastry cutter, work the butter into the mixture until it resembles coarse crumbs with some pea-sized pieces.
    5. Sprinkle the crumble topping evenly over the peaches in the baking dish.
    6. Bake in the oven until the topping is golden brown and the peaches are bubbling around the edges, about 35 minutes.
    7. Remove from the oven and let it cool slightly before serving. The crumble should have a crisp, golden topping with warm, soft peaches underneath.

    This peach crumble captures the essence of late summer with its juicy fruit and crispy topping, making it an ideal seasonal treat. It pairs beautifully with a scoop of vanilla ice cream or a dollop of whipped cream, adding a creamy contrast to the warm fruit.

    Whether you’re reminiscing about hot days gone by or simply craving a fruit-driven dessert, this recipe delivers warmth and comfort in every bite. It’s a reminder that sometimes, the simplest ingredients can create the most memorable dishes. Enjoy the aroma, savor the flavor, and let this crumble bring a little sunshine to your day.

  • The Art of Peach Crisp: A Nostalgic Twist with a Modern Heart

    The Art of Peach Crisp: A Nostalgic Twist with a Modern Heart

    Peach crisp isn’t just a dessert; it’s a feeling of sunshine and childhood memories wrapped in a warm, flaky topping. Today, I want to explore how a simple fruit dessert can evoke a deep sense of nostalgia and create new traditions in your kitchen. It’s about embracing the imperfectly perfect peaches and turning them into a comforting treat that feels like a hug on a chilly day.

    This recipe is incredibly adaptable, perfect for lazy summer afternoons or cozy fall evenings. The balance of tart peaches and sweet caramelized topping sparks joy in every bite. And the best part? It’s straightforward enough to whip up amidst chaos while still impressing your taste buds.

    Peach Crisp

    Peach crisp is a fruit-based dessert that combines tender, juicy peaches with a crunchy, buttery topping. The dish is assembled with sliced peaches topped with a oat-almond mixture and baked until bubbling and golden brown, resulting in a warm, slightly caramelized treat with a contrasting crispy topping and soft fruit filling.
    Prep Time 15 minutes
    Cook Time 40 minutes
    Total Time 55 minutes
    Servings: 6
    Course: Main Course
    Cuisine: American
    Calories: 290

    Ingredients
      

    • 5 cups ripe peaches peeled, pitted, and sliced
    • 1/4 cup granulated sugar for peaches
    • 1 tablespoon lemon juice to brighten the peaches
    • 1 cup old-fashioned oats
    • 1/2 cup all-purpose flour
    • 1/2 cup brown sugar
    • 1/2 cup unsalted butter cold and cut into small pieces
    • 1/2 teaspoon ground cinnamon
    • 1/4 teaspoon salt

    Equipment

    • 9×9-inch baking dish
    • Mixing bowls
    • Measuring cups and spoons
    • Sharp knife
    • peeler

    Method
     

    1. Preheat your oven to 350°F (175°C). Peel the peaches using a peeler, remove the pits, and cut them into thin slices. Toss the slices with granulated sugar and lemon juice in a mixing bowl until evenly coated.
    2. Spread the seasoned peach slices evenly in a greased 9×9-inch baking dish, creating a smooth, fruit-filled layer.
    3. In a separate bowl, combine oats, flour, brown sugar, cinnamon, and salt. Mix well to distribute the dry ingredients evenly.
    4. Add the cold, small pieces of butter to the dry mixture. Use your fingers or a pastry cutter to cut in the butter until the mixture resembles coarse crumbs.
    5. Sprinkle the crisp topping mixture evenly over the peaches, covering the surface completely.
    6. Bake in the preheated oven for 40-45 minutes, or until the topping is golden brown and bubbling around the edges.
    7. Remove the dish from the oven and let it rest for about 10 minutes to allow the juices to settle and the topping to firm up slightly.
    8. Serve the peach crisp warm, optionally topped with a scoop of vanilla ice cream or a dollop of whipped cream for extra indulgence.

    Notes

    Peach crisp can be made with fresh or frozen peaches. For a nuttier topping, fold in some chopped pecans or almonds before baking.

    As the aroma of cinnamon and toasted oats fills your home, you realize this peach crisp has become a staple in your seasonal rotations. It’s not just about the flavor; it’s the memories stirred and new moments created around the table. A bowl of this warm, fragrant dessert is a gentle reminder of life’s simple pleasures.

    Whether served with a scoop of vanilla ice cream or just on its own, this peach crisp offers comfort and satisfaction. It’s the kind of dish that makes you slow down and savor the fleeting beauty of fresh summer peaches or the comforting glow of canned ones in winter. And that, truly, is what makes this recipe special.

  • Eerie Sweetness: Halloween Ghost Brownies

    Eerie Sweetness: Halloween Ghost Brownies

    Every October, my kitchen transforms into a haunted workshop, and these Halloween Ghost Brownies are the star of the show. Their ghostly appearance, with melting chocolate eyes and a gooey marshmallow mouth, makes them irresistible to kids and adults alike. The crispy edges paired with fudgy interior create a perfect spooky treat that ignites nostalgia and chaos in equal measure.

    What excites me most is the way these brownies combine simplicity with a dash of Halloween magic. They’re great for last-minute parties, or when you want to add a playful twist to your dessert table. Making them feels like casting a quick charm—no fancy equipment needed, just your kitchen and a sense of fun.

    Halloween Ghost Brownies

    These Halloween Ghost Brownies are fudgy, dense chocolate treats with a crispy edge, shaped and decorated to resemble ghostly figures. They incorporate melted chocolate, butter, and eggs for a rich batter, baked until firm with a shiny surface. Once cooled, they are decorated with melting chocolate eyes and marshmallow mouths for a spooky, playful appearance.
    Prep Time 15 minutes
    Cook Time 25 minutes
    Total Time 40 minutes
    Servings: 12
    Course: Main Course
    Cuisine: American
    Calories: 250

    Ingredients
      

    • 1/2 cup unsalted butter melted
    • 1 cup granulated sugar
    • 2 large eggs beaten
    • 1 teaspoon vanilla extract
    • 2/3 cup unsweetened cocoa powder
    • 1/2 cup all-purpose flour
    • 1/4 teaspoon baking powder
    • Pinch salt
    • 3/4 cup semi-sweet chocolate chips for melting and decorating
    • 1/2 cup mini marshmallows for mouths
    • Dark chocolate or melting chocolate quantity as needed chocolate for melting for eyes and decorations

    Equipment

    • Mixing bowls
    • Whisk
    • 10×8 inch baking pan
    • Parchment paper
    • Saucepan
    • Spatula
    • Cooling rack
    • Piping bag or plastic zip-top bag
    • Oven

    Method
     

    1. Preheat your oven to 350°F (175°C) and line a baking pan with parchment paper to prevent sticking.
    2. In a saucepan, melt the unsalted butter over low heat until smooth, then remove from heat and stir in the cocoa powder until well combined and glossy.
    3. In a large mixing bowl, whisk together the granulated sugar and beaten eggs until the mixture is smooth and slightly frothy.
    4. Pour the melted chocolate mixture into the egg mixture, stirring continuously to combine and integrate the flavors.
    5. Sift in the flour, baking powder, and salt over the wet ingredients, then fold everything together gently with a spatula until just combined. The batter will be thick and fudgy.
    6. Stir in most of the chocolate chips into the batter, reserving a few for decoration.
    7. Spread the batter evenly into the prepared pan using a spatula, smoothing the top to ensure even baking.
    8. Bake for about 20-25 minutes, until the edges are set and a toothpick inserted into the center comes out with a few moist crumbs.
    9. Allow the brownies to cool completely in the pan on a cooling rack. This helps them set and makes cutting easier.
    10. While the brownies cool, melt the remaining chocolate chips or melting chocolate in a microwave-safe bowl in 30-second bursts, stirring until smooth.
    11. Use a piping bag or a plastic zip-top bag with the tip cut off to pipe two small eyes on each brownie with melted chocolate, and place a mini marshmallow underneath for the mouth, creating a ghostly face.
    12. Let the decorated brownies sit for a few minutes until the chocolate sets. Then, serve and enjoy these spooky, fudgy Halloween treats!

    These Ghost Brownies aren’t just treats — they’re conversation starters. Every bite carries the scent of rich chocolate and toasted marshmallows, making them as comforting as they are creepy. When the evening gets darker, the allure of these spooky sweets beckons everyone around.

    Perfect for this season’s festivities, they add a little mischief and a lot of flavor. Watching friends and family delight in their ghostly charm is the best reward. Sometimes, the simplest ideas are the sweetest surprises of all.

  • Enchanted Halloween Poison Toffee Apples That Beware!

    Enchanted Halloween Poison Toffee Apples That Beware!

    Halloween whispers promises of magic, mischief, and edible illusions. This year, I decided to craft something that looks delightfully sinister — Poison Toffee Apples with a twist of playful danger. They’re not just treats; they’re edible spellbinding objects that lure curiosity.

    The secret ingredient? A dash of chaos and a sprinkle of nostalgia that makes these apples both enchanting and slightly mischievous. As the sweet crunch gives way to the sticky toffee coating, your senses will be invited on a wild ride of flavors and textures, perfect for a spooky season gathering.

    Poison Toffee Apples

    Poison Toffee Apples are whole fresh apples coated in a sticky, crunchy toffee layer that hardens to a glossy shell. The dish involves boiling sugar and butter to create the toffee, then dipping and coating the apples to achieve a firm, shiny exterior with a sweet, crisp bite underneath.
    Prep Time 15 minutes
    Cook Time 20 minutes
    Total Time 35 minutes
    Servings: 4
    Course: Main Course
    Cuisine: Festive
    Calories: 220

    Ingredients
      

    • 4 fresh apples preferably tart varieties like Granny Smith
    • 1 cup cup granulated sugar
    • 1/2 cup cup unsalted butter
    • 1/4 teaspoon teaspoon salt
    • 1 teaspoon teaspoon vanilla extract

    Equipment

    • Candy thermometer
    • Wooden skewers or sticks
    • Baking sheet
    • Parchment paper
    • Saucepan

    Method
     

    1. Wash and thoroughly dry the apples, then remove the stems and insert a wooden skewer or stick into the core of each apple, creating a handle.
    2. Line a baking sheet with parchment paper and set aside to catch drips later.
    3. Combine the sugar, butter, salt, and vanilla in a medium saucepan over medium heat.
    4. Bring the mixture to a gentle boil, stirring constantly until the sugar dissolves completely and the syrup turns golden and slightly thickened, about 8-10 minutes. Attach a candy thermometer to monitor the temperature; it should reach about 300°F (149°C).
    5. Once the toffee reaches the correct temperature and has a rich amber color, remove it from heat immediately.
    6. Quickly dip each apple into the hot toffee, tilting the pan to coat evenly, then lift out and allow excess toffee to drip back into the pan.
    7. Place the coated apples on the prepared baking sheet to cool and harden, about 15-20 minutes. The toffee will form a shiny, crisp shell around the apple.
    8. Repeat the dipping process for each apple for a thicker, more dramatic coating if desired.
    9. Once the toffee has fully hardened, remove the apples from the sticks, or serve as is with the sticks intact for a festive presentation.

    Notes

    Handle the hot toffee with care to prevent burns. For added fun, you can decorate the toffee with edible glitter or colored sugar before it sets entirely.
    These Poison Toffee Apples aren’t just eye-catching; they’re a conversation starter that embodies the spirit of Halloween. Sharing them adds a touch of mysterious magic to your celebrations, turning ordinary treats into memorable moments.

    Enjoy crafting these edible illusions and marvel at how they transform a simple apple into a hauntingly beautiful centerpiece. When set in a dim candlelit room, their glossy, dark sheen seems to shimmer with a wicked charm. Truly, they are a deliciously daring addition to any Halloween table.

  • Spooky-Sweet Halloween Pumpkin Rice Krispie Treats

    Spooky-Sweet Halloween Pumpkin Rice Krispie Treats

    Every autumn, I love turning the familiar into something delightfully spooky, and these Halloween Pumpkin Rice Krispie Treats do just that. The scent of toasted marshmallows and buttery cereal fills the kitchen as I shape them into tiny jack-o’-lanterns, combining nostalgia with a dash of chaos. It’s a fun project that sparks joy in both kids and adults alike, especially when decorated with mischievous little faces.

    Halloween is a time for playful indulgence, and these treats fit perfectly into the giggly chaos of the season. Their vibrant orange hue and crispy texture make them a standout on any dessert table. Plus, they’re surprisingly easy to whip up, meaning less time in the kitchen and more time enjoying the spooky festivities.

    Halloween Pumpkin Rice Krispie Treats

    These treats are made by melting marshmallows and butter, then mixing in toasted rice cereal to create a sticky base. They are shaped into mini jack-o’-lanterns, resulting in crispy, orange-colored confections with a fun, festive appearance. The final texture is crunchy with a chewy marshmallow center, perfect for seasonal snacking.
    Prep Time 15 minutes
    Cook Time 10 minutes
    Total Time 25 minutes
    Servings: 12
    Course: Main Course
    Cuisine: American
    Calories: 150

    Ingredients
      

    • 4 cups miniature marshmallows or large marshmallows cut into smaller pieces
    • 6 tablespoons unsalted butter plus extra for greasing
    • 6 cups rice cereal such as Rice Krispies
    • Orange food coloring few drops food coloring to give the treats their vibrant hue

    Equipment

    • Large saucepan
    • Spatula
    • Mini pumpkin-shaped silicone molds or cookie cutters
    • Baking sheet in case of shaping

    Method
     

    1. Grease the mini silicone molds or a baking sheet lightly with butter to prevent sticking.
    2. In a large saucepan, melt the butter over low heat until it’s bubbling softly, filling your kitchen with a rich, buttery aroma.
    3. Add the marshmallows to the melted butter, stirring constantly until they are completely melted and the mixture is smooth and glossy.
    4. Remove the saucepan from heat and stir in a few drops of orange food coloring until the mixture is a bright, pumpkin-like hue.
    5. Quickly fold in the rice cereal using a spatula, mixing gently but thoroughly until all the cereal is coated in the vibrant marshmallow mixture.
    6. Using buttered hands or a spoon, press the mixture into the prepared silicone molds or spread onto the baking sheet, shaping into small pumpkin or round shapes.
    7. Allow the treats to set at room temperature for about 15-20 minutes until firm and crispy.
    8. Carefully pop the treats out of the molds or cut into pumpkin shapes if laid out on a sheet.
    9. Decorate with tiny faces or add embellishments if desired to bring your spooky pumpkins to life.
    10. Serve immediately or store in an airtight container for up to a day to enjoy their crunchy texture.

    Whether you’re crafting these treats for a last-minute party or a quiet family night, they bring a sense of playful magic to the table. The burst of sweet, crunchy goodness is sure to inspire smiles and maybe a few giggles. As the season winds down, these pumpkin treats become a charming reminder of all the sticky, sweet fun of Halloween.

    Sharing something homemade makes the holiday even more special, especially when it’s as fun to make as it is to eat. There’s a certain satisfying chaos that comes with creating themed treats, and these pumpkin Krispie treats hit every note of festive delight. Enjoy every crispy, gooey, pumpkin-spiced bite!

  • Spooky Elegance: Crafting the Perfect Halloween Spider Web Cake

    Spooky Elegance: Crafting the Perfect Halloween Spider Web Cake

    As a baker obsessed with holiday traditions, I love elevating Halloween treats beyond simple decorations. The Spider Web Cake combines eerie elegance with a touch of chaos—its web spun with glossy icing that glistens like real silk under dim lights. Making this cake is a delightful messy ritual, perfect for embracing the spooky season.

    This recipe is less about perfection and more about the fun of creating something visually stunning while playing with textures. Every crack of sugar and streak of black icing tells a story of late-night baking adventures and childhood fears turned sweet. It’s a showstopper that turns any table into a haunted masterpiece.

    ## WHY I LOVE THIS RECIPE?
    – The contrast of dark chocolate and shimmering web details sparks nostalgic chills.
    – The chaotic beauty reflects the wild energy of Halloween parties.
    – I relish the slow, mindful task of crafting a web—meditative and satisfying.
    – It’s a baking project that invites messy hands and loud laughter.
    – Seeing everyone’s awe-struck faces is a reward that never gets old.

    Spider Web Chocolate Cake

    This cake features a rich chocolate sponge layered with smooth frosting, topped with a glossy black icing web. The web decoration is created by piping shiny icing in a circular pattern with radiating lines, resulting in a striking, textured appearance. The final cake combines moist crumb with a decorative, web-like finish that mimics a spooky spider web.
    Prep Time 30 minutes
    Cook Time 35 minutes
    Total Time 1 hour 5 minutes
    Servings: 12
    Course: Main Course
    Cuisine: Halloween
    Calories: 420

    Ingredients
      

    • 1 3/4 cups all-purpose flour
    • 2 cups granulated sugar
    • 3/4 cup unsweetened cocoa powder
    • 1 1/2 teaspoons baking soda
    • 1 teaspoon baking powder
    • 1/2 teaspoon salt
    • 2 large eggs
    • 1 cup buttermilk
    • 1/2 cup vegetable oil
    • 2 teaspoons vanilla extract
    • 1 cup hot water
    • 2 cups powdered sugar
    • 1/2 cup unsweetened cocoa powder
    • 1/4 cup milk adjust for consistency
    • 1/4 cup light corn syrup for glossy web icing
    • 1/2 teaspoon vanilla extract

    Equipment

    • Mixing bowls
    • Electric mixer
    • 8-inch round cake pan
    • Cooling rack
    • Piping bag with small round tip
    • Spatula
    • Sifter

    Method
     

    1. Preheat your oven to 350°F (175°C). Grease the cake pan and set aside.
    2. In a large mixing bowl, sift together the flour, sugar, cocoa powder, baking soda, baking powder, and salt until well combined.
    3. Add eggs, buttermilk, vegetable oil, and vanilla extract to the dry ingredients. Mix on medium speed until the batter is smooth and uniform.
    4. Pour in the hot water gradually while mixing, and continue until the batter is thin but laced with rich chocolate aroma.
    5. Pour the batter into the prepared cake pan and smooth the top with a spatula.
    6. Bake in the preheated oven for about 35 minutes, or until a toothpick inserted in the center comes out clean.
    7. Remove the cake from the oven and let it cool in the pan for 10 minutes, then transfer to a wire rack to cool completely.
    8. While the cake cools, prepare the frosting by mixing powdered sugar, cocoa powder, milk, corn syrup, and vanilla extract until smooth and glossy. Adjust the milk to get a flowing yet thick icing consistency.
    9. Spread a thin layer of frosting over the completely cooled cake to seal in moisture, then chill for 15 minutes.
    10. Spread the remaining frosting evenly over the top and sides of the cake. Fill a piping bag fitted with a small round tip with the glossy web icing.
    11. Pipe concentric circles from the center outward on the top of the cake to form the web, then add radiating lines across the circles with quick, confident strokes. Use the web icing for a shiny, web-like effect.
    12. Once the web pattern is complete, set the cake aside for a few minutes to let the icing firm slightly before serving. Enjoy your spooky Spider Web Chocolate Cake!
    This Spider Web Cake isn’t just a dessert; it’s a conversation starter. Its slightly imperfect web design reminds us that beauty lies in the chaos of creativity. Whipping up this cake becomes a joyful ritual that feeds the soul as much as it delights the taste buds.

    As the season chills in, baking something so visually striking feels especially apt. The aroma of rich cocoa blends with a hint of vanilla, promising comfort amid the cool October air. This cake turns your haunted gathering into a celebration of spooky craftsmanship and homemade magic.

  • Spooky Dessert Chaos: Halloween Dirt Cake with Gummy Worms

    Spooky Dessert Chaos: Halloween Dirt Cake with Gummy Worms

    As the leaves turn and the air dips into crisp territory, I find myself craving a little playful chaos in the kitchen. Halloween is the perfect excuse to embrace mess, color, and a touch of the grotesque with this dirt cake masterpiece. It’s not just a dessert; it’s a sensory experience with textures and flavors that evoke childhood mischief and autumn nights.

    This recipe isn’t about finesse; it’s about fun. Swirling chocolate crumbles with tangy gummy worms transforms simple ingredients into a whimsical, slightly spooky treat. Watch the faces light up and ears perk with delight when you serve this layered tableau of edible chaos.

    Halloween Dirt Cake

    This layered dessert combines crushed cookies, pudding, and gummy worms to create a messy, playful treat that resembles a dirt mound. The dish features a crumbly, creamy texture with colorful gummy worms scattered throughout, resembling a spooky garden scene. It is assembled in layers to evoke an autumnal, mischievous aesthetic.
    Prep Time 20 minutes
    Cook Time 10 minutes
    Total Time 30 minutes
    Servings: 8
    Course: Main Course
    Cuisine: comfort food
    Calories: 350

    Ingredients
      

    • 1 package chocolate pudding mix instant
    • 4 cups milk for pudding
    • 2 cups cookie crumbles crushed chocolate cookies or Oreos
    • 1 cup whipped topping such as cool whip
    • 1 bag gummy worms

    Equipment

    • Mixing bowls
    • Electric mixer or whisk
    • Serving dish or trifle bowl
    • Spatula
    • Measuring cups
    • Cookie crumbles or crushed Oreos

    Method
     

    1. In a large mixing bowl, whisk together the instant chocolate pudding mix with the cold milk until smooth and thickened, about 2-3 minutes.
    2. Gently fold the whipped topping into the prepared pudding until evenly combined, creating a smooth, creamy mixture.
    3. Spread a layer of crushed cookies at the bottom of your serving dish to mimic dirt.
    4. Pour half of the chocolate pudding mixture over the crushed cookies, smoothing it out with a spatula for an even layer.
    5. Add another layer of crushed cookies on top of the pudding layer to build up the ‘dirt’ effect.
    6. Pour the remaining pudding mixture over the second cookie layer, smoothing the top gently.
    7. Sprinkle the top with additional cookie crumbs for extra texture and ‘dirt’ appearance.
    8. Decorate the top with gummy worms, placing some so they appear to wiggle out of the ‘dirt’ for a spooky effect.
    9. Refrigerate the dirt cake for at least 2 hours to allow flavors to meld and the texture to set.
    10. Once chilled and set, serve the dirt cake in slices or scoops, reveling in its playful, messy look and layered textures.

    In the end, Halloween Dirt Cake isn’t just about the taste, but the memories and chuckles it sparks. It’s a perfect centerpiece for parties and an instant conversation starter among guests of all ages. This recipe reminds me that sometimes, the best treats are the delightfully messy ones, especially when they bring out childhood nostalgia and holiday cheer.

    Keep it simple, embrace the chaos, and let your creativity run wild with gummy worms and chocolate crumbs. As the season turns and spooky vibes fill the air, this dirt cake will be waiting to delight, surprise, and maybe even gross out a little. That’s the magic of a good holiday dessert—messy, memorable, and delicious.

  • Pumpkin Bread with a Secret Twist: A Cozy Fall Surprise

    Pumpkin Bread with a Secret Twist: A Cozy Fall Surprise

    Every fall, pumpkin bread graces my kitchen table, filling the air with its spicy-sweet aroma. But this year, I decided to give it a little twist—adding a hint of unexpected warmth with hints of ginger and a splash of orange zest. It’s a cozy upgrade that makes the familiar feel exciting again.

    The process is almost meditative, from sifting the flour to watching the batter rise and develop that perfect crackle. The best part? The first warm slice, where the cinnamon smell mingles with a hint of citrus, making my heart smile. This bread isn’t just a snack; it’s a small celebration of autumn’s best flavors.

    Pumpkin Bread with Ginger and Orange Zest

    This pumpkin bread is made by mixing a moist batter of pumpkin puree, flour, sugar, and warm spices, then baking until golden with a crackly top. The addition of ginger and orange zest provides a subtle spicy and citrusy aroma, resulting in a soft, tender loaf with a slightly dense crumb and inviting fall appearance.
    Prep Time 20 minutes
    Cook Time 50 minutes
    Total Time 1 hour 10 minutes
    Servings: 8
    Course: Main Course
    Cuisine: American
    Calories: 250

    Ingredients
      

    • 1.5 cups all-purpose flour
    • 1 cup granulated sugar
    • 1/2 cup unsalted butter melted
    • 1 cup pumpkin puree
    • 3 large eggs
    • 1 1/2 teaspoons ground cinnamon
    • 1/2 teaspoon ground ginger
    • 1 teaspoon orange zest
    • 1/2 teaspoon baking soda
    • 1/2 teaspoon salt

    Equipment

    • Mixing bowls
    • Whisk
    • Loaf pan
    • Cooling rack

    Method
     

    1. Preheat your oven to 350°F (175°C) and grease a standard loaf pan with butter or non-stick spray.
    2. In a large mixing bowl, whisk together the flour, sugar, cinnamon, ginger, baking soda, and salt until evenly combined. This helps distribute the spices for an even flavor.
    3. In a separate bowl, whisk the eggs, then add the melted butter, pumpkin puree, and orange zest. Whisk until the mixture is smooth and well combined. The batter should look uniform and slightly thick.
    4. Pour the wet mixture into the dry ingredients, then fold gently with a spatula until just combined. Don’t overmix; a few streaks are fine—the batter will be thick yet cohesive.
    5. Pour the batter into the prepared loaf pan, smoothing the top with your spatula to ensure an even surface. The batter should fill the pan about three-quarters full.
    6. Bake in the preheated oven for 50 to 55 minutes, or until a toothpick inserted into the center comes out clean and the top is golden with a slight crackle.
    7. Remove the bread from the oven and let it cool in the pan for about 10 minutes. Then, transfer it to a wire rack to cool completely. The loaf will firm up as it cools.
    8. Once cooled, slice the pumpkin bread with a serrated knife to reveal its moist crumb and fragrant top. It’s perfect for enjoying plain or with a pat of butter.

    Sharing this pumpkin bread has become a fall ritual, each slice promising comfort and a tiny adventure. It’s great for mornings when you need a little extra cheer or as a thoughtful gift in a cozy box. Every bite carries the season’s essence, wrapping you in comfort regardless of the chill outside.

    As the days grow shorter, baking this bread reminds me to slow down and savor simple joys. The spicy warmth, the soft crumb, the lingering scent of fall—these moments make the season special. This pumpkin bread isn’t just a recipe; it’s a small, sweet pause in busy days.

  • Spooky Delight: Halloween Monster Eyeball Cake Pops

    Spooky Delight: Halloween Monster Eyeball Cake Pops

    Forget traditional Halloween treats—these monster eyeball cake pops bring a chaotic splash of fun to any spooky party. The moment you unpackage them, the smell of rich cake crumbs and sweet icing fills the air, instantly drawing curious glances and excited squeals. Each eyeball is a tiny masterpiece, ready to surprise guests with their quirky, slightly grotesque charm.

    What makes these irresistible is their perfect balance of creepy and cute. Breaking one open reveals a moist, flavorful cake interior, contrasted by a vividly colored icing that looks shockingly realistic. They’re easy enough to make in a chaotic kitchen—just watch out for the lava of chocolate or the splash of food coloring!

    Monster Eyeball Cake Pops

    Chocolate cake crumbs are mixed with sweet icing to form a dough, which is then shaped into small balls. These are coated in a layer of chocolate and decorated with vivid icing and edible decor to resemble creepy eyeballs. The final result is a set of moist, detailed cake pops with a spooky, realistic appearance.
    Prep Time 30 minutes
    Cook Time 10 minutes
    Total Time 40 minutes
    Servings: 12
    Course: Main Course
    Cuisine: Halloween
    Calories: 150

    Ingredients
      

    • 2 cups chocolate cake crumbs preferably homemade or store-bought crumbled
    • 1/2 cup sweet icing can be store-bought or homemade
    • 8 oz dark chocolate or melting chocolate for coating the cake pops
    • 1 cup white icing for eyeball details
    • food coloring red and black for bloodshot details and pupils

    Equipment

    • Mixing bowls
    • Lollipop sticks
    • Melting pot or microwave-safe bowl
    • Baking sheet
    • Parchment paper
    • Food coloring
    • Decorating tools

    Method
     

    1. Combine the cake crumbs and sweet icing in a mixing bowl, stirring until you get a uniform, dough-like mixture that holds together when pressed.
    2. Use your hands to shape the mixture into small, round balls about the size of a golf ball, then insert a lollipop stick into each one to serve as a handle.
    3. Place the cake pops on a parchment-lined baking sheet and chill in the refrigerator for at least 30 minutes to firm up.
    4. While they chill, melt the dark chocolate in a melting pot or microwave in short bursts until smooth and glossy.
    5. Dip each chilled cake pop into the melted chocolate, covering it completely, then gently tap off excess chocolate and place back on the parchment paper to set.
    6. Once the chocolate coating firms up, melt some white icing and dye small portions with red and black food coloring to create details like bloodshot veins and pupils.
    7. Using small decorating tools or toothpicks, add red streaks across the white icing for veins and draw black pupils in the center, creating a realistic eyeball look.
    8. Allow the decorated cake pops to fully dry or set in the refrigerator for about 15 minutes to ensure the details are firm.

    Notes

    Work quickly when decorating to prevent icing from drying out. Use different colors for more realistic effects.
    These eyeball cake pops are more than just a spooky snack; they’re a reminder of childhood Halloween fun, mixed with a dash of culinary chaos. Once assembled, they bring a whimsical, slightly gross look that’s perfect for a themed party or a festive day at home. No matter how many you make, they’re guaranteed to be a highlight.

    As the season shifts and our need for playful recipes grows, these eyeballs keep things lively and memorable. They’re quick to whip up and endlessly customizable, making your holiday a little more deliciously bizarre and a lot more fun.