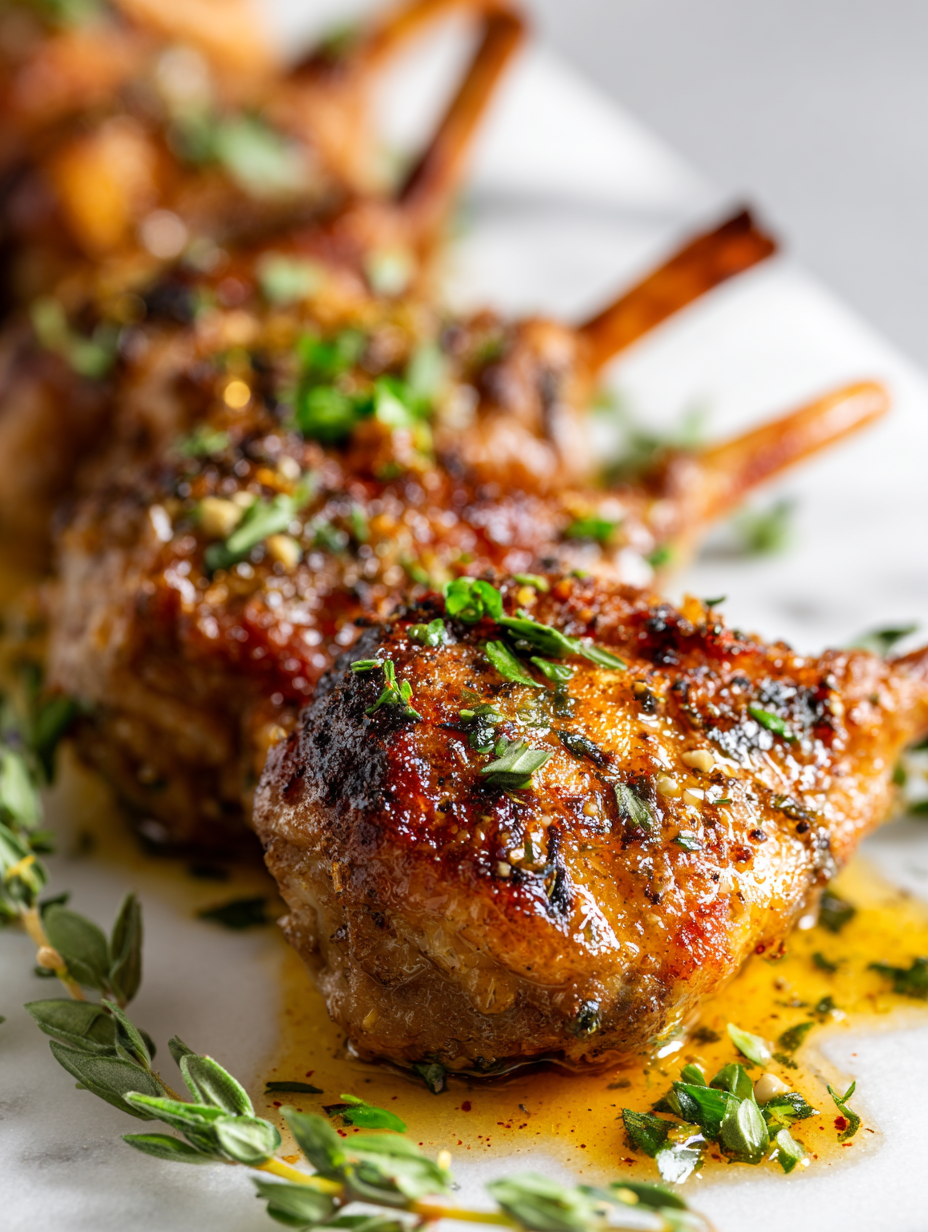
Chicken lollipops are the kind of messy, finger-licking snack that makes gatherings feel a little more lively. There’s something satisfying about tearing into that crispy, spicy coating and getting your hands all over it, no utensils needed. It’s a dish that invites everyone to lean in, share a laugh, and enjoy the tactile joy of eating with your fingers.
I first discovered chicken lollipops at a bustling street food stall, where the aroma of fried chicken mingled with the hum of chatter. Since then, I’ve tweaked the recipe to make it more manageable at home, turning it into a messy, fun project that’s as much about the process as the eating. It’s the kind of dish that sparks nostalgia and chaos in equal parts, perfect for casual nights or weekend get-togethers.
In a world that’s obsessed with neat, plated food, there’s something raw and honest about biting into a chicken lollipop. It reminds me that food can be messy and imperfect, yet still incredibly satisfying. Plus, it’s a guaranteed way to get everyone to dig in with their hands, making it a social, unpretentious treat that feels like a small rebellion against the fine dining fuss.
Focusing on the tactile satisfaction of eating chicken lollipops, emphasizing the messy, hands-on experience that makes this dish a fun, communal treat—perfect for gatherings where everyone digs in with their fingers.
The tactile joy of finger-licking chicken
- I love how the crispy coating crunches so satisfyingly, almost like a small celebration in every bite.
- There’s a chaotic joy in tearing into these with your hands, especially when everyone’s doing the same around the table.
- This dish brings back wild, loud family dinners where mess was part of the fun, not a problem to be solved.
- I get a quiet pride from perfecting that spicy, sticky glaze—knowing each bite will be just a little messy and a lot delicious.
- Honestly, it’s the kind of snack that makes me forget about utensils and just dive right in, hands first.
The tactile joy of finger-licking chicken
Making chicken lollipops started as a way to turn a simple chicken wing into something more playful and finger-friendly. I remember the first time I tried to shape the drumettes into lollipops, it was a bit messy but so satisfying to see them come together. Since then, it’s become a go-to for casual get-togethers, where everyone loves digging in with their hands and sharing that messy, spicy joy. It’s not about perfection, just about the fun of eating and a little bit of chaos on the plate.
Trivia and Origins
- Chicken lollipops originated in street food stalls in India, where vendors shaped drumettes into fun, finger-friendly bites.
- They gained popularity in the U.S. through casual dining and are often associated with game day parties and informal gatherings.
- The shape mimics a lollipop, making it a playful way to serve chicken, encouraging messy, communal eating experiences.
Ingredient breakdown
- Chicken drumettes: I select plump, meaty pieces that hold up well to frying and shaping. Swap with chicken tenders if you want a leaner option, but they won’t hold the lollipop shape as easily.
- Flour and cornstarch: I use a 2:1 mix for that extra crunch and lightness. If you need gluten-free, rice flour works, but it’s a tad crispier and less airy.
- Spicy marinade: I rely on garlic, ginger, soy, and chili paste. If you’re avoiding soy, try fish sauce for depth, but skip the chili for milder flavor.
- Breadcrumbs: I prefer panko for maximum crunch. If you want a softer coat, try regular breadcrumbs, but you’ll lose some of that crispy texture.
- Sweet and spicy glaze: I make it bright with honey and sriracha. For a smoky touch, add a splash of smoked paprika—smells incredible as it cooks.
- Oil for frying: I use vegetable or canola oil—neutral and high smoke point. If you want less mess, try a deep-fryer; for pan-frying, keep the oil shallow and hot.
- Garnishes: I love chopped scallions and toasted sesame seeds. You can add a squeeze of lime for brightness or skip it if you prefer a straightforward spice kick.
Spotlight on key ingredients
Chicken drumettes:
- I find plump, meaty pieces that hold shape and stay juicy. Swap with tenders for a leaner, easier-to-shape option, but they won’t form the classic lollipop look as well.
- They have a firm, slightly bouncy texture during frying, and hold the spicy marinade beautifully, giving that satisfying bite.
Panko breadcrumbs:
- I love their airy crunch that turns into a crispy shell. If you want softer coating, use regular bread crumbs, but you’ll lose the signature crispness.
- They puff up slightly when fried, creating that addictive crackle, and absorb just enough oil to stay crispy without becoming greasy.
Notes for ingredient swaps
- Dairy-Free: Swap milk or buttermilk in marinades with coconut milk or almond milk, which won’t alter the spicy, savory profile much.
- Gluten-Free: Use rice flour or certified gluten-free panko instead of wheat flour and standard breadcrumbs for a crisp coating without gluten.
- Low-Sodium: Replace soy sauce with coconut aminos for a similar umami hit with less salt, but expect a slightly sweeter flavor.
- Sweetener: Substitute honey with agave syrup or maple syrup for a different kind of sweetness that’s just as sticky and flavorful.
- Spice Level: Omit or reduce sriracha for milder flavor, or add a dash of smoked paprika for a smoky, less spicy kick that still enhances the glaze.
- Oil: For a lighter option, try air frying instead of deep frying, but expect a different texture—less crisp and more tender.
- Herbs & Garnishes: Swap scallions for chopped cilantro or basil for a fresh, aromatic twist that brightens the dish.
Equipment & Tools
- sharp paring knife: Shaping the chicken into lollipop form.
- deep-fry thermometer: Monitoring oil temperature for perfect frying.
- large heavy-bottomed pan or wok: Ensuring even heat for frying.
- slotted spoon or spider: Removing fried chicken from hot oil safely.
Step-by-step guide to chicken lollipops
- Gather your equipment: a sharp paring knife, a deep-fry thermometer, a large heavy-bottomed pan or wok, and a slotted spoon or spider for frying.
- Prepare the chicken: Take your drumettes, pat dry, and trim any excess fat or loose skin. Set aside.
- Shape into lollipops: Hold a drumette, and with your knife, cut and push the meat down towards the base, creating a stick-like shape. Twist and smooth the tip to resemble a lollipop. Repeat for all pieces.
- Marinate: Mix soy, garlic, ginger, and chili paste. Toss the shaped chicken in the marinade, cover, and chill for at least 30 minutes—more if you have time, up to 2 hours.
- Prepare the coating: Mix flour, cornstarch, and a pinch of salt in a bowl. Set up a separate bowl with beaten eggs.
- Heat the oil: Pour oil into your pan, enough for deep frying, and heat to 180°C (350°F). Use your thermometer to check temperature. If it’s not hot enough, the coating will soak up oil and become greasy.
- Coat the chicken: Dip each lollipop into the egg, then dredge in the flour mixture, pressing gently to adhere. Shake off excess.
- Fry: Carefully lower the chicken into the hot oil. Fry in batches, don’t overcrowd, for about 8-10 minutes. Turn occasionally. Look for golden, crispy coating and cooked-through meat.
- Check doneness: The lollipops should be crispy and golden. The meat should be firm and no pink inside. Use a meat thermometer—internal temp should reach 75°C (165°F).
- Remove and drain: Use a slotted spoon or spider to lift out, place on paper towels. Let rest for 2 minutes to settle juices and finish crisping.
- Make the glaze: In a small pan, simmer honey, sriracha, and a dash of soy or fish sauce for 2-3 minutes until slightly thickened and fragrant.
- Toss and glaze: Coat the fried chicken with the spicy glaze, turning to evenly distribute. Serve immediately with garnishes.
Let the fried chicken rest for 2 minutes to settle juices and crispness. Toss with glaze while hot. Serve immediately on a platter, garnished with scallions and sesame seeds if desired.
How to Know It’s Done
- Coating is golden and crispy, not greasy or burnt.
- Internal temperature reaches 75°C (165°F).
- Meat is firm, no pink inside, with a juicy interior.
Chicken Lollipops
Ingredients
Equipment
Method
- Use a paring knife to carefully shape each chicken drumette into a lollipop form, pushing the meat down towards the base and twisting the tip for a lollipop look.
- Mix soy sauce, minced garlic, grated ginger, and chili paste to create a flavorful marinade. Toss the shaped chicken in the marinade, ensuring it's well coated. Cover and refrigerate for at least 30 minutes.
- In a bowl, combine flour, cornstarch, and a pinch of salt. In a separate bowl, beat the eggs. Set both aside.
- Heat vegetable or canola oil in a large pan or wok to 180°C (350°F). Use a thermometer to check the temperature for perfect frying.
- Remove chicken from marinade and dip each piece into the beaten eggs, then dredge in the flour mixture, pressing gently so the coating adheres well.
- Carefully lower the coated chicken pieces into the hot oil in small batches. Fry for about 8-10 minutes until golden brown and crispy, turning occasionally for even frying.
- Use a slotted spoon or spider to remove the fried chicken from oil, letting excess oil drip off, then place on paper towels to drain and rest for 2 minutes.
- While the chicken is frying, simmer honey, soy sauce, and sriracha in a small pan for 2-3 minutes until slightly thickened and fragrant.
- Toss the fried chicken lollipops in the warm glaze until evenly coated, then transfer to a serving platter.
- Garnish with chopped scallions and toasted sesame seeds. Serve immediately for maximum crunch and flavor.
Notes
Pro tips for perfect chicken lollipops
- Cold chicken first: Chill the drumettes before shaping to make molding easier and prevent sticking.
- Proper dredging: Dip in egg first, then coat with flour for a crispy, even shell that sticks well.
- Oil temp check: Use a thermometer to keep oil at 180°C (350°F); it’s the sweet spot for crispness without greasiness.
- Avoid overcrowding: Fry in small batches to maintain oil temperature and get that crackly coating.
- Rest after frying: Let the chicken sit for 2 minutes so juices settle and the coating crisps up fully.
- Glaze while hot: Toss the fried lollipops in glaze immediately for maximum stickiness and flavor punch.
- Handle carefully: Use a slotted spoon or spider to prevent breaking the shape when removing from oil.
Common mistakes and how to fix them
- FORGOT to dry chicken thoroughly, causing excess oil absorption and soggy coating.
- DUMPED too much marinade, making the coating soggy and difficult to crisp.
- OVER-TORCHED the oil, turning coating bitter and smoky; maintain temperature at 180°C (350°F).
- UNDER-COOKED the chicken, risking raw meat; always check internal temp for safety.
Fast fixes for crispy chicken lollipops
- When oil shimmers, splash a tiny bit of water—if it crackles, it’s ready to fry.
- DUMPED too much marinade? Pat chicken dry to avoid soggy coating.
- Splash a little more oil if the coating isn’t crisping—keep temperature steady at 180°C (350°F).
- Overcrowd the pan? Fry in smaller batches to keep oil temperature up and crunch intact.
- Fix sticky coating by lowering heat and letting the chicken rest on paper towels to drain excess oil.
Prep, store, and reheat tips
- Prep the chicken lollipops: Shape and marinate the chicken at least 30 minutes ahead, up to 2 hours, for deeper flavor and easier handling during frying. The smell of garlic and soy will fill your fridge, promising spicy, savory bites later.
- Prepare the coating mixture and glaze in advance: Keep the dry and wet ingredients separate, covered, in the fridge. The glaze may thicken slightly overnight, intensifying its sweet and spicy aroma.
- Store fried chicken: If you need to make it ahead, keep the fried lollipops in a warm oven (around 90°C/194°F) on a wire rack for up to 1 hour. They’ll stay crispy, but the coating will soften if left too long.
- Reheat with care: Reheat in a hot oven (around 180°C/350°F) for 8-10 minutes until crispy again. The smell of reheated spice and honey will remind you of fresh-fried goodness, though the coating may not be as crackly as right after frying.
Top questions about chicken lollipops
1. Can I use chicken tenders instead of drumettes?
Yes, using chicken tenders can work, but they won’t hold the lollipop shape as well and may be less juicy.
2. How do I know when the chicken is fully cooked?
Cook the chicken until the internal temp hits 75°C (165°F); the coating should be golden and crispy.
3. How many lollipops can I fry at once?
Fry in small batches to prevent oil from dropping in temperature, which keeps the coating crispy.
4. What’s the best oil temperature for frying?
Use a thermometer to keep oil at 180°C (350°F). Too hot, and the coating burns; too cold, and it gets greasy.
5. Why isn’t my coating crispy?
If the coating isn’t crispy enough, increase frying time slightly or check the oil temperature.
6. How should I store and reheat leftovers?
Store leftovers in an airtight container in the fridge for up to 2 days; reheat in oven for best crispness.
7. How do I safely remove chicken from the oil?
Use a slotted spoon or spider to gently lift the chicken from hot oil, avoiding breakage.
8. Can I make the dish milder or spicier?
Adjust spice levels by adding or reducing sriracha or chili paste in the glaze to suit your heat preference.
9. Should I chill the chicken before frying?
Chilling the shaped chicken before frying helps hold the shape better and makes coating easier.
10. When should I apply the glaze?
Yes, glazing while hot ensures the sauce sticks well and creates a sticky, flavorful coating.
There’s something satisfying about the messy, tactile experience of eating chicken lollipops. They’re perfect for casual gatherings where everyone dives in with fingers, sharing laughs and spicy bites.
This dish isn’t just about the flavor—it’s about the chaos, the joy of messy eating, and the simple pleasure of finger-licking good chicken that brings people together around the table.

Hi, I’m Emily Carter, the creator and recipe developer behind Salt Strategist. I’m so happy you’re here. This blog is where my love for flavor, creativity, and thoughtful cooking comes together in one beautiful, ever evolving space.


