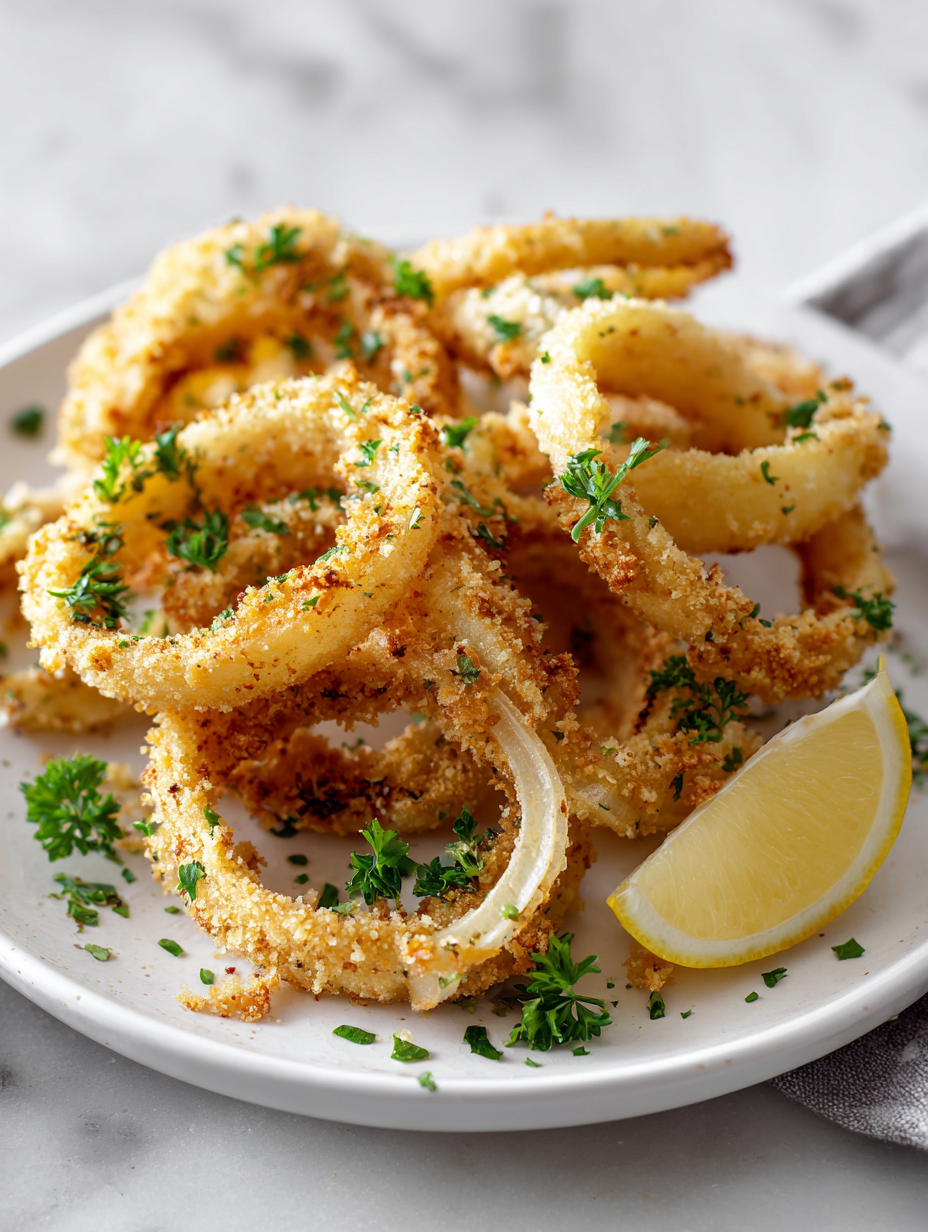
Blog

  • Spooktacularly Cheesy Halloween Mummy Pizza

    Spooktacularly Cheesy Halloween Mummy Pizza

    Every October, I love digging into the whimsical chaos of Halloween treats that blend fun with flavor. This year, I stumbled upon a quirky idea: turning classic pizza into tiny, mummy-like creations that bristle with cheese and playful bandages of pepperoni. The smell of bubbling cheese and baked bread fills the kitchen with a welcoming warmth that echoes the spooky season.

    What draws me most to this recipe isn’t just its visual charm, but the way it transforms simple ingredients into a festive feast. It’s perfect for kids and adults alike, with a mix of crunch, gooey cheese, and savory toppings. Plus, it’s a fantastic way to turn a weekday meal into a spooky celebration without much fuss.

    Mummy Pizza Bites

    Mummy pizza bites are small, individual pizza crusts topped with cheese and pepperoni, designed to resemble little mummies with bandage-like strips. The pizzas are baked until the cheese is bubbly and golden, and the pepperoni is crispy around the edges, creating a fun, spooky-themed appetizer or snack. Their visual appearance is playful with cheese oozing out from beneath the pepperoni strips, mimicking mummy wrappings.
    Prep Time 15 minutes
    Cook Time 15 minutes
    Total Time 30 minutes
    Servings: 4
    Course: Main Course
    Cuisine: American
    Calories: 150

    Ingredients
      

    • 1 package pizza dough store-bought or homemade
    • 1 cup shredded mozzarella cheese
    • 20 slices pepperoni for wrapping the mummy bandages
    • to taste salt and pepper optional
    • 1 tablespoon olive oil for brushing the crust

    Equipment

    • Baking sheet
    • Parchment paper
    • rolling pin
    • Knife
    • Measuring spoons

    Method
     

    1. Preheat your oven to 400°F (200°C) and line a baking sheet with parchment paper.
    2. Roll out the pizza dough on a lightly floured surface to about 1/4-inch thickness. Use a round cutter or a glass to cut out small circles—about 3 inches in diameter.
    3. Transfer the dough circles onto your prepared baking sheet and brush the tops lightly with olive oil. This helps the crust turn golden and adds flavor.
    4. Sprinkle shredded mozzarella cheese evenly over each dough circle, covering the surface but leaving a small border around the edges.
    5. Place a few slices of pepperoni in the center of each cheese-topped circle to create the ‘head’ of your mummy.
    6. Slice remaining pepperoni into thin strips to resemble mummy bandages. Carefully lay these strips diagonally over the cheese covering the edges and, if desired, crisscross over the ‘mummy’ head for a fun, wrapped effect.
    7. Bake the mini pizzas in the preheated oven for about 12-15 minutes, or until the crust is golden and crisp and the cheese is melted and bubbly.
    8. Remove from the oven and let cool slightly. Serve warm to enjoy the gooey cheese and crispy crust with your spooky, fun presentation.

    Notes

    For extra spooky effect, add small olive eyes or black sesame seeds on the pepperoni heads.

    As the last slice disappears, I find myself already planning the next fun twist on this idea. Each bite reminds me that food needs to be playful and not perfect—especially when celebrating spooky seasons with loved ones. These mummy pizzas are not just a dish, but a cheerful chaos in the making, perfect for creating memories around the table.

    So, whether you’re throwing a Halloween party or just craving some spooky comfort food, this recipe makes it easy to add a dash of fun and a sprinkle of joy. It’s a little messy, a little hilarious, but always delicious. Here’s to many more kitchens filled with the smell of cheesy, cheesy magic.

  • Chill & Caramel: The Ultimate Summer Slushie

    Chill & Caramel: The Ultimate Summer Slushie

    During the scorching months, I crave a dessert that’s refreshing yet indulgent. This caramel slushie takes me back to lazy afternoons when the smell of roasted caramelized sugar filled the air, and every sip cools my senses.

    What sets this recipe apart is its unexpected depth. Instead of a simple fruity frozen drink, it offers a rich, buttery caramel flavor paired with icy smoothness. It’s a comfort treat that also sparks nostalgia and invites moments of quiet joy.

    Perfect for summer gatherings or a solo escape, this slushie balances decadence with simplicity. It’s a reminder that even the simplest ingredients—cream, caramel, ice—can come together to create something truly delightful.

    Caramel Slushie

    This caramel slushie combines rich, buttery caramel with icy blended ice to create a smooth, refreshing dessert. The process involves cooking caramel to develop deep flavor, then blending it with cream and ice until icy and velvety in texture. The final beverage is thick, chilled, and visually appealing with swirls of caramel throughout.
    Prep Time 10 minutes
    Cook Time 20 minutes
    Total Time 30 minutes
    Servings: 2
    Course: Main Course
    Cuisine: American
    Calories: 250

    Ingredients
      

    • 1/2 cup granulated sugar for caramel
    • 1 tablespoon unsalted butter to enrich the caramel
    • 1/2 cup heavy cream to stabilize caramel
    • 2 cups ice cubes for blending
    • 1/2 cup whole milk for blending
    • 1/4 cup heavy cream for blending

    Equipment

    • Saucepan
    • Blender
    • Measuring cups and spoons

    Method
     

    1. Start by heating a saucepan over medium heat, then sprinkle the sugar evenly into the pan. Watch as it begins to melt and turn a golden amber color, swirling gently to promote even caramelization. This process takes about 5-7 minutes and fills your kitchen with a warm caramel aroma.
    2. Once the sugar is fully melted and has a rich amber hue, add in the butter carefully—it will bubble vigorously. Stir continuously until the butter is fully incorporated and the caramel becomes smooth, about 1-2 minutes.
    3. Slowly pour in the heavy cream while stirring. The mixture will bubble up again, so pour steadily and stir until the caramel is thickened and glossy. Remove from heat and let it cool slightly—this helps the caramel set up just enough without becoming too firm.
    4. Transfer the warm caramel to the blender, then add the whole milk and heavy cream for smooth blending. Toss in the ice cubes afterward, so they don’t start melting immediately, maintaining the slushie’s icy texture.
    5. Blend on high speed until the mixture is thick, frosty, and velvety, usually about 30-45 seconds. Check for smoothness; if needed, blend a bit longer to achieve a uniform, slushie consistency.
    6. Pour the caramel slushie into glasses, swirling gently to showcase the rich caramel streaks throughout. Serve immediately for the best icy texture.
    This caramel slushie proves that summer desserts can be both quick and luxurious. Its creamy, sweet flavor makes it ideal for hot days that call for something special in a glass.

    Enjoy making this recipe whenever you need a cooling escape or a sweet pick-me-up. Each sip is a little reminder that simple pleasures often bring the most satisfaction.

  • Spooky Sweet and Savory: Halloween Bat Wings with Soy Sauce Magic

    Spooky Sweet and Savory: Halloween Bat Wings with Soy Sauce Magic

    Every October, my kitchen becomes a playground of playful shadows and daring flavors. This year, I decided to transform mundane chicken wings into eerie bat wings, perfect for a festive feast or a hushed Netflix binge. The secret? A rich soy sauce marinade that glistens under dim candlelight, giving each wing a glossy, mysterious appeal.

    Imagine little flaps coated in a savory, slightly sweet glaze, with crispy edges ready to crackle. These bat wings aren’t just fun—they’re a nostalgic nod to childhood costume parties, with a touch of gourmet magic. The aroma alone, with hints of garlic and soy, pulls everyone close, eager for a taste of the supernatural.

    **WHY I LOVE THIS RECIPE?**

    • The simplicity allows me to focus on spooky presentation and playful plating.
    • I love how the soy marinade deepens flavor while keeping the wings juicy.
    • Crunchy skin with a savory punch is addictive, especially with a side of eerie gums and bones.
    • This dish sparks childhood memories mixed with a dash of chaos during Halloween prep.
    • Crafting these wings is a joyful chaos, perfect for making seasonal meals memorable.

    **AVOID MY DISASTER (You’re Welcome)**

    • FORGOT to preheat the oven? Wings stuck, but a quick blast and glass of water reset the texture.
    • DUMPED too much soy? The wings turned too salty. Rinse briefly and start fresh.
    • OVER‑TORCHED the first batch? Crust turned bitter. Lower the heat and crack open a cold soda.
    • MISSED a glaze during roasting? They baked dry. Re-apply glaze in last 5 minutes for shine and flavor.

    **QUICK FIXES THAT SAVE YOUR DAY**

    • When wings stick, splash a little oil and gently loosen with a spatula.
    • Patch a too-salty batch with a drizzle of honey and extra garlic powder.
    • Shield delicate wings from overcooking by covering with foil halfway through baking.
    • When glaze is too thin, simmer for 1 minute to thicken and shimmer.
    • When missing that smoky aroma, toss wings briefly over a hot skillet until crisp and fragrant.

    Letting these wings shine on my holiday table feels grounding amidst the chaos of October. The contrast of savory soy and crispy skin brings a satisfying crunch that holds up well under flickering candles. Every bite feels like a little ritual—spooky, nostalgic, and downright delicious.

    Ginger Soy Chicken Wings

    This dish features chicken wings marinated in a savory soy sauce mixture, then baked until crispy and glazed for a glossy finish. The wings develop a crunchy exterior with a flavorful, slightly sticky coating, showcasing a combination of tender meat and crisp skin.
    Prep Time 15 minutes
    Cook Time 30 minutes
    Total Time 45 minutes
    Servings: 4
    Course: Main Course
    Cuisine: Asian
    Calories: 320

    Ingredients
      

    • 2 pounds chicken wings preferably drumettes and flats
    • 1/4 cup soy sauce dark or regular
    • 2 cloves garlic minced
    • 1 tablespoon honey for sweetness and glaze
    • 1 teaspoon fresh ginger grated
    • 1/2 teaspoon black pepper freshly ground
    • 1 tablespoon vegetable oil for baking spray

    Equipment

    • Baking sheet
    • Mixing bowl

    Method
     

    1. Preheat your oven to 400°F (200°C) and line a baking sheet with parchment or lightly spray with vegetable oil to prevent sticking.
    2. In a large mixing bowl, combine soy sauce, minced garlic, grated ginger, honey, and black pepper to create the marinade.
    3. Add the chicken wings to the marinade and toss thoroughly to coat each piece evenly. Cover the bowl and let it marinate in the refrigerator for at least 30 minutes.
    4. Spread the marinated chicken wings out in a single layer on the prepared baking sheet, ensuring space between each piece for crisping.
    5. Bake the wings in the preheated oven for about 25-30 minutes, flipping halfway through, until the skin is golden brown and crispy, and the glaze is bubbling.
    6. Meanwhile, pour the remaining marinade into a small saucepan and simmer over medium heat for 2-3 minutes until it thickens slightly into a glossy glaze.
    7. Remove the wings from the oven and brush generously with the thickened soy glaze for a shiny, flavorful coating.
    8. Return the glazed wings to the oven for an additional 2-3 minutes to set the glaze and crisp up the exterior once more.
    9. Take the wings out of the oven and let them rest for a few minutes. Serve hot, garnished with chopped scallions or sesame seeds if desired.

    Notes

    For extra crunch, broil the wings for the last 2 minutes, keeping a close eye to prevent burning. Adjust marinade quantities for more or less sweetness. Save leftover glaze for drizzling over rice or vegetables.
    As the night falls and shadows dance around the dinner table, these Halloween Bat Wings stand as a fun centerpiece. Their glossy, dark glaze hints at a mysterious sweetness that’s perfect for a festive gathering or a spooky night at home.

    Cooking dishes like this reminds me of how food can turn a simple meal into an adventure. The blend of savory soy, crispy textures, and playful presentation captures the spirit of Halloween. Sometimes, a little chaos in the kitchen creates the best memories.

  • Chill Out with an Unexpected Twist: The Flavored Chocolate Slushie

    Chill Out with an Unexpected Twist: The Flavored Chocolate Slushie

    Imagine a blazing summer afternoon, the sun sinking low, casting a warm glow over everything. Your throat craves a cool escape, but instead of reaching for the usual ice cream, you discover a secret weapon: the chocolate slushie with a surprise twist. This recipe isn’t just about cooling down; it’s about an unexpected flavor adventure that transforms ordinary summer refreshment into a remarkable treat.

    What makes this chocolate slushie stand out is its bold combination of rich cocoa and a hint of spice or unexpected add-ins, turning a simple frozen drink into a memorable moment. I stumbled upon this idea while experimenting in my kitchen, blending old childhood joy with a touch of adult sophistication. Now, I can’t imagine hot days without this creamy, chill delight.

    Brewed from a throwback love for icy drinks and elevated with creative flair, this recipe is perfect for anyone craving a cold pick-me-up that sparks curiosity with every sip.

    Chocolate Spiced Slushie

    A chilled frozen beverage that combines rich cocoa with a hint of warming spice, resulting in a creamy, icy drink with a vibrant flavor profile. The mixture is blended until smooth and slushy, offering a visually appealing, scoopable texture with a deep chocolate hue and subtle spice presence.
    Prep Time 10 minutes
    Total Time 10 minutes
    Servings: 2
    Course: Main Course
    Cuisine: Beverage, Dessert
    Calories: 120

    Ingredients
      

    • 1 cup whole milk
    • 2 tablespoons unsweetened cocoa powder
    • 2 tablespoons honey or simple syrup
    • 1/2 teaspoon ground cinnamon optional for warmth
    • 1/4 teaspoon ground cayenne pepper optional for a spicy kick

    Equipment

    • Blender
    • Measuring cups and spoons

    Method
     

    1. Measure out the milk, cocoa powder, honey, cinnamon, and cayenne, and add them to your blender.
    2. Blend the mixture on low speed first to combine the dry cocoa and spices with the milk until smooth and no lumps remain, about 30 seconds.
    3. Add the ice cubes to the blender, filling it up to about 1.5 cups, depending on your desired thickness.
    4. Secure the lid and blend on high for 30-45 seconds until the mixture is thick, slushy, and smooth in texture, stopping occasionally to check consistency.
    5. Taste the slushie and adjust sweetness if needed by adding more honey and blending again briefly.
    6. Pour the chocolate spiced slushie into glasses, and serve immediately with a straw or spoon for scooping.
    This chocolate slushie is just the beginning of playful, cool concoctions to beat the heat. As summer peaks, these frozen surprises keep mornings lively and afternoons refreshing. Plus, it’s a simple reminder that sometimes, the best ideas come from mixing comfort with a little chaos.

    Remember, the real magic lies in your creativity. Whether adding a splash of chili or a dash of salt, each tweak makes the experience uniquely yours. Cheers to simple pleasures and cool experiments in the kitchen.

  • Chilling with Oreo: The Frozen Dream You Never Knew You Needed

    Chilling with Oreo: The Frozen Dream You Never Knew You Needed

    Cooking on a hot day can be a serious challenge, especially when you crave something sweet and cool but don’t want to turn on the oven. Enter the Oreo slushie — a surprisingly simple yet indulgent treat that turns your favorite cookie into a frosty delight. The magic lies in how the creamy ice blends with chunks of chocolatey goodness, creating a texture that’s both smooth and satisfyingly crumbly.

    When I first discovered this recipe, it felt like a nostalgic shortcut back to childhood afternoons. But it also became my go-to for spontaneous gatherings or a quick hush-hush dessert to surprise guests. Plus, it’s so easy, I honestly can’t believe I didn’t start making it months ago. The cooler months? Perfect too—just swap the ice for frozen bananas, and you’re set.

    Oreo Slushie

    The Oreo slushie is a frozen beverage made by blending crushed Oreo cookies with ice and milk, creating a thick, creamy drink with chunks of chocolate cookie throughout. The texture combines smoothness from the milk and ice with delightful crunchiness from the cookies, resulting in a visually appealing and indulgent treat.
    Prep Time 5 minutes
    Total Time 5 minutes
    Servings: 2
    Course: Main Course
    Cuisine: Modern Dessert
    Calories: 210

    Ingredients
      

    • 8 cookies Oreo cookies roughly crushed
    • 1 ½ cups milk cold
    • 2 cups ice cubes

    Equipment

    • Blender
    • Measuring cups and spoons

    Method
     

    1. Place the Oreo cookies in a plastic bag and gently crush them with your hands or a rolling pin until they break into small crumbs. Set aside.
    2. Add the crushed Oreos to your blender along with the cold milk and ice cubes.
    3. Secure the lid on the blender and blend on high speed for about 30 seconds, or until everything is well combined and the mixture is smooth with some cookie chunks remaining.
    4. Pause briefly to check the consistency; if it’s too thick, add a splash more milk and blend again for a few seconds.
    5. Once the mixture is creamy and frosty with visible cookie pieces, pour it into glasses.
    6. Serve immediately with a straw or spoon, allowing the cool, crunchy texture to shine through.

    Notes

    For an extra indulgence, top with whipped cream or sprinkle additional crushed Oreos before serving.

    This Oreo slushie is more than just a summer refresher; it’s a reminder that simple ingredients can turn into spectacular treats with just a blender and a little bit of love. It’s perfect for those moments when you want comfort in a glass, topped off with a few extra cookie crumbles for good measure. Despite its chill exterior, it warms my heart every time I sip one.

    Seasons may change, but the joy of a good frozen treat stays constant. Whether you’re celebrating something special or just looking to beat the heat, this recipe brings a little bit of fun back into the kitchen. Sometimes, all it takes is an Oreo and some ice to create a little magic that’s cool, crispy, and totally satisfying.

  • Spooky Fun: The Irresistible Halloween Spider Cheese Ball

    Spooky Fun: The Irresistible Halloween Spider Cheese Ball

    Mixing a bit of chaos with cheeseball charm, the Halloween Spider Cheese Ball transforms a simple appetizer into a festive centerpiece. Its gleaming, gooey spider legs cast an eerie shadow, perfect for any spooky gathering. The surprise? A creamy, tangy core that melts in your mouth with each bite.

    What makes this recipe truly stand out is its interactive nature—guests can pick and choose which creepy legs to munch on first. It’s a playful way to introduce flavor with a dash of Halloween mischief. Plus, it’s surprisingly easy to prepare, making it a perfect project for last-minute festive fun.

    Halloween Spider Cheese Ball

    The Halloween Spider Cheese Ball is a creamy, tangy cheese spread shaped into a ball with decorative, edible spider legs made from pretzel sticks or similar ingredients. The cheese ball has a smooth, firm texture that can be easily sliced or served with accompaniments, while the spider legs add a playful, spooky touch to the presentation.
    Prep Time 20 minutes
    Total Time 20 minutes
    Servings: 8
    Course: Main Course
    Cuisine: American
    Calories: 180

    Ingredients
      

    • 8 oz Cream cheese softened
    • 1 cup Shredded cheddar cheese
    • 2 tbsp Fresh chopped chives optional for flavor
    • 1/2 tsp Garlic powder
    • 1/2 tsp Paprika
    • to taste Salt and pepper
    • 10 pretzel sticks Pretzel sticks or black olives for spider legs
    • additional Optional toppings chopped nuts, chopped herbs, or sliced vegetables

    Equipment

    • Mixing bowl
    • Plastic wrap
    • Serving Platter
    • Large spoon or spatula
    • Knife

    Method
     

    1. In a mixing bowl, combine softened cream cheese, shredded cheddar, chopped chives, garlic powder, paprika, salt, and pepper. Stir until well blended and smooth, with no lumps remaining.
    2. Transfer the cheese mixture onto a piece of plastic wrap. Shape it into a firm, round ball by folding the wrap over and pressing gently. Refrigerate for at least 15 minutes to help it hold its shape.
    3. Unwrap the cheese ball carefully and place it onto a serving platter. Use a spatula or the back of a spoon to smooth out the surface and create an even, rounded appearance.
    4. Line up pretzel sticks or black olives on one side of the cheese ball, attaching them with a small amount of soft cheese if needed, to form spider legs radiating outward. Spread them evenly and press lightly to secure.
    5. Optionally, add chopped nuts, herbs, or sliced vegetables on top or around the cheese ball for extra flavor and visual interest.
    6. Serve the Halloween Spider Cheese Ball with crackers, sliced baguette, or fresh vegetables for dipping and snacking. Enjoy the spooky, creamy centerpiece!

    This cheese ball isn’t just a treat; it’s a conversation starter. Its visual impact and irresistible texture make it the star of any Halloween table. As you watch friends break into smiles and giggles over those spooky legs, you’ll feel the delight of creating something both delicious and delightfully scary.

    Enjoy this recipe as a clever way to celebrate the season, blending comfort food with creative Halloween flair. It’s a small gesture that turns ordinary ingredients into a memorable experience. Happy haunting—and snacking!

  • Eerie Sweetness: Halloween Ghost Brownies

    Eerie Sweetness: Halloween Ghost Brownies

    Every October, my kitchen transforms into a haunted workshop, and these Halloween Ghost Brownies are the star of the show. Their ghostly appearance, with melting chocolate eyes and a gooey marshmallow mouth, makes them irresistible to kids and adults alike. The crispy edges paired with fudgy interior create a perfect spooky treat that ignites nostalgia and chaos in equal measure.

    What excites me most is the way these brownies combine simplicity with a dash of Halloween magic. They’re great for last-minute parties, or when you want to add a playful twist to your dessert table. Making them feels like casting a quick charm—no fancy equipment needed, just your kitchen and a sense of fun.

    Halloween Ghost Brownies

    These Halloween Ghost Brownies are fudgy, dense chocolate treats with a crispy edge, shaped and decorated to resemble ghostly figures. They incorporate melted chocolate, butter, and eggs for a rich batter, baked until firm with a shiny surface. Once cooled, they are decorated with melting chocolate eyes and marshmallow mouths for a spooky, playful appearance.
    Prep Time 15 minutes
    Cook Time 25 minutes
    Total Time 40 minutes
    Servings: 12
    Course: Main Course
    Cuisine: American
    Calories: 250

    Ingredients
      

    • 1/2 cup unsalted butter melted
    • 1 cup granulated sugar
    • 2 large eggs beaten
    • 1 teaspoon vanilla extract
    • 2/3 cup unsweetened cocoa powder
    • 1/2 cup all-purpose flour
    • 1/4 teaspoon baking powder
    • Pinch salt
    • 3/4 cup semi-sweet chocolate chips for melting and decorating
    • 1/2 cup mini marshmallows for mouths
    • Dark chocolate or melting chocolate quantity as needed chocolate for melting for eyes and decorations

    Equipment

    • Mixing bowls
    • Whisk
    • 10×8 inch baking pan
    • Parchment paper
    • Saucepan
    • Spatula
    • Cooling rack
    • Piping bag or plastic zip-top bag
    • Oven

    Method
     

    1. Preheat your oven to 350°F (175°C) and line a baking pan with parchment paper to prevent sticking.
    2. In a saucepan, melt the unsalted butter over low heat until smooth, then remove from heat and stir in the cocoa powder until well combined and glossy.
    3. In a large mixing bowl, whisk together the granulated sugar and beaten eggs until the mixture is smooth and slightly frothy.
    4. Pour the melted chocolate mixture into the egg mixture, stirring continuously to combine and integrate the flavors.
    5. Sift in the flour, baking powder, and salt over the wet ingredients, then fold everything together gently with a spatula until just combined. The batter will be thick and fudgy.
    6. Stir in most of the chocolate chips into the batter, reserving a few for decoration.
    7. Spread the batter evenly into the prepared pan using a spatula, smoothing the top to ensure even baking.
    8. Bake for about 20-25 minutes, until the edges are set and a toothpick inserted into the center comes out with a few moist crumbs.
    9. Allow the brownies to cool completely in the pan on a cooling rack. This helps them set and makes cutting easier.
    10. While the brownies cool, melt the remaining chocolate chips or melting chocolate in a microwave-safe bowl in 30-second bursts, stirring until smooth.
    11. Use a piping bag or a plastic zip-top bag with the tip cut off to pipe two small eyes on each brownie with melted chocolate, and place a mini marshmallow underneath for the mouth, creating a ghostly face.
    12. Let the decorated brownies sit for a few minutes until the chocolate sets. Then, serve and enjoy these spooky, fudgy Halloween treats!

    These Ghost Brownies aren’t just treats — they’re conversation starters. Every bite carries the scent of rich chocolate and toasted marshmallows, making them as comforting as they are creepy. When the evening gets darker, the allure of these spooky sweets beckons everyone around.

    Perfect for this season’s festivities, they add a little mischief and a lot of flavor. Watching friends and family delight in their ghostly charm is the best reward. Sometimes, the simplest ideas are the sweetest surprises of all.

  • The Artful Stuffed Peppers: A Symphony of Flavors

    The Artful Stuffed Peppers: A Symphony of Flavors

    Imagine a burst of sunlight on your plate—bright, inviting, and unexpectedly sophisticated. Stuffed peppers offer just that, but with a twist that elevates the dish from simple comfort to a piece of culinary art. This version, infused with unexpected herbs and a hint of smoky paprika, becomes a celebration of seasonal produce and bold flavors.

    As I prep these peppers, I’m transported back to childhood summers, yet I add my own modern flair—crunchy walnuts, tangy feta, and a squeeze of lemon brighten every bite. The aroma filling my kitchen feels like a warm embrace, promising a meal that’s both hearty and refreshingly inventive. Let’s dive into a recipe that turns humble ingredients into a star-worthy creation.

    Stuffed Peppers with Herbs, Feta, and Walnuts

    This dish features bell peppers filled with a savory mixture of herbs, crumbled feta, crunchy walnuts, and lemon zest. The peppers are baked until tender and slightly browned, resulting in a colorful, hearty, and textured entrée with a vibrant appearance.
    Prep Time 20 minutes
    Cook Time 30 minutes
    Total Time 50 minutes
    Servings: 4
    Course: Main Course
    Cuisine: Mediterranean
    Calories: 250

    Ingredients
      

    • 4 large bell peppers preferably red, yellow, or orange for color
    • 1 cup feta cheese crumbled
    • 0.5 cup crushed walnuts for crunch
    • 1 tablespoon lemon zest from a fresh lemon
    • 2 tablespoons olive oil divided, for roasting and mixing
    • 2 cloves garlic minced
    • 1 teaspoon dried oregano optional but adds flavor
    • to taste salt and pepper for seasoning

    Equipment

    • Baking dish
    • Chef’s knife
    • Cutting board
    • Mixing bowls
    • Spoon or spatula
    • Oven

    Method
     

    1. Preheat your oven to 375°F (190°C). Cut the tops off the bell peppers and scoop out the seeds and membranes. Arrange them in a baking dish and brush the outside with a drizzle of olive oil.
    2. In a mixing bowl, combine the crumbled feta, crushed walnuts, lemon zest, minced garlic, dried oregano, and a splash of olive oil. Stir everything together until well mixed. Taste and season with salt and pepper as needed.
    3. Spoon the filling mixture into each hollowed-out pepper, pressing gently to pack the filling tightly and fill evenly to the top.
    4. Once all peppers are filled, drizzle a little olive oil over the top of each, then place them in the oven to bake uncovered for about 25-30 minutes, until the peppers are tender and the filling is golden and slightly bubbling.
    5. Remove the peppers from the oven and let them rest for a few minutes. The filling should be fragrant, and the peppers should be soft but hold their shape.
    6. Serve the stuffed peppers warm, garnished with extra lemon zest or fresh herbs if desired, and enjoy their vibrant, textured interior.

    These stuffed peppers strike a perfect balance between nostalgia and innovation, making them ideal for any season. They’re easy to customize, whether you prefer a vegetarian version or a meat-laden masterpiece. Each bite delivers a satisfying crunch and a medley of vibrant flavors that linger long after the last forkful.

    Cooking this dish reminds me that simplicity can be endlessly creative, especially when seasonal produce is at its peak. It’s a reminder to slow down, enjoy the process, and savor the small wins in your kitchen. No matter the occasion, these peppers bring a touch of joy and a splash of color to your table.

  • Secrets to a Soul-Warming Fall Pumpkin Soup with a Twist

    Secrets to a Soul-Warming Fall Pumpkin Soup with a Twist

    As the leaves start turning shades of amber and gold, I find myself craving something both comforting and unexpectedly fresh. This roasted pumpkin soup isn’t just any fall dish; it’s a sensory journey that brings out the sweet, smoky aroma of oven-roasted pumpkins paired with subtle hints of sage and allspice. The simplicity of this recipe allows the natural flavors of pumpkin to shine through, making each spoonful a nostalgic yet invigorating experience.

    Creating this soup in the midst of fall chaos feels like a small act of self-care. It’s perfect for those busy weekends when you want warmth and flavor without hours spent slaving over complex recipes. Plus, the vibrant orange hue and velvety texture make it a stunning centerpiece on any table, even when you’re short on time or ingredients.

    Roasted Pumpkin Soup

    This roasted pumpkin soup is prepared by oven-roasting pumpkin halves until tender and lightly caramelized, then blending the softened flesh with aromatic herbs and spices for a smooth, velvety texture. The final dish features a vibrant orange hue and a rich, smoky-sweet flavor profile, with a creamy consistency that is perfect for warming up on cool days.
    Prep Time 10 minutes
    Cook Time 40 minutes
    Total Time 50 minutes
    Servings: 4
    Course: Main Course
    Cuisine: Fall
    Calories: 220

    Ingredients
      

    • 1 medium pumpkin halved and seeded
    • 2 tablespoons olive oil for roasting
    • 1 small onion chopped
    • 2 cloves garlic minced
    • 1 teaspoon fresh sage chopped
    • 1/2 teaspoon allspice ground
    • 4 cups vegetable broth
    • 1 cup cream optional, for creaminess
    • to taste salt and pepper

    Equipment

    • Baking sheet
    • Blender

    Method
     

    1. Preheat your oven to 400°F (200°C). Place the pumpkin halves cut side up on a baking sheet and brush with olive oil. Roast until the flesh is soft and caramelized, about 40 minutes.
    2. Allow the roasted pumpkin to cool slightly, then scoop out the flesh into a large pot. Set aside.
    3. Into a large pot, heat a tablespoon of olive oil over medium heat. Add the chopped onion and sauté until translucent and fragrant, about 5 minutes.
    4. Add the minced garlic, chopped sage, and ground allspice, cooking for another minute until fragrant.
    5. Pour in the vegetable broth and bring the mixture to a gentle simmer.
    6. Add the scooped pumpkin flesh to the simmering broth, stirring to combine. Let it cook together for about 10 minutes to meld flavors.
    7. Use an immersion blender or transfer the mixture to a blender, then blend until smooth and creamy, achieving a velvety texture.
    8. Return the blended soup to the heat, stir in the cream if using, and season with salt and pepper to taste. Warm through for a few minutes.
    9. Serve the hot pumpkin soup garnished with fresh sage or a swirl of cream, enjoying its rich color and smooth consistency.
    This roasted pumpkin soup feels like a quiet celebration of the season’s bounty. Its gentle sweetness and smoky undertones evoke the cozy evenings spent wrapped in blankets with a good book nearby.

    As seasons shift and pumpkin patches become more abundant, this dish becomes a must-make. Its warm, inviting aroma fills the kitchen and makes even the dullest days a little brighter. Sometimes, the simplest ingredients turn into the most memorable meals.

  • Frozen Peach Bliss: A Cool Twist on a Summer Classic

    Frozen Peach Bliss: A Cool Twist on a Summer Classic

    Ever wondered how to turn ripe, juicy peaches into a refreshing escape from the heat that’s also a treat for your senses? This peach slushie isn’t just a frozen drink; it’s an experience of summer’s finest aroma and texture. Imagine biting into a cold, sweet peach while being enveloped in a breeze of icy delight.

    Most recipes rush through the blending process, but I like to experiment with unexpected ingredients to elevate this simple comfort. A dash of spice, or a splash of tang, can turn a basic slushie into something memorable. Let’s explore how this frozen fruity treat can become your new go-to for sunny days or lazy afternoons.

    Peach Slushie

    This peach slushie is a frozen beverage made by blending ripe peaches with sweeteners, ice, and optional flavor additions until smooth and icy. The final texture is thick, icy, and refreshing, resembling a sorbet-like drink with a vibrant peach color. It captures the juicy aroma of peaches while offering a chilled, smooth consistency.
    Prep Time 10 minutes
    Total Time 10 minutes
    Servings: 2
    Course: Main Course
    Cuisine: American
    Calories: 100

    Ingredients
      

    • 4 large ripe peaches pitted and sliced
    • 2 tablespoons honey or maple syrup, optional for added sweetness
    • 1 cup ice cubes for icy texture
    • 1/4 cup orange juice fresh or store-bought, optional for tang

    Equipment

    • Blender
    • Knife

    Method
     

    1. Slice the ripe peaches into small chunks and place them into the blender.
      4 large ripe peaches
    2. Add the honey and orange juice to the peaches, distributing evenly for a balanced sweetness and tang.
      2 tablespoons honey, 1/4 cup orange juice
    3. Fill the blender with ice cubes, ensuring they are evenly distributed to start chilling and thickening the mixture.
      1 cup ice cubes
    4. Secure the lid on the blender and blend everything on high speed for about 30-45 seconds until the mixture is smooth and icy, with a slushy consistency.
    5. Stop the blender and check the texture; if it’s too thick, add a splash more orange juice and blend briefly to loosen.
    6. Pour the icy peach mixture into glasses, allowing it to mound slightly above the rim for a generous serve.
    7. Garnish with fresh peach slices or a sprig of mint if desired for a colorful finish.
    This peach slushie is the perfect companion for a hot day, whether you’re relaxing in the backyard or hosting friends. Its natural sweetness and vibrant flavor make it feel like instant summer in every sip. Plus, it’s so easy to prepare that you’ll find yourself making it again and again, no matter the occasion.

    Seasonal, bright, and endlessly customizable, this recipe reminds me why I love simple pleasures. Next time you see perfectly ripe peaches, grab a few and freeze them — you’re just minutes away from a chilly, joyful burst of flavor.