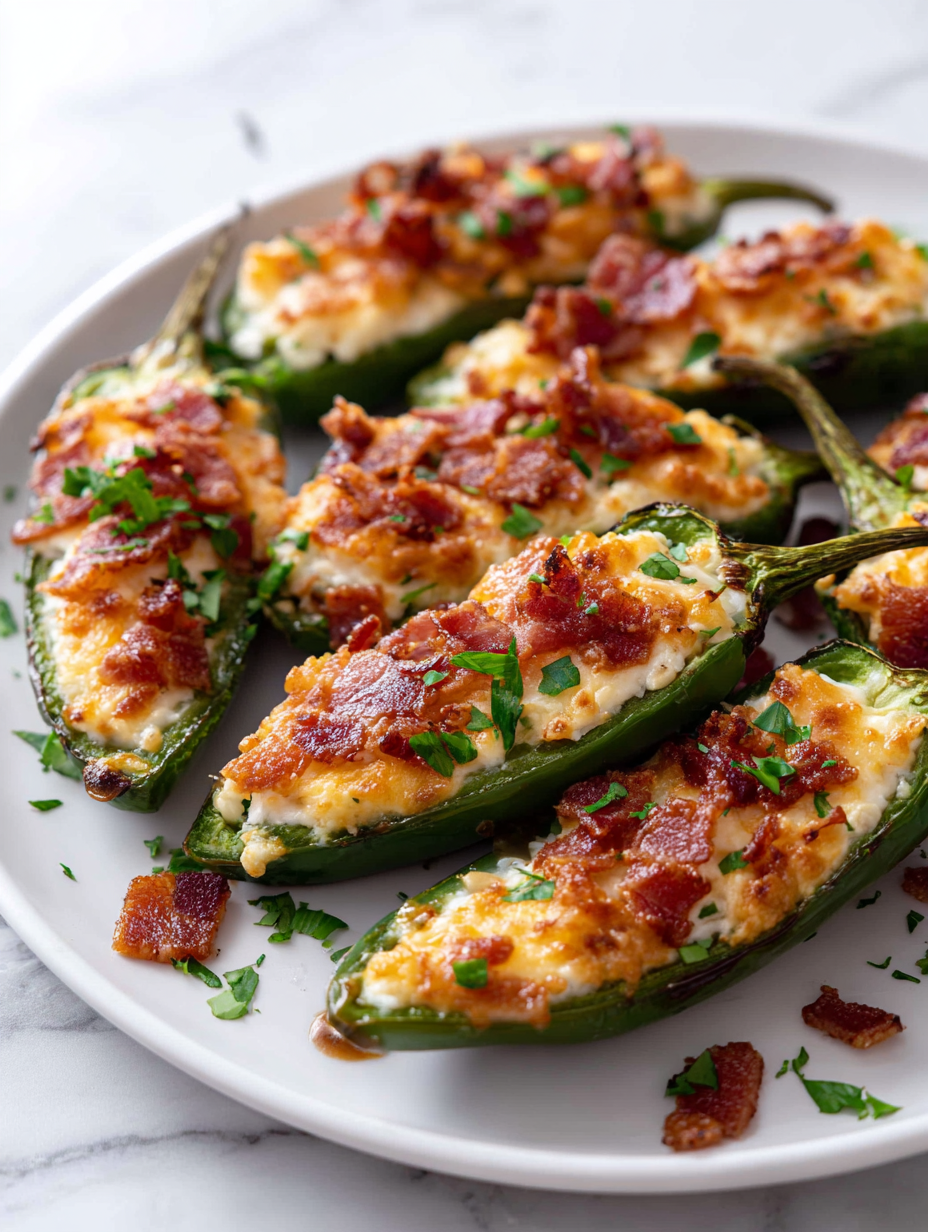
Stuffed jalapeños are a little guilty pleasure of mine, but I’ve always felt they could use a bit of an upgrade. Instead of just cream cheese and bacon, I like mixing in unexpected cheeses and a splash of beer for a richer, more layered flavor. It’s like giving these fiery little bites a fancy twist without losing their easy charm.
There’s something about the way the cheese melts into the spicy pepper, creating that perfect gooey contrast. When you add a splash of beer, it deepens the flavor and adds a subtle tang that keeps everyone guessing. It’s not your typical snack—more like a small celebration in each bite, perfect for sharing or just sneaking a few for yourself.
Focusing on how using a unexpected blend of cheeses and a splash of beer in the stuffing elevates the traditional jalapeño popper, making it a richer, more complex snack that surprises even seasoned eaters.
Unexpected Cheese & Beer Twist
- I love how these jalapeños remind me of lazy summer afternoons at my grandma’s house, sitting out back with the grill going.
- There’s a thrill in biting into that first fiery pepper, only to have the cheesy, smoky filling burst out—kind of like a tiny flavor explosion.
- I used to be wary of stuffing peppers, but once I got the hang of balancing the heat with rich cheese, it became my go-to appetizer for parties.
- Nothing beats that moment when I pull these out of the oven and the scent of melted cheese and roasted peppers fills the room—pure comfort in smell.
The spark behind this dish
- This recipe came about when I was craving a snack that had a bit more personality than the usual stuffed pepper. I wanted something that balanced heat with richness, a little chaos with a lot of flavor. It’s become a favorite because it’s a messy, honest kind of bite that doesn’t hold back.
- I remember the first time I threw in a splash of beer—something about the way it bubbled up inside the peppers, adding a subtle tang, made me realize how much flavor can come from just a little unexpected tweak. Now, these jalapeños are my go-to for casual get-togethers or when I need a small, fiery reward after a long day.
- heading
- story_type
Trivia and Origins
- Stuffed jalapeños likely originated in Texas, where spicy peppers are a culinary staple and perfect for handheld snacks.
- The first versions probably used simple cream cheese and bacon, but over time, creative twists like cheeses and alcohol emerged.
- In the 1980s, jalapeño poppers gained popularity at American tailgate parties, becoming a symbol of casual, fiery comfort food.
Ingredient breakdown
- Jalapeños: I love how their fiery kick wakes up the palate, but if you want less heat, scrape out some seeds—just be careful, the insides are where the spice lives.
- Cream cheese: It’s the creamy glue that holds everything together, making each bite gooey and rich. Swap in Greek yogurt for a tangy, lighter version—just watch the moisture level.
- Cheddar cheese: I prefer sharp, aged cheddar for a bold flavor that melts beautifully. A milder mozzarella works if you want more subtlety, but don’t skip the cheese altogether.
- Bacon: Crispy bacon bits add smoky crunch, but for a leaner option, try pancetta or even sautéed mushrooms for a chewy, savory bite. The aroma alone is worth it.
- Beer: A splash of lager or pale ale adds depth and a slight tang—try a different brew for varied flavor. Skip it if you’re avoiding alcohol, but then, you’ll miss that subtle fizz.
- Herbs & spices: Fresh cilantro or chives brighten the stuffing, but dried oregano or cumin can give it a smoky, earthy kick—use what you love or have on hand.
- Optional toppings: Consider a drizzle of hot sauce or a sprinkle of everything bagel seasoning on top for extra punch—think of it as the finishing wink.
Spotlight on key ingredients
Jalapeños:
- I love their fiery kick and how their firm flesh holds the stuffing, but if you want less heat, scrape out some seeds—be gentle with the membranes, they pack the punch.
- Cream cheese: It’s the creamy glue that makes each bite gooey and rich. Swap in Greek yogurt for a tangy, lighter version—just watch the moisture level so it doesn’t get too runny.
Cheddar cheese and bacon:
- Cheddar cheese: I prefer sharp, aged cheddar for a bold flavor that melts beautifully. A milder mozzarella works if you want more subtlety, but don’t skip the cheese altogether; it’s the heart of that luscious filling.
- Bacon: Crispy bacon bits add smoky crunch, but for a leaner, less messy option, try pancetta or sautéed mushrooms—they bring that savory, umami punch without the grease drip.
Notes for ingredient swaps
- Dairy-Free: Swap cream cheese for blended silken tofu or cashew cheese—loses some creaminess but keeps the texture.
- Cheese Variations: Use pepper jack for extra spice or gouda for a smoky twist—each adds a different flavor punch.
- Meatless Option: Replace bacon with sautéed mushrooms or smoked paprika for umami depth without the pork.
- Gluten-Free: Ensure your bacon is gluten-free, and use almond flour-based breading if you add toppings—no wheat needed.
- Vegan: Use vegan cream cheese and shredded plant-based cheese—still gooey, just plant-based and a bit lighter.
- Heat Level: For milder peppers, scrape out seeds and membranes; for more heat, leave some seeds intact.
- Brew Swap: Try a different beer like a stout for richer malt notes or a pilsner for crisper brightness—choose what complements your filling.
Equipment & Tools
- Sharp knife: Cut peppers and prepare ingredients precisely.
- Spoon or melon baller: Remove seeds and stuff peppers evenly.
- Baking dish: Hold stuffed peppers securely during baking.
- Oven thermometer: Ensure accurate oven temperature for perfect baking.
Step-by-step guide to stuffed jalapeños
- Equipment & Tools: Gather a sharp knife (for precise cuts), a small spoon or melon baller (to clean and stuff peppers), a baking dish (to hold the jalapeños snugly), and an oven thermometer (to monitor oven heat).
- Preheat oven to 200°C (390°F). Line your baking dish with parchment or a silicone mat for easy cleanup.
- Slice jalapeños lengthwise, carefully avoiding cutting all the way through. Use the spoon or melon baller to remove seeds and membranes—leave some seeds if you want more heat.
- Mix your stuffing: combine cream cheese, shredded sharp cheddar, chopped cooked bacon, a splash of beer, and chopped herbs in a bowl. Adjust salt and pepper to taste. It should be creamy and slightly thick.
- Stuff each jalapeño half generously with the cheese mixture, pressing down slightly so it stays put. Place them cut side up in the prepared baking dish.
- Bake for 15–20 minutes. The cheese should be bubbling and golden, and the peppers slightly softened. Keep an eye on them; if tops brown too fast, tent with foil.
- Check doneness: the peppers should be tender but still hold their shape, and the cheese should be oozy and slightly browned. If not, give them 5 more minutes.
- Remove from oven and let rest for 5 minutes. This helps the cheese set just enough to avoid spilling when plated. Garnish with fresh herbs or a drizzle of hot sauce if desired.
- Serve warm, with a side of lime wedges or a simple salad. Enjoy the smoky, cheesy bite with a little kick of heat.
Let the stuffed jalapeños rest for 5 minutes out of the oven to set the cheese. Serve directly from the dish, garnished with herbs or hot sauce for extra flair.
How to Know It’s Done
- Cheese is golden and bubbly, peppers are tender but not mushy.
- Jalapeños have softened slightly but still hold their shape.
- Filling is oozy and slightly browned on top.
Cheesy Beer-Stuffed Jalapeños
Ingredients
Equipment
Method
- Preheat your oven to 200°C (390°F). Line a baking dish with parchment or a silicone mat for easy cleanup.
- Use a sharp knife to carefully slice each jalapeño lengthwise, creating a pocket. Use the small spoon or melon baller to gently remove seeds and membranes, leaving some seeds if you prefer extra heat.
- In a bowl, combine the softened cream cheese, shredded cheddar, crispy bacon bits, a splash of beer, and chopped herbs. Mix everything until smooth and well incorporated; the mixture should be creamy but hold its shape.
- Use a spoon to stuff each jalapeño half generously with the cheese mixture, pressing down slightly to pack it in. Place the stuffed peppers cut side up in your prepared baking dish.
- Bake in the preheated oven for 15–20 minutes, or until the cheese is bubbling and golden brown on top. Keep an eye on them; if the cheese begins to brown too quickly, tent the dish with foil.
- Once baked, remove from the oven and let rest for about 5 minutes. This helps the cheese set slightly, making them easier to serve without spilling. Garnish with extra herbs or a drizzle of hot sauce if desired.
- Serve warm, pairing these smoky, cheesy bites with lime wedges or a fresh salad for a perfect appetizer or snack.
Tips & Tricks for Perfect Stuffed Jalapeños
- Bold the cheese: Use freshly grated cheese for better melting and a more consistent gooey texture.
- Chill the filling: Refrigerate the stuffing for 10 minutes if it feels too loose—makes it easier to stuff without spilling.
- Pre-bake peppers: Give the jalapeños a 3-minute blast at 200°C (390°F) before stuffing to soften slightly and reduce baking time.
- Use a silicone mat: Line your baking dish to prevent sticking and make cleanup a breeze, especially with cheesy drips.
- Monitor the cheese: Tent with foil if it browns too fast; aim for bubbly, golden cheese with a slight crust for optimal flavor.
- Seed control: Remove seeds carefully to control heat; for more spice, leave some inside, but beware—it can get fiery quick.
- Rest before serving: Let stuffed peppers sit for 5 minutes after baking—this helps the cheese set and reduces mess.
Common stuffed jalapeños mistakes
- FORGOT to check pepper doneness? Test with tongs—peppers should be tender and slightly charred.
- DUMPED filling too runny? Chill mixture for 10 minutes to firm up before stuffing.
- OVER-TORCHED cheese? Cover with foil halfway through baking to prevent burning.
- MISSED the resting step? Let stuffed peppers sit 5 minutes to avoid cheese spills when serving.
Quick fixes and pantry swaps
- When peppers are too fiery, splash some milk or dairy to tame the heat quickly.
- If filling is too runny, dump in a little shredded cheese to thicken in 5 seconds.
- Splash water on a pan with scorched cheese to stop burning and shimmer away smoke.
- Patch over cracked peppers with a tiny dab of extra filling or a sprinkle of cheese.
- Shield cheese topping with foil if it starts to over-torch and turn bitter.
Prep, store, and reheat tips
- You can prepare the stuffed peppers a day in advance; keep them covered in the fridge for up to 24 hours. The cheese filling will firm up slightly, making stuffing easier and preventing spills.
- Store unbaked jalapeños in an airtight container in the fridge for up to 24 hours. The peppers might lose some crispness, but the flavors meld nicely overnight.
- Bake the stuffed jalapeños fully, then cool completely. Store leftovers in an airtight container in the fridge for up to 3 days. Reheat in a 180°C (350°F) oven for 10–15 minutes until bubbling and hot to the touch, with the cheese slightly oozy again.
- Reheating in the microwave is quick—about 30–40 seconds on high—but watch for uneven heating. The cheese may not be as gooey, but the smoky flavor still shines through.
- For freezing, assemble and bake the jalapeños, then let cool. Wrap tightly in plastic wrap and freeze up to 2 months. Reheat straight from frozen in the oven at 180°C (350°F) for 20–25 minutes, until heated through and cheese is bubbling.
Top questions about stuffed jalapeños
1. How do I handle the heat of jalapeños safely?
Use gloves when handling hot peppers to avoid skin irritation, and always wash your hands thoroughly afterward.
2. Can I make these milder or spicier?
Remove all seeds and membranes if you want milder peppers. Keep some for extra spice, but be careful when tasting.
3. Should I pre-bake the peppers before stuffing?
Pre-baking the peppers for 3 minutes softens them slightly and shortens overall baking time. Just a quick blast is enough.
4. How do I prepare the peppers for stuffing?
Use a small spoon or melon baller to clean out the seeds and create space for the filling. It’s easier and neater.
5. How do I keep the filling from spilling out?
Mix the filling thoroughly to make sure the cheeses and herbs are evenly distributed. It helps prevent spillage and gives flavor in every bite.
6. What’s the perfect baking time and temperature?
Bake at 200°C (390°F) for about 15–20 minutes or until the cheese is bubbly and golden. Keep an eye on them so they don’t over-brown.
7. Should I rest the peppers after baking?
Let the stuffed jalapeños rest for 5 minutes after baking. This helps the cheese set and makes them easier to serve without spilling.
8. How do I prevent the cheese from burning?
If the cheese starts to burn, tent the dish with foil halfway through baking. It shields the topping while keeping the inside cooked.
9. How should I store and reheat leftovers?
Store leftovers in an airtight container in the fridge for up to 3 days. Reheat in the oven for best texture, or microwave for quickness.
10. Can I customize the beer in the recipe?
For a smoky flavor, try using a different beer like stout or porter in the stuffing. It adds depth and richness to each bite.
These stuffed jalapeños might just become your new go-to snack. They’re fiery, cheesy, and a little messy—in the best way. Perfect for casual gatherings or a spicy treat on a weeknight, they remind me how small tweaks can elevate simple ingredients.
And honestly, there’s something satisfying about biting into that perfect balance of heat and richness. Once you get the hang of the stuffing and baking, you’ll find it’s almost impossible to stop at just one. It’s a dish that keeps you coming back for more, no matter how many times you’ve made it.

Hi, I’m Emily Carter, the creator and recipe developer behind Salt Strategist. I’m so happy you’re here. This blog is where my love for flavor, creativity, and thoughtful cooking comes together in one beautiful, ever evolving space.


